1.1 لوحة التحكم الرئيسية
1.1.V1.9-01
الأداة الأساسية للتنقل في Medicalholodeck.
لوحة التحكم الرئيسية هي الأداة الأساسية للتنقل في Medicalholodeck. افتراضيًا، تظهر أسفل نافذة المكتبة. تتيح المكتبة الوصول إلى مجموعات البيانات. يمكن تبديل رؤيتها بالنقر على زر المكتبة.
زر القفز يتيح الحركة في مساحة العمل. اختره باستخدام الزناد، ثم أشر إلى الموقع المطلوب واضغط على الزناد مرة أخرى لتغيير موقعك. انقر على الزر مرة أخرى لإلغاء تفعيل الوظيفة.
زر التسجيل 4D يسمح بإنشاء تسجيلات VR. اضغط عليه لبدء التسجيل، واضغط مرة أخرى للإيقاف. بعد ذلك، ستظهر لوحة تحكم فوق اللوحة، وسيبدأ تشغيل التسجيل المكاني تلقائيًا. يتم حفظ تسجيلاتك في قسم RecordXR من المكتبة.
في قسم TeamXR، يمكنك العثور على إعدادات جلسة VR، مثل بدء الجلسة، الانضمام إليها، وإدارتها.
وظيفة التصيير عن بعد تتيح تشغيل التطبيق على خادم خارجي، مع تحميل معالجة الرسومات ثلاثية الأبعاد وتحسين الجودة البصرية. لتشغيل بيئة التصيير، انقر على زر التصيير عن بعد. تتطلب هذه الوظيفة تثبيت تطبيق منفصل وتدعم حاليًا أجهزة VR مستقلة فقط.
الوصول إلى الإعدادات بالنقر على أيقونة الترس. هنا ستجد أيضًا التراخيص، PACS والخدمات.
لإزالة جميع مجموعات البيانات من مساحة العمل، انقر على زر إعادة التعيين. اضغط على زر الخروج إذا كنت ترغب في إغلاق التطبيق.
لفق أو استعادة إجراء، تفاعل مع أيقونة السهم المناسبة.
لإنشاء فيديو، اضغط على زر التسجيل. سيصبح أحمر للإشارة إلى بدء التسجيل. انقر عليه مرة أخرى للإيقاف. لالتقاط صورة انقر على زر الكاميرا. سيتم حفظ الصور والفيديوهات على سطح المكتب. هذان الزرّان متاحان فقط في وضع PC-VR أو تطبيق Remote Rendering. على الجهاز المستقل، اضغط على زر Oculus واختر خيار 'Take Photo' أو 'Record Video' من لوحة التطبيق.
لتحريك اللوحة، هدف مقبضها واضغط على الزناد. أفلت الزناد لوضع اللوحة في الموضع الجديد.
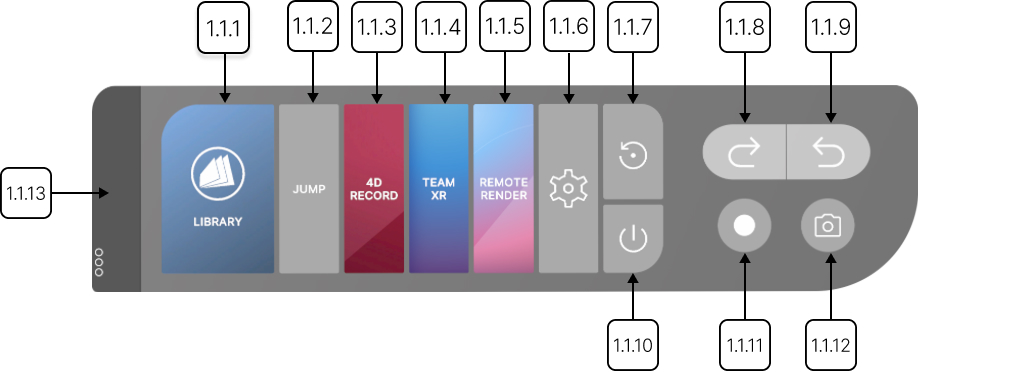
1.1.1
المكتبة
1.1.1.V1.9-01
حدد هذا الزر بالمشغل لتفعيل أو إيقاف عرض المكتبة.
1.1.2
القفز
1.1.2.V1.9-01
يُفعّل الحركة داخل مساحة العمل. حدده بالمشغل ثم أشر إلى الموقع المطلوب. حدده مرة أخرى لتعطيل الوظيفة.
1.1.3
تسجيل 4D
1.1.3.V1.9-01
ينشئ تسجيلات واقع افتراضي غامرة. حدده بالمشغل لبدء التسجيل ثم مرة أخرى للإيقاف. سيظهر التسجيل بعد ذلك في قسم RecordXR بالمكتبة.
1.1.4
TeamXR
1.1.4.V1.9-01
يفتح إعدادات TeamXR. حدده بالمشغل لبدء أو الانضمام إلى أو إدارة جلسة واقع افتراضي.
1.1.5
العرض عن بُعد
1.1.5.V1.9-01
يطلق بيئة العرض. يتطلب تثبيت تطبيق منفصل ويدعم حاليًا فقط سماعات الواقع الافتراضي المستقلة.
1.1.6
الإعدادات
1.1.6.V1.9-01
يفتح إعدادات Medicalholodeck.
1.1.7
إعادة تعيين مساحة العمل
1.1.7.V1.9-01
يزيل جميع النماذج والبيانات من مساحة العمل.
1.1.8
تراجع
1.1.8.V1.9-01
يعيد آخر إجراء قمت به في بيئة الواقع الافتراضي. اضغط عليه عدة مرات بالمشغل للتراجع عن عدة إجراءات بالترتيب.
1.1.9
إعادة
1.1.9.V1.9-01
يعيد الإجراءات التي تم التراجع عنها سابقًا. اضغط عليه عدة مرات بالمشغل لإعادة عدة إجراءات بالترتيب.
1.1.10
خروج
1.1.10.V1.9-01
يغلق التطبيق. اضغط عليه بالمشغل للخروج.
1.1.11
تسجيل فيديو
1.1.11.V1.9-01
يسجل تجربتك في الواقع الافتراضي. اضغط عليه بالمشغل لبدء التسجيل ثم مرة أخرى للإيقاف. سيتم حفظ الفيديو على سطح المكتب لديك (فقط على PC‑VR). على الأجهزة المستقلة، اضغط زر Oculus وافتح أيقونة الكاميرا من القائمة ثم اختر “Record Video”.
1.1.12
التقاط صورة
1.1.12.V1.9-01
يلتقط صورة لتجربتك في الواقع الافتراضي. اضغط عليه بالمشغل لالتقاط الصورة. سيتم حفظ لقطة الشاشة على سطح المكتب لديك (فقط على PC‑VR). على الأجهزة المستقلة، اضغط زر Oculus وافتح أيقونة الكاميرا من القائمة ثم اختر “Take Photo”.
1.1.13
مقبض
1.1.13.V1.9-01
يغيّر موضع اللوحة. حدده بالمشغل ثم أفلته لوضعه في موقع جديد.