How to use Medicalholodeck AI
What is AI segmentation?
AI segmentation automatically identifies and separates anatomical
structures like organs, bones, and tissues, in CT or MRI scans. Instead
of manually outlining regions, AI models complete the task in seconds by
recognizing patterns learned from expert-labeled data.
How to run AI segmentation in the cloud?
 2. Options

Collapses or expands the group section. 3. Handle Use the handle to move the segmentation control panel. Hover with your laser, hold the trigger to drag it, then release to set its position.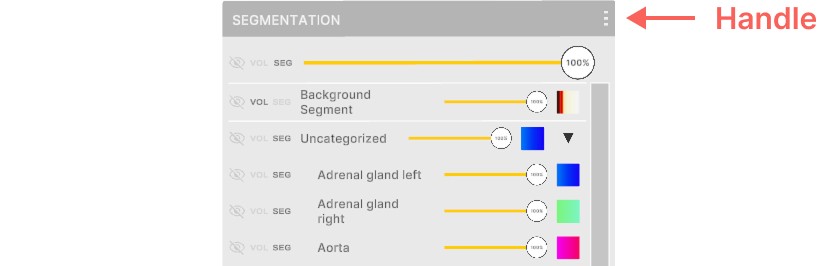 How to install TotalSegmentator
To install TotalSegmentator you need to first install Python, PyTorch
and add python to the PATH. TotalSegmentator works on Ubuntu, macOS, and
Windows, and supports both CPU and GPU. Performance on CPU is
significantly slower.
1. Installing Python
If you already have Python on your device you can skip this step.
How to check if you have Python installed?
How to install TotalSegmentator
To install TotalSegmentator you need to first install Python, PyTorch
and add python to the PATH. TotalSegmentator works on Ubuntu, macOS, and
Windows, and supports both CPU and GPU. Performance on CPU is
significantly slower.
1. Installing Python
If you already have Python on your device you can skip this step.
How to check if you have Python installed?
Note, that it’s very important to have Python added to the environmental variable PATH. To see if you have it in PATH type ‘python’ in the command prompt. If it’s added you will see it ‘open’ in the command prompt. If not, a message like that will appear ‘python is not recognized as an internal or external variable. See here how to add Python to the PATH. 2. Installing PyTorch If you already have PyTorch on your device you can skip this step. How to check if you have PyTorch installed?
- Load your DICOM data into Medicalholodeck. See here how to load data.
- Select from AI models optimized for specific scan types, such as main structures MRI or chest CT.
- Start the segmentation process. All data is anonymized and handled in full compliance with HIPAA standards.
- The segmented data will appear in front of you, along with a segmentation panel.
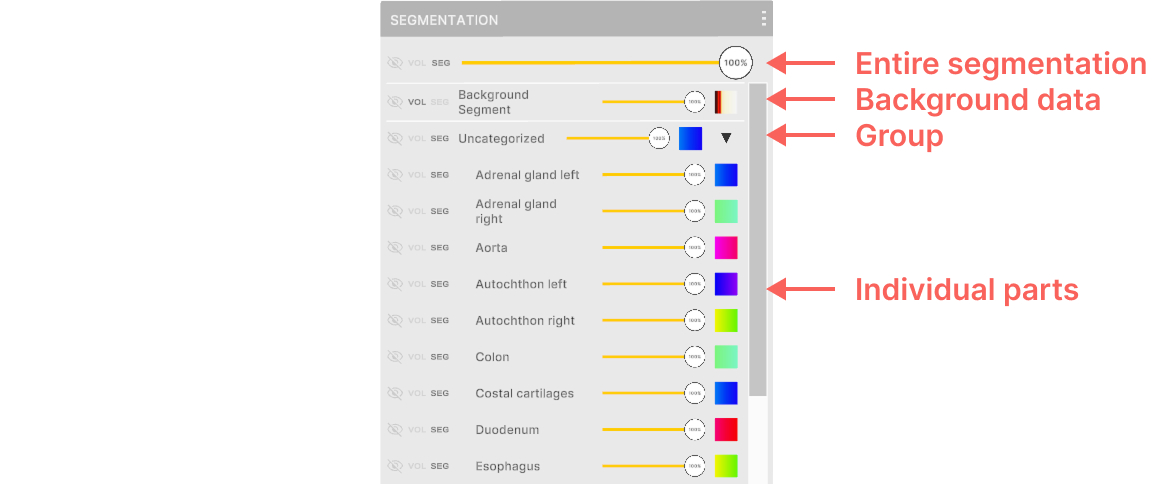
2. Options
2.1
Visibility controls
Control how the section is displayed. It can be hidden (eye with a slash), shown using the main transfer function from the Medical Imaging XR panel (vol), or displayed with its own segmentation transfer function (seg). 2.2 Opacity slider
Adjusts opacity of the section from 0% to 100% 2.3 Segmentation transfer function
Enables setting transparency and colors to specific Hounsfield Units (HU) using color pins in the segmentation.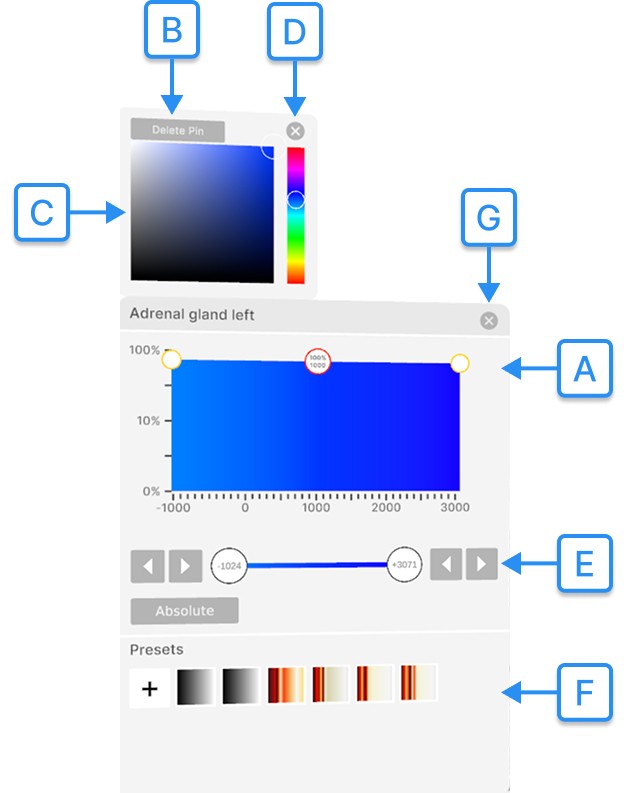
2.4
Arrow
Control how the section is displayed. It can be hidden (eye with a slash), shown using the main transfer function from the Medical Imaging XR panel (vol), or displayed with its own segmentation transfer function (seg). 2.2 Opacity slider
Adjusts opacity of the section from 0% to 100% 2.3 Segmentation transfer function
Enables setting transparency and colors to specific Hounsfield Units (HU) using color pins in the segmentation.
A
Color pins
They adjust transparency and assign colors to specific Hounsfield Units (HU).
To add a pin, click on an empty spot on the graph.
To change transparency, move the selected pin vertically and release the trigger. Transparency ranges from 0% to 100% on a logarithmic scale.
To assign a specific color to an HU value, move the selected color pin horizontally and release the trigger. B Delete pin
Deletes a color pin from the transfer function. Select the pin with the laser, then press the delete pin button. C Color picker
Allows changing a pin's color. Select the pin with the trigger, then choose a new color. D Close color picker
Closes color picker. E Tissue filter
The tissue filter section adjusts the visible range of DICOM data based on Hounsfield Units (HU). It also allows switching between relative and absolute color values. Learn more about it here. F Transfer function preset
Manages DICOM presets. Transfer function preset is a saved configuration of a transfer function and a color schema, also used in the Medical Imaging XR panel. Learn more about it here. G Close segmentation transfer function
Closes segmentation transfer function.
Collapses or expands the group section. 3. Handle Use the handle to move the segmentation control panel. Hover with your laser, hold the trigger to drag it, then release to set its position.
How to install TotalSegmentator
To install TotalSegmentator you need to first install Python, PyTorch
and add python to the PATH. TotalSegmentator works on Ubuntu, macOS, and
Windows, and supports both CPU and GPU. Performance on CPU is
significantly slower.
1. Installing Python
If you already have Python on your device you can skip this step.
How to check if you have Python installed?
- Open command prompt.
- Type
python --version - If it’s installed you will see the installed version. If not, a message like 'python' is not recognized as an internal or external command will be shown.
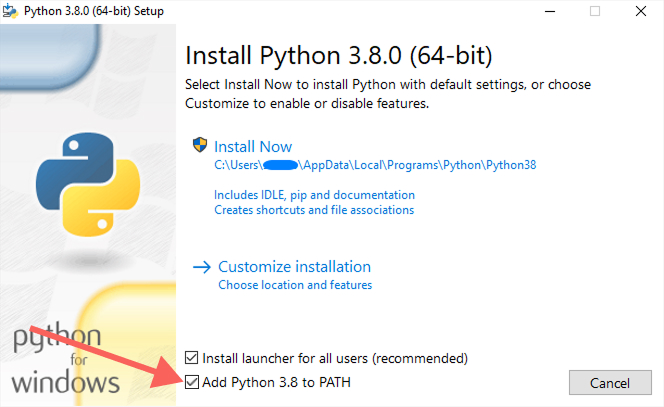
- Go to Download Python Website.
- Find the version between 3.7 and 3.13.
- Look for the downloaded .exe file.
- Make sure to select the 'Add python.exe to PATH' checkbox, and ensure that pip will be installed alongside Python (it is included when you choose the 'Install Now' option).
- Install Python.
- You can check if installed properly by following the steps above: How to check if you have Python installed?
Note, that it’s very important to have Python added to the environmental variable PATH. To see if you have it in PATH type ‘python’ in the command prompt. If it’s added you will see it ‘open’ in the command prompt. If not, a message like that will appear ‘python is not recognized as an internal or external variable. See here how to add Python to the PATH. 2. Installing PyTorch If you already have PyTorch on your device you can skip this step. How to check if you have PyTorch installed?
- Open command prompt.
- Type
python - Type
import torch - Type
print(torch.__version__) - If it’s installed you will see the installed version. If not, a message like 'ModuleNotFoundError: No module named 'torch' will be shown.
- Go to Download PyTorch Website.
- Choose the correct version of PyTorch depending if you want to use the CPU or CUDA (GPU) version.
-
Copy (CTRL+C) the command specified in Run this Command section e.g
pip3 install torch torchvision torchaudio --index-url https://download.pytorch.org/whl/cu118 - Open command prompt and paste the copied command.
- Install PyTorch.
- You can check if installed properly by following the steps above: How to check if you have PyTorch installed?
- Open a command prompt.
- Type
pip install TotalSegmentator==2.5.0 - Install TotalSegmentator.
-
To check if TotalSegmentator is installed properly type in the command
line
TotalSegmentator -–version. It should show the installed version. - Restart your computer to make TotalSegmentator available to other apps, like Medicalholodeck.
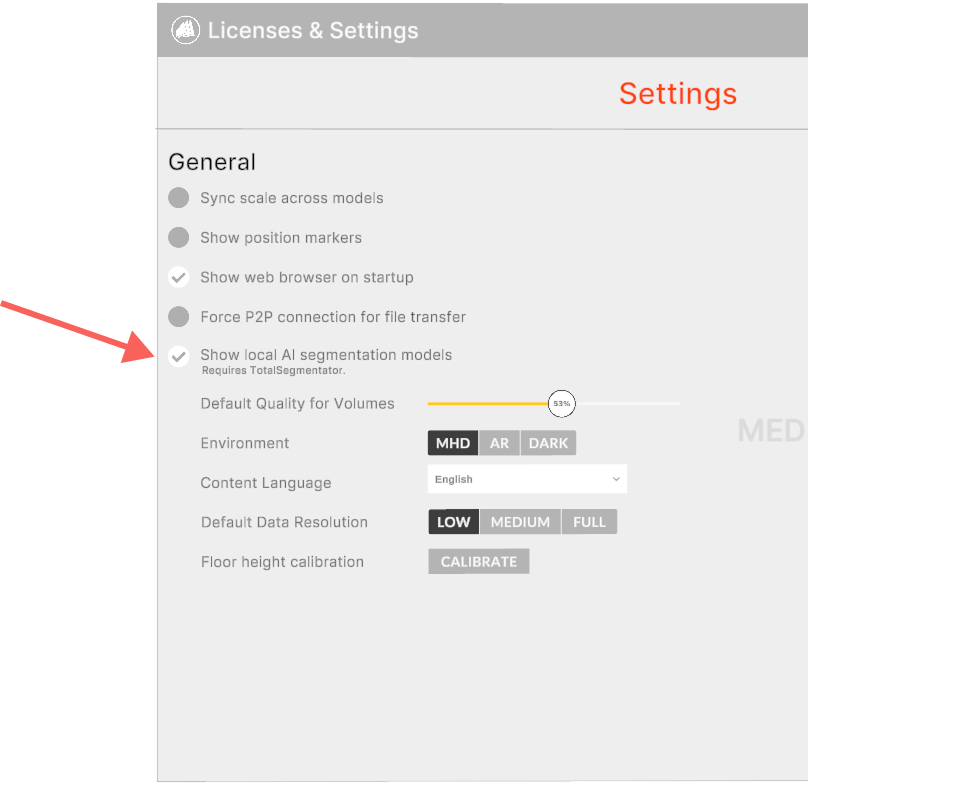
- Go to the settings and allow showing local segmentation models.
- Once everything is installed correctly, the segmentation options in Medicalholodeck will appear without the cloud note, indicating local processing.