User Interface
The Medicalholodeck user interface consists of the main control pad, the
object pad, the library panel and object markers.
1. Main control pad
The primary tool for navigating Medicalholodeck.
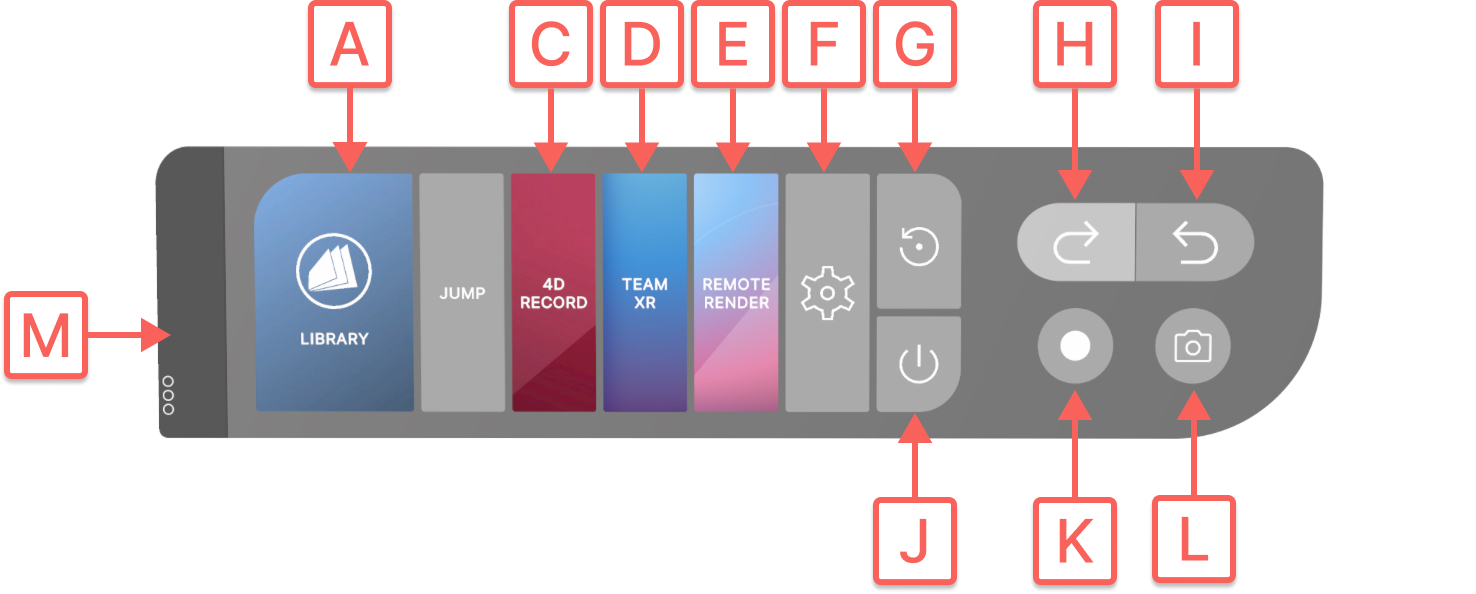
A
Library
Select this button with the trigger to toggle the library's visibility. B Jump
Enables movement in the workspace. Select with the trigger, then point to your desired location. Select again to disable the function. C 4D Record
Creates immersive VR recordings. Select it with the trigger to start recording and again to stop. The recording will then appear in the RecordXR section of the library. D Team XR
Opens TeamXR settings. Select with the trigger to start, join, or manage a VR session. E Remote Render
Launches the rendering environment. Requires a separate app and currently supports only standalone VR headsets. F Settings
Opens Medicalholodeck’s settings. G Reset workspace
Clears all models and data from the workspaces. H Undo
Reverts your last action in the VR environment. Press repeatedly with the trigger to undo multiple actions in order. I Redo
Restores previously undone actions. Press repeatedly with the trigger to redo multiple actions in order. J Exit
Closes the application. Press it with the trigger to exit. K Capture a movie
Records your VR experience. Press it with the trigger to start and again to stop. The video will be saved to your desktop. Only active on the PC-VR mode. In standalone mode, press the Oculus button and open the camera icon from the menu. Then select “Record Video” or “Take Photo.” L Take a photo
Captures an image of your VR experience. Press it with the trigger to take a photo. The screenshot will be saved to your desktop. Only active on the PC-VR mode. In standalone mode, press the Oculus button and open the camera icon from the menu. Then select “Record Video” or “Take Photo.” M Handle
Repositions the panel. Select it with trigger and release to set it to a new position.
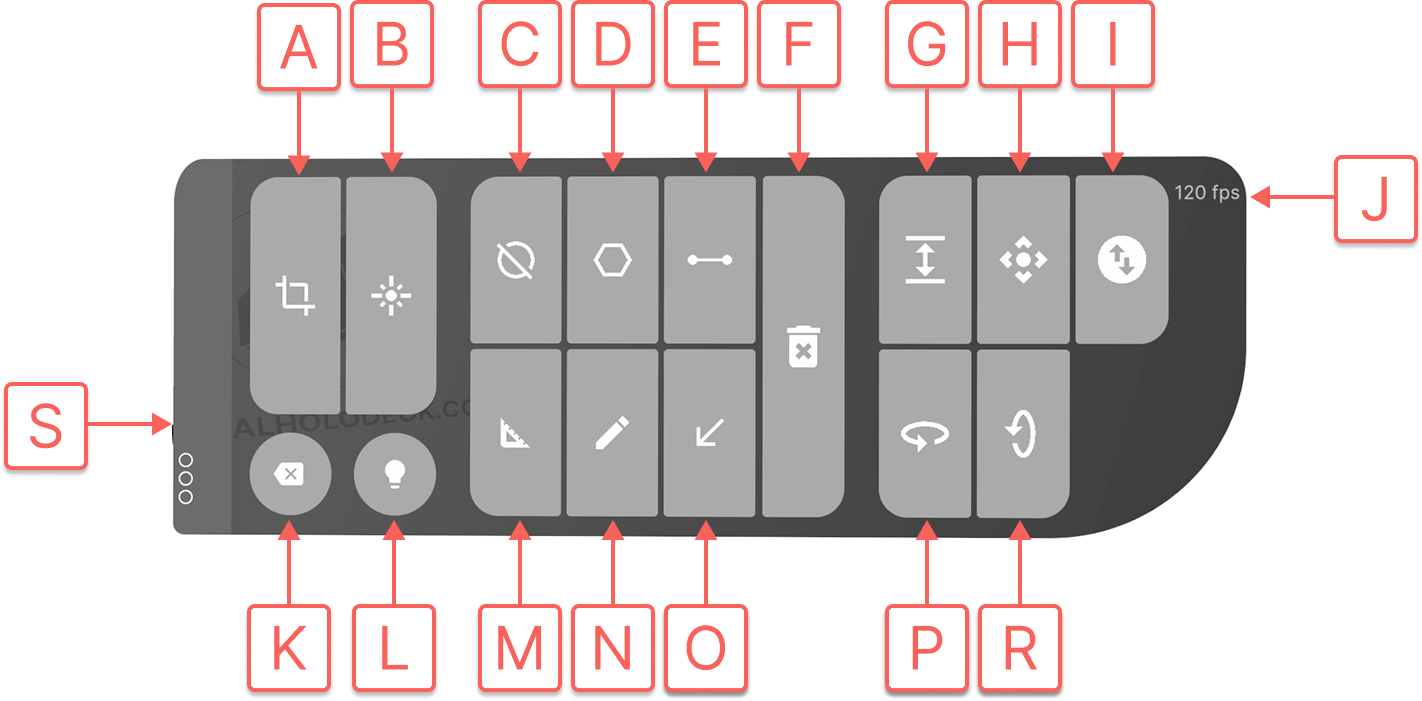
2. Object pad
The object pad provides tools for manipulating, measuring, and
annotating datasets. It appears when a dataset is loaded from the
library.
Select this button with the trigger to toggle the library's visibility. B Jump
Enables movement in the workspace. Select with the trigger, then point to your desired location. Select again to disable the function. C 4D Record
Creates immersive VR recordings. Select it with the trigger to start recording and again to stop. The recording will then appear in the RecordXR section of the library. D Team XR
Opens TeamXR settings. Select with the trigger to start, join, or manage a VR session. E Remote Render
Launches the rendering environment. Requires a separate app and currently supports only standalone VR headsets. F Settings
Opens Medicalholodeck’s settings. G Reset workspace
Clears all models and data from the workspaces. H Undo
Reverts your last action in the VR environment. Press repeatedly with the trigger to undo multiple actions in order. I Redo
Restores previously undone actions. Press repeatedly with the trigger to redo multiple actions in order. J Exit
Closes the application. Press it with the trigger to exit. K Capture a movie
Records your VR experience. Press it with the trigger to start and again to stop. The video will be saved to your desktop. Only active on the PC-VR mode. In standalone mode, press the Oculus button and open the camera icon from the menu. Then select “Record Video” or “Take Photo.” L Take a photo
Captures an image of your VR experience. Press it with the trigger to take a photo. The screenshot will be saved to your desktop. Only active on the PC-VR mode. In standalone mode, press the Oculus button and open the camera icon from the menu. Then select “Record Video” or “Take Photo.” M Handle
Repositions the panel. Select it with trigger and release to set it to a new position.
A
Cutter
Enables precise cuts through the datasets. Select it with the right trigger to activate the cutter on your left controller; press again to switch it to the right. Move your hand into the model to see a live cut. Pull the left trigger to fix the cut. To remove it, point your laser at the red X. Use the marker’s cut visibility button to show/hide cuts. B Laser
Turns on the laser, by default on your right controller. Use the laser to point at interface elements, and press the trigger to select or activate them. C Masking
Lets you focus on specific regions of a DICOM dataset by modifying their visibility. Use your controller like a brush to 'paint' areas in the 3D image - depending on the selected mode, the marked region will be hidden, isolated, or highlighted. Pressing the mask button with the trigger opens an additional panel and displays a red ball at your controller’s fingertip. Masking requires a lot of rendering power so it is recommended for PC-VR setup.
Allows area measurement. Press it with the trigger and a black cone will appear at your controller’s fingertip. Press the trigger to place points and outline your shape. To close the shape, move the cone near the first point and press the trigger when the click to close the shape prompt appears. The surface area will then be displayed in square millimeters (mm²). E Measure distance
Allows distance measurement. Press it with the trigger and a black cone will appear at your controller’s fingertip. Press the trigger to set the start point, move to the endpoint, and press again to display the distance in millimeters. F Delete
Removes objects like measurements, shapes, or drawings from the workspace. A red X will appear on your controller - aim at the object and press the trigger to delete it. G Scale
Resizes the active dataset. Press it with the trigger to enter scaling mode. Move the controller up or down while holding the trigger to adjust the size, then release the trigger to set it. H Move
Repositions the active dataset. Aim at the button, hold the trigger to move the dataset, and release to place it. I Move backward
Adjusts the dataset’s distance. Aim at the button, hold the trigger and move the controller up or down to bring it closer or farther while holding the trigger. Release to set the position. J Frame rate
Displays performance in FPS, helping you monitor app smoothness. K Remove dataset
Deletes the active dataset. Press it with the trigger to remove it from the scene. L Light on/off
Controls dataset lighting. Press the trigger to toggle the light on or off. In Medical Imaging XR, lighting is available only in PC-VR mode due to performance limitations. M Measure angle
Measures angles in VR. Press the trigger to set the angle’s vertex, then define the two line endpoints. The angle in degrees appears instantly once both lines are placed. N Draw
Enables drawing. Aim your laser at the button, press the trigger, and move your controller to draw lines. An additional panel will appear. Release the trigger to stop drawing.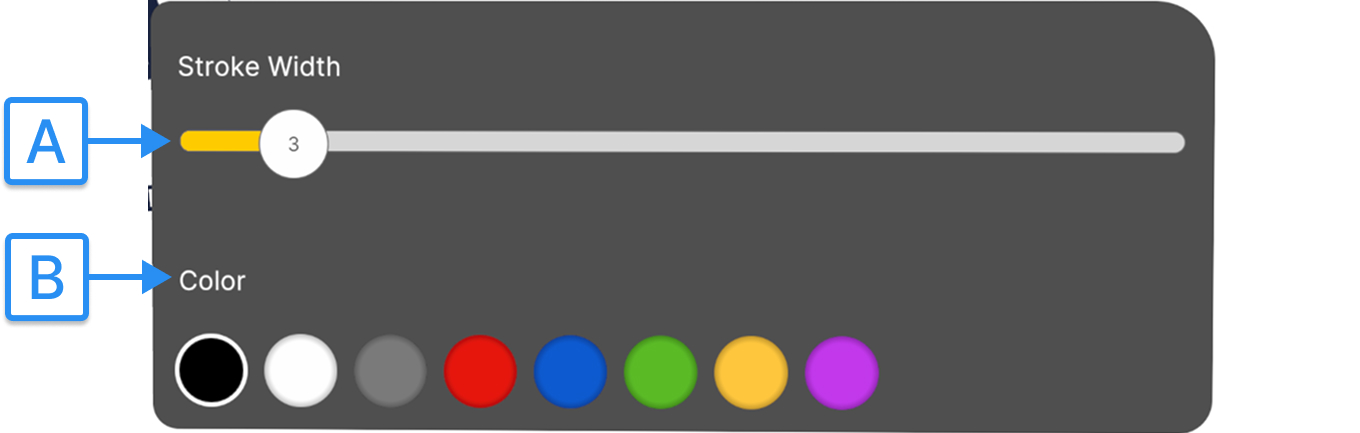
Places visual markers in the scene. Aim your laser at the button, press the trigger, and a colored arrow will appear at your controller’s fingertip. Move it to the desired location and press the trigger to place the marker. P Rotate horizontally
Rotates the active dataset left or right. Hold the trigger while moving the controller horizontally, then release to set the angle. R Rotate vertically
Tilts the dataset up or down. Hold the trigger and move the controller vertically, then release to set the angle. S Handle
Repositions the panel. Select it with trigger and release to set it to a new position. 3. Library panel The library panel is the main hub for accessing datasets. It includes five sections: saved scenes, Medical Imaging XR, RecordXR and Dissection Master and Anatomy Master.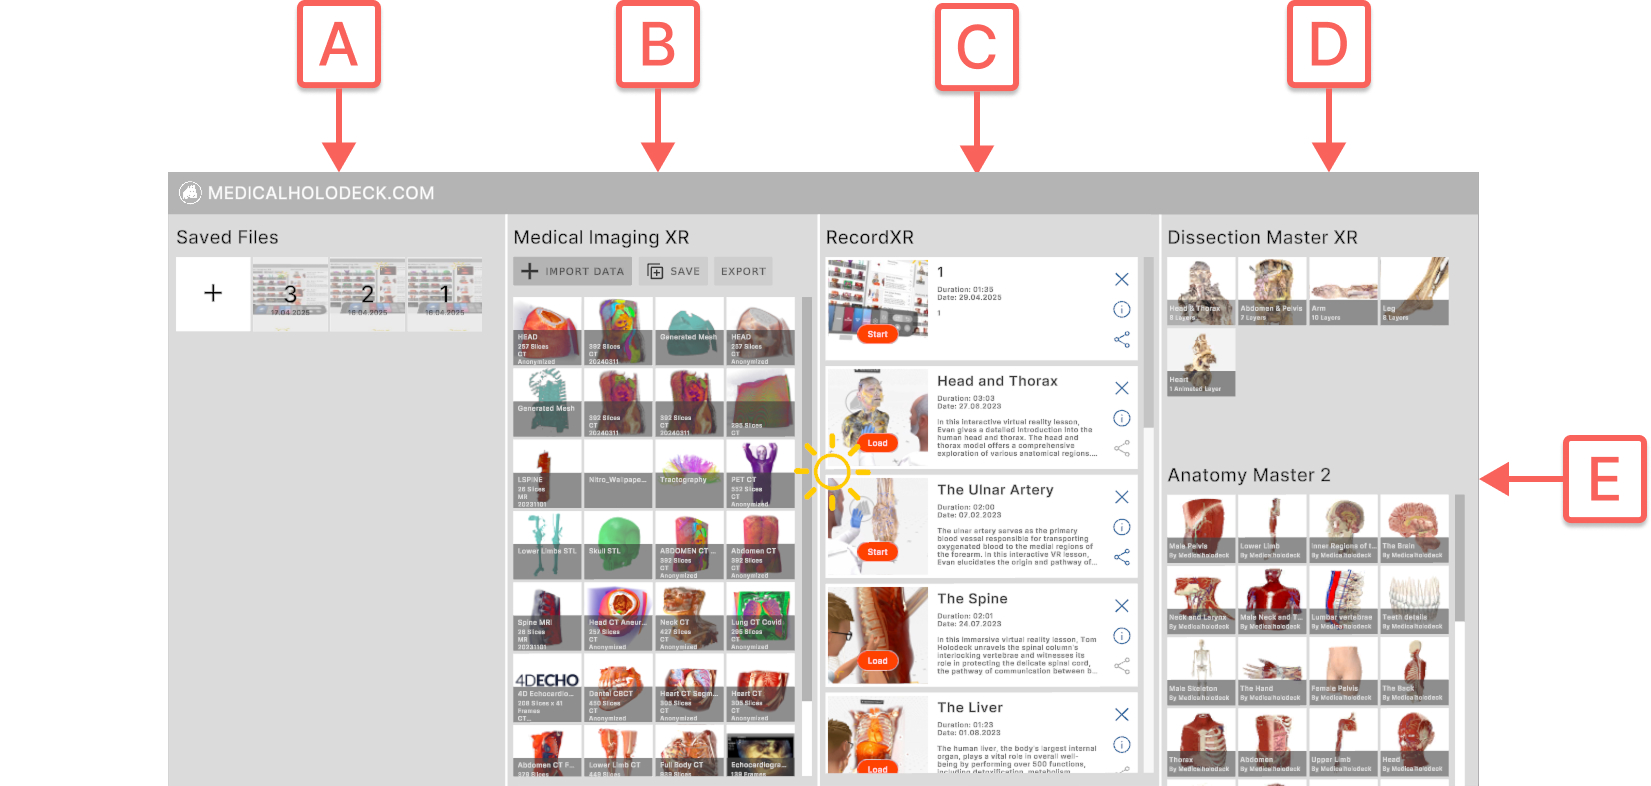
Enables precise cuts through the datasets. Select it with the right trigger to activate the cutter on your left controller; press again to switch it to the right. Move your hand into the model to see a live cut. Pull the left trigger to fix the cut. To remove it, point your laser at the red X. Use the marker’s cut visibility button to show/hide cuts. B Laser
Turns on the laser, by default on your right controller. Use the laser to point at interface elements, and press the trigger to select or activate them. C Masking
Lets you focus on specific regions of a DICOM dataset by modifying their visibility. Use your controller like a brush to 'paint' areas in the 3D image - depending on the selected mode, the marked region will be hidden, isolated, or highlighted. Pressing the mask button with the trigger opens an additional panel and displays a red ball at your controller’s fingertip. Masking requires a lot of rendering power so it is recommended for PC-VR setup.
A
Mask size
Adjusts the red ball’s size. Use the slider to set the desired width. B Mask mode
Allows switching between different masking modes.
Restores masked areas. Point at the region, hold the trigger to unmask, then release. D Mask channel
Let you organize and separate different masked areas within your DICOM dataset. Switch channels to apply and manage varied masking effects. E Mask volume
Shows the volume of the masked area on the selected channel.
D
Measure area
Adjusts the red ball’s size. Use the slider to set the desired width. B Mask mode
Allows switching between different masking modes.
- Isolate: keeps only the selected area visible
- Hide: hides parts of the dataset
- Highlight: visually emphasizes selected areas.
Restores masked areas. Point at the region, hold the trigger to unmask, then release. D Mask channel
Let you organize and separate different masked areas within your DICOM dataset. Switch channels to apply and manage varied masking effects. E Mask volume
Shows the volume of the masked area on the selected channel.
Allows area measurement. Press it with the trigger and a black cone will appear at your controller’s fingertip. Press the trigger to place points and outline your shape. To close the shape, move the cone near the first point and press the trigger when the click to close the shape prompt appears. The surface area will then be displayed in square millimeters (mm²). E Measure distance
Allows distance measurement. Press it with the trigger and a black cone will appear at your controller’s fingertip. Press the trigger to set the start point, move to the endpoint, and press again to display the distance in millimeters. F Delete
Removes objects like measurements, shapes, or drawings from the workspace. A red X will appear on your controller - aim at the object and press the trigger to delete it. G Scale
Resizes the active dataset. Press it with the trigger to enter scaling mode. Move the controller up or down while holding the trigger to adjust the size, then release the trigger to set it. H Move
Repositions the active dataset. Aim at the button, hold the trigger to move the dataset, and release to place it. I Move backward
Adjusts the dataset’s distance. Aim at the button, hold the trigger and move the controller up or down to bring it closer or farther while holding the trigger. Release to set the position. J Frame rate
Displays performance in FPS, helping you monitor app smoothness. K Remove dataset
Deletes the active dataset. Press it with the trigger to remove it from the scene. L Light on/off
Controls dataset lighting. Press the trigger to toggle the light on or off. In Medical Imaging XR, lighting is available only in PC-VR mode due to performance limitations. M Measure angle
Measures angles in VR. Press the trigger to set the angle’s vertex, then define the two line endpoints. The angle in degrees appears instantly once both lines are placed. N Draw
Enables drawing. Aim your laser at the button, press the trigger, and move your controller to draw lines. An additional panel will appear. Release the trigger to stop drawing.
A
Stroke width
Use the stroke width slider to adjust the line thickness. Aim your laser, pull the trigger, and adjust the size to your preference. B Color
Select your desired color and press the trigger to update the drawing tool's color.
O
Marker
Use the stroke width slider to adjust the line thickness. Aim your laser, pull the trigger, and adjust the size to your preference. B Color
Select your desired color and press the trigger to update the drawing tool's color.
Places visual markers in the scene. Aim your laser at the button, press the trigger, and a colored arrow will appear at your controller’s fingertip. Move it to the desired location and press the trigger to place the marker. P Rotate horizontally
Rotates the active dataset left or right. Hold the trigger while moving the controller horizontally, then release to set the angle. R Rotate vertically
Tilts the dataset up or down. Hold the trigger and move the controller vertically, then release to set the angle. S Handle
Repositions the panel. Select it with trigger and release to set it to a new position. 3. Library panel The library panel is the main hub for accessing datasets. It includes five sections: saved scenes, Medical Imaging XR, RecordXR and Dissection Master and Anatomy Master.
A
Saved scenes
Captures and stores your current VR setup. This lets you resume later with all settings and positions preserved.
It is section is for managing medical imaging data - upload, view in VR, and adjust DICOM windowing with ease. For full guidance, see the Medical Imaging XR manual. C RecordXR
A dedicated hub for spatial recordings - review, replay, delete, or export them as RXR files. For details, see the RecordXR manual. D Dissection Master XR
It is a virtual dissection lab with layered, annotated models from real human bodies. Press the model with the trigger to load a dataset into VR. For full guidance, see the Dissection Master manual. E Anatomy Master 2
It is a 3D human anatomy atlas in virtual reality, featuring detailed male and female models. Press a model with the trigger to load it into VR. For full guidance, see the Anatomy Master manual. 4. Object marker In Medicalholodeck, each loaded dataset is marked by an object marker on the floor - blue for active, grey for inactive.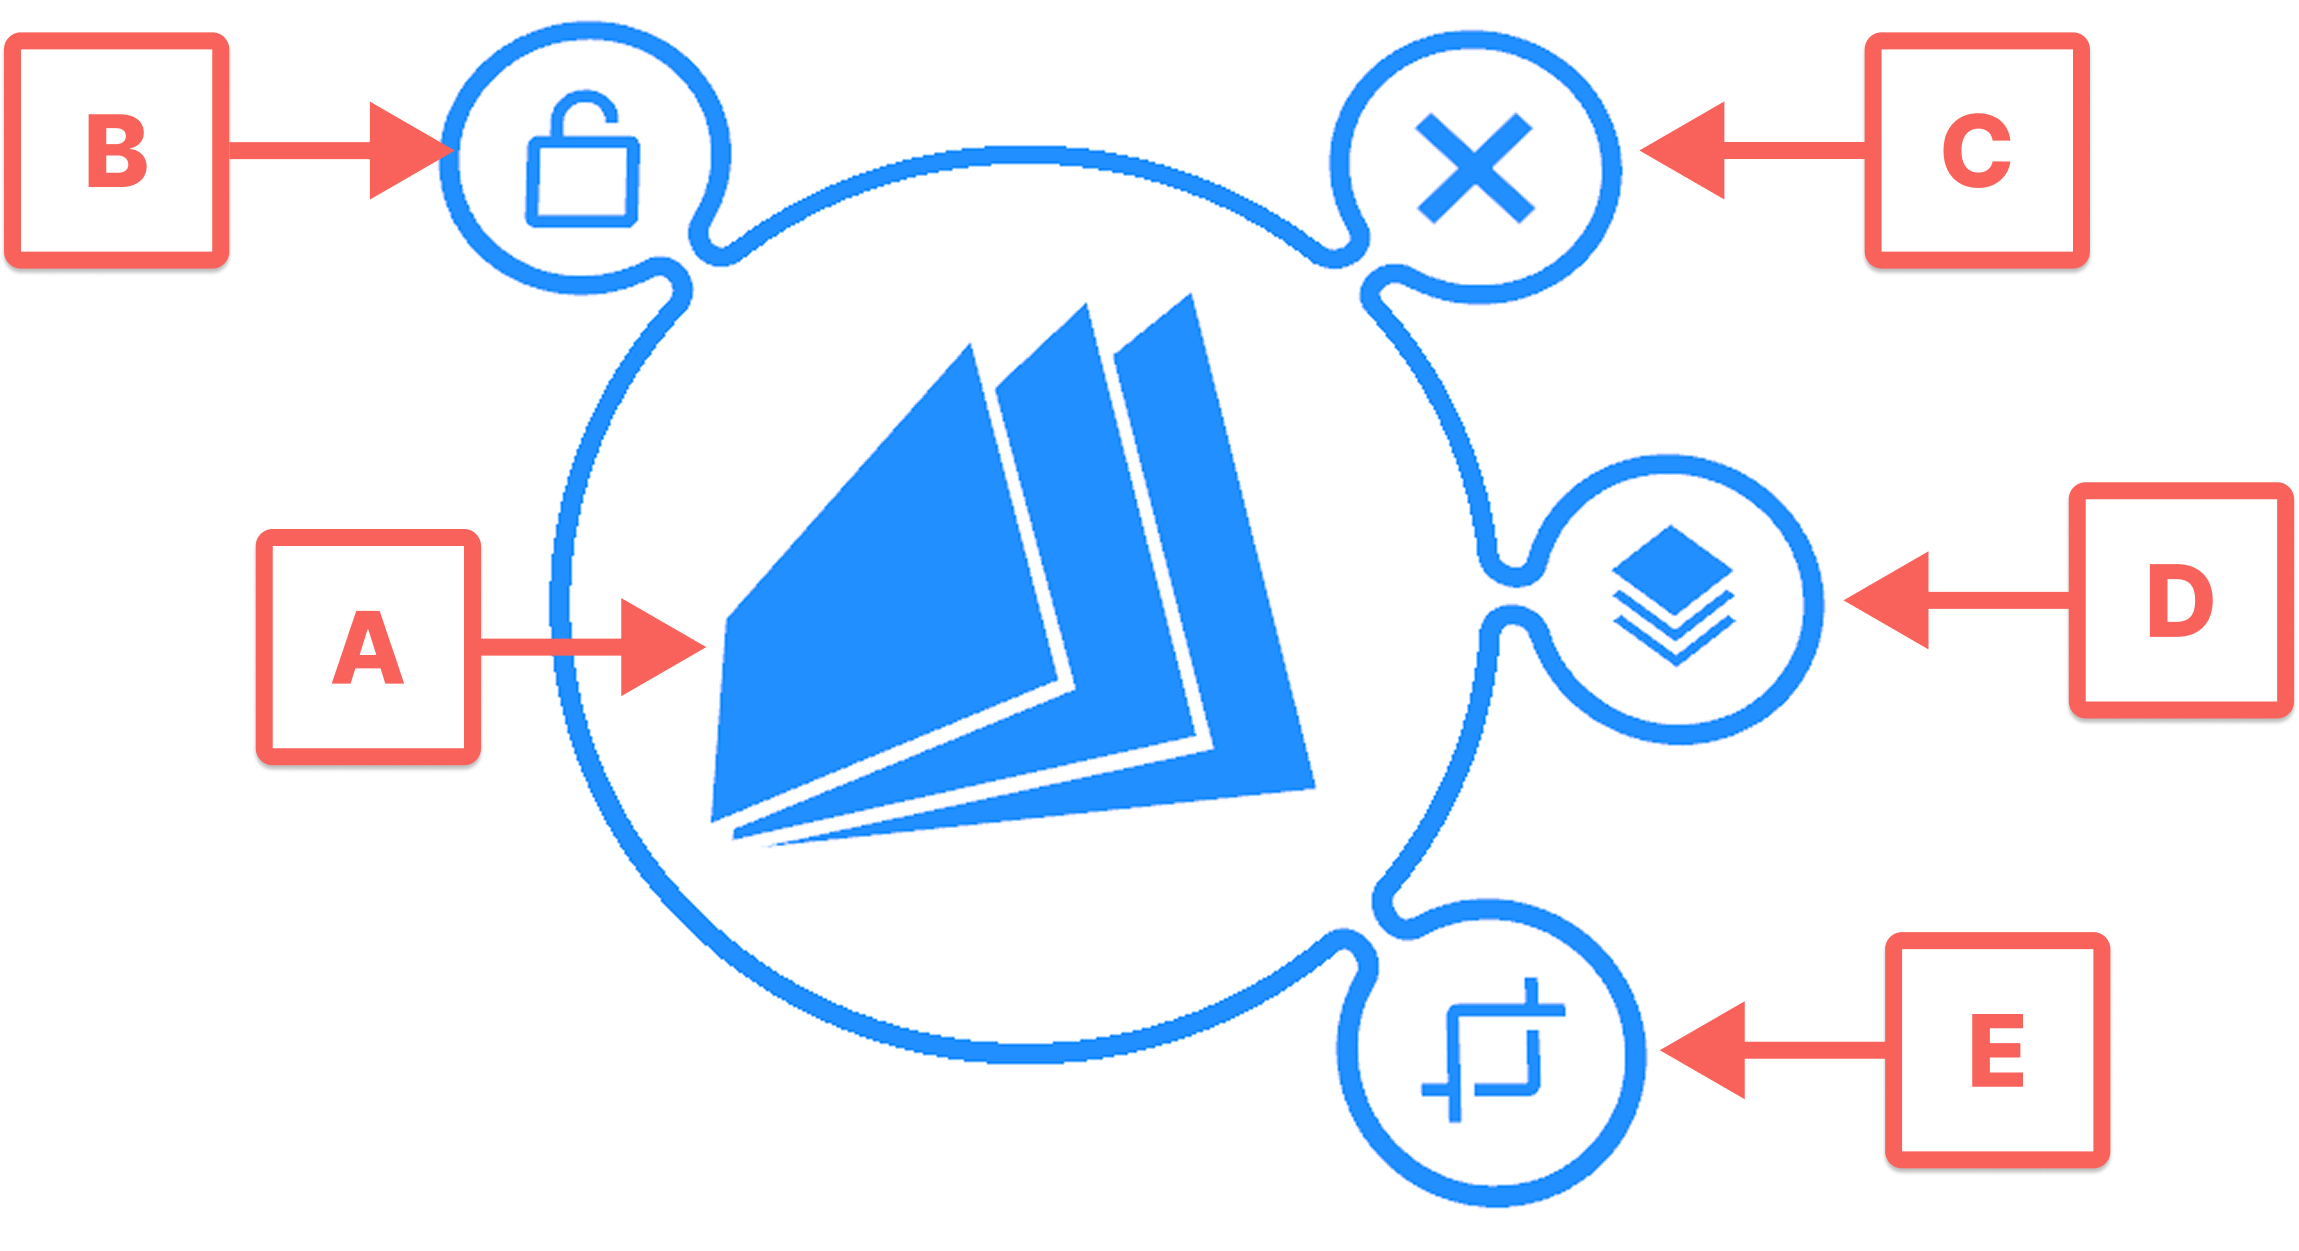
A yellow sun represents the lighting and appears above the scene by default. Aim and hold the trigger to move it and adjust the light angle. Light marker
This tool lets you move the lighting and toggle it on or off. When off, the sun and marker turn blue. Aim at the marker and hold the trigger to move it. Press the on/off button to toggle lighting. 6. Controllers
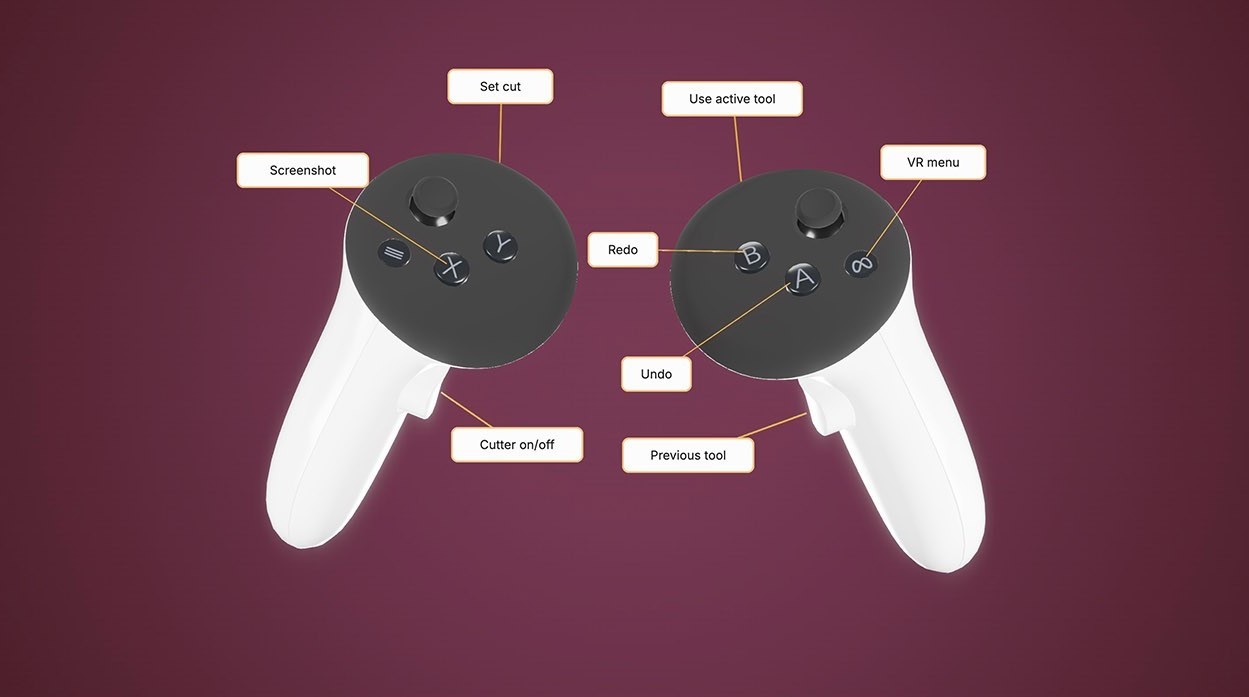 Left controller
Screenshot (X)
Left controller
Screenshot (X)
Captures a screenshot of your current view and saves it to your desktop. This function is only available in PC-VR mode. In standalone mode, press the Oculus button and open the camera icon from the menu. Then select “Record Video” or “Take Photo.” Set cut (trigger)
Places the cut when the cutter tool is active. Cutter on/off (grip)
Turns the cutter tool on or off. Right controller Previous tool (grip)
Activates the previously used tool. Undo (A)
Reverts your last action. Press repeatedly to undo multiple steps. Redo (B)
Restores undone actions. Press repeatedly to redo multiple steps. Use active tool (trigger)
Allows using the current tool. VR menu (menu button)
Opens the Meta Quest main menu. 7. Settings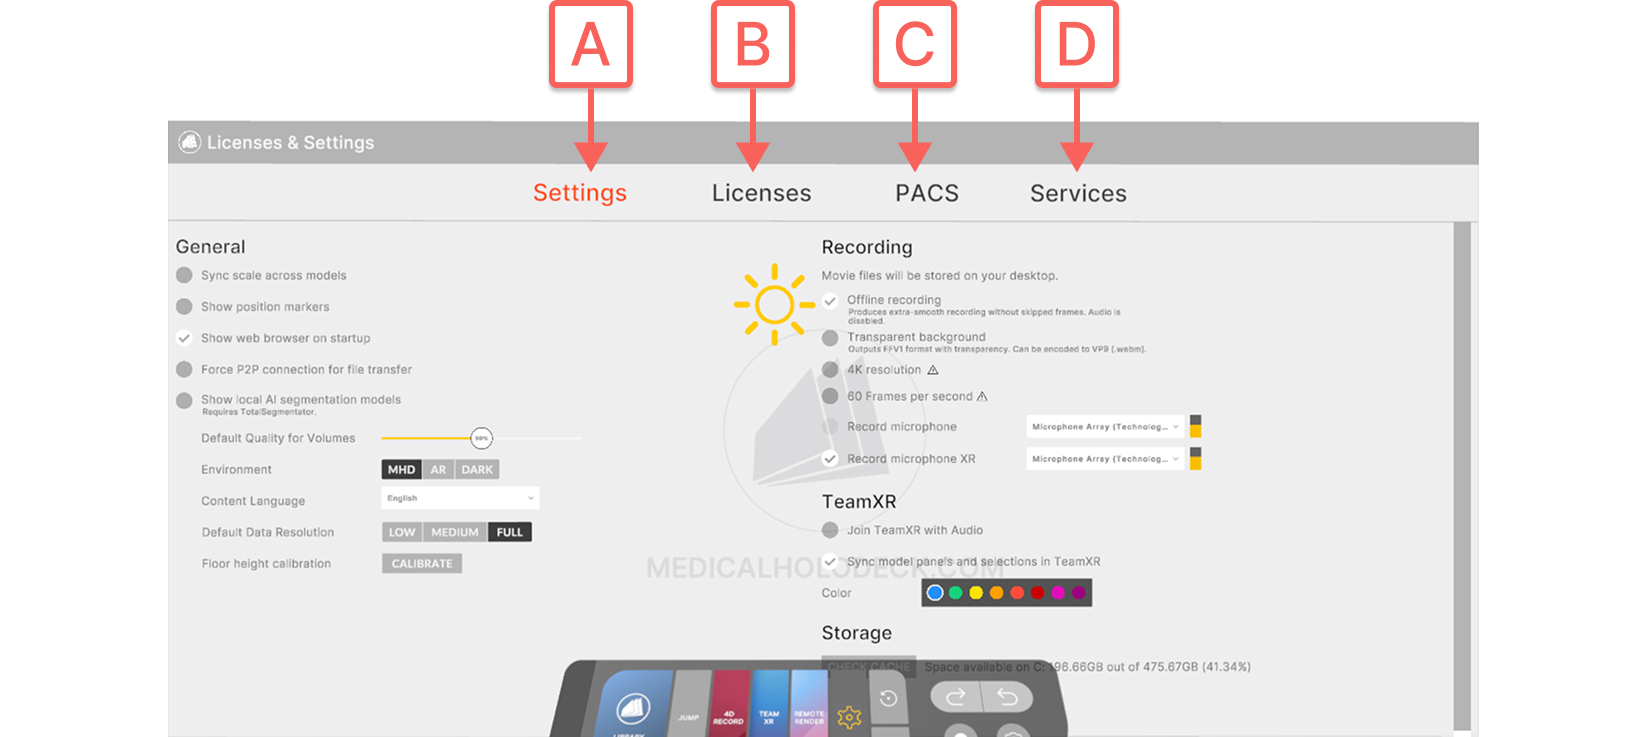
Captures and stores your current VR setup. This lets you resume later with all settings and positions preserved.
A
Save
Captures the current VR environment. Press the + button with the trigger. The saved scene will appear on the right with a unique ID, date, and preview image for easy reference. B Load
Opens a previously saved scene. Press the desired scene’s button with the trigger to restore it. C Delete
Removes a saved scene. Press the X in the top-right corner of the scene’s button with the trigger to delete it.
B
Medical Imaging XR
Captures the current VR environment. Press the + button with the trigger. The saved scene will appear on the right with a unique ID, date, and preview image for easy reference. B Load
Opens a previously saved scene. Press the desired scene’s button with the trigger to restore it. C Delete
Removes a saved scene. Press the X in the top-right corner of the scene’s button with the trigger to delete it.
It is section is for managing medical imaging data - upload, view in VR, and adjust DICOM windowing with ease. For full guidance, see the Medical Imaging XR manual. C RecordXR
A dedicated hub for spatial recordings - review, replay, delete, or export them as RXR files. For details, see the RecordXR manual. D Dissection Master XR
It is a virtual dissection lab with layered, annotated models from real human bodies. Press the model with the trigger to load a dataset into VR. For full guidance, see the Dissection Master manual. E Anatomy Master 2
It is a 3D human anatomy atlas in virtual reality, featuring detailed male and female models. Press a model with the trigger to load it into VR. For full guidance, see the Anatomy Master manual. 4. Object marker In Medicalholodeck, each loaded dataset is marked by an object marker on the floor - blue for active, grey for inactive.
A
Center
Allows moving the model around the workspace. To do so, click and hold on it to select. Then point the laser to the desired location and release it to drop in the new position. B Lock
Locks the model in its actual position C Delete
Deletes the model from workspace. D Groups
Allows grouping of data sets and overlaying them for comparison. Particularly useful for analyzing different types of data from a single patient. E Cuts visibility
Shows or hides the placed cuts.
5. Lighting
In Medicalholodeck, lighting can be toggled and angled to enhance
model visibility. It's visualized by a yellow sun and marker.
Light
Allows moving the model around the workspace. To do so, click and hold on it to select. Then point the laser to the desired location and release it to drop in the new position. B Lock
Locks the model in its actual position C Delete
Deletes the model from workspace. D Groups
Allows grouping of data sets and overlaying them for comparison. Particularly useful for analyzing different types of data from a single patient. E Cuts visibility
Shows or hides the placed cuts.
A yellow sun represents the lighting and appears above the scene by default. Aim and hold the trigger to move it and adjust the light angle.
Light marker
This tool lets you move the lighting and toggle it on or off. When off, the sun and marker turn blue. Aim at the marker and hold the trigger to move it. Press the on/off button to toggle lighting.
6. Controllers
Left controller
Screenshot (X)
Captures a screenshot of your current view and saves it to your desktop. This function is only available in PC-VR mode. In standalone mode, press the Oculus button and open the camera icon from the menu. Then select “Record Video” or “Take Photo.” Set cut (trigger)
Places the cut when the cutter tool is active. Cutter on/off (grip)
Turns the cutter tool on or off. Right controller Previous tool (grip)
Activates the previously used tool. Undo (A)
Reverts your last action. Press repeatedly to undo multiple steps. Redo (B)
Restores undone actions. Press repeatedly to redo multiple steps. Use active tool (trigger)
Allows using the current tool. VR menu (menu button)
Opens the Meta Quest main menu. 7. Settings
A
Settings
This section contains general settings for recording, TeamXR, and storage information. B Licenses
Contains details about your current license and it is possible to renew it from this section. C PACS
Allows connecting directly to your PACS server. D Services
Medicalholodeck offers on-premise solutions to ensure that your data never leaves your local servers. For more information contact info@medicalholodeck.com. 8. Low framerate screen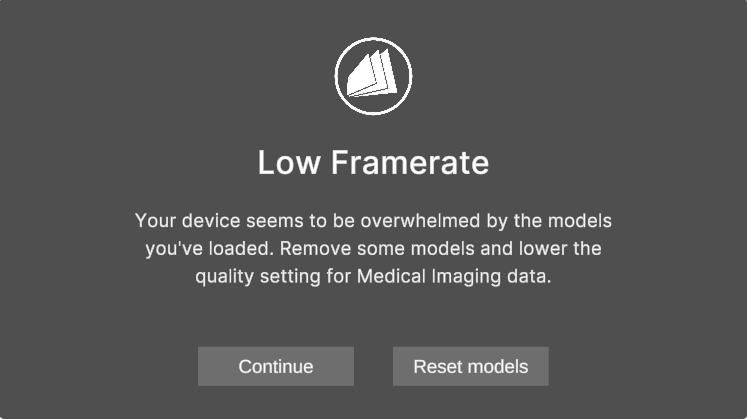 When the frame rate drops below 10 FPS, a warning screen appears
to protect your device from crashing or overheating. You then can
choose to continue or remove all data to reduce load. After that
it is recommended to adjust quality settings to improve
performance. See
here
for more detailed information.
When the frame rate drops below 10 FPS, a warning screen appears
to protect your device from crashing or overheating. You then can
choose to continue or remove all data to reduce load. After that
it is recommended to adjust quality settings to improve
performance. See
here
for more detailed information.
This section contains general settings for recording, TeamXR, and storage information. B Licenses
Contains details about your current license and it is possible to renew it from this section. C PACS
Allows connecting directly to your PACS server. D Services
Medicalholodeck offers on-premise solutions to ensure that your data never leaves your local servers. For more information contact info@medicalholodeck.com. 8. Low framerate screen
When the frame rate drops below 10 FPS, a warning screen appears
to protect your device from crashing or overheating. You then can
choose to continue or remove all data to reduce load. After that
it is recommended to adjust quality settings to improve
performance. See
here
for more detailed information.