1.4 Object marker
1.4.V1.9-01
In Medicalholodeck, each loaded dataset comes with an object marker on the floor - blue for active, grey for inactive.
Each loaded dataset has a marker displayed on the floor If the marker is grey the dataset is inactive. To activate it, click on the marker Its colour will turn blue.
Hold the trigger while aiming at the marker to move it and change the position of the dataset.
Click the lock icon if you wish to fix the model's position. The marker will turn red.
Interacting with the cutter icon toggles the visibility of the active cut planes of the dataset.
Two or more datasets from the workspace can be grouped together. Click the layers icon to open the group settings. Use the transparency sliders to adjust the visibility of each object. Use the corresponding toggle to select which object the cutting tool affects. The visibility of each object can also be toggled. To separate a dataset from the group, select the unlink icon.
Click the 'X' icon to remove a dataset from the scene.
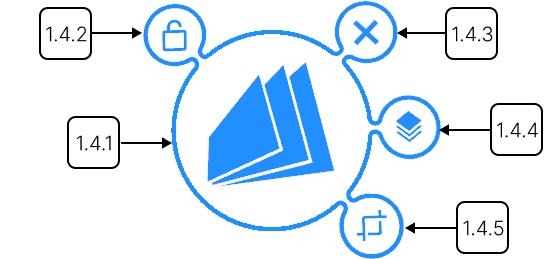
1.4.1
Center
1.4.1.V1.9-01
Allows moving the model around the workspace. To do so, click and hold on it to select. Then point the laser to the desired location and release it to drop in the new position.
1.4.2
Lock
1.4.2.V1.9-01
Locks the model in its actual position.
1.4.3
Delete
1.4.3.V1.9-01
Deletes the model from workspace.
1.4.4
Groups
1.4.4.V1.9-01
Allows grouping of data sets and overlaying them for comparison. Particularly useful for analyzing different types of data from a single patient.
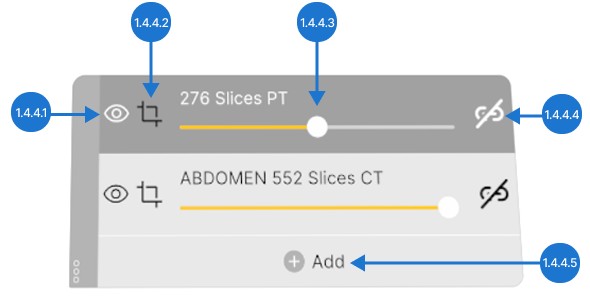
1.4.4.1
Visibility
Allows to toggle the visibility of the dataset.
1.4.4.2
Crop
Shows whether the cutting tool is applied to the dataset.
1.4.4.3
Slider
Allows adjusting the transparency of the dataset.
1.4.4.4
Add
Allows adding more datasets to the group. After clicking, a new panel opens, allowing you to select which datasets to include from the list.
1.4.4.5
Unlink
Removes the dataset from the group.
1.4.5
Cuts visibility
1.4.5.V1.9-01
Shows or hides the placed cuts.