User Interface
The Medicalholodeck user interface consists of the main control pad, the
object pad, the library panel and object markers.
1. Main control pad
The primary tool for navigating Medicalholodeck.
 Note that quality settings above 50% offer only small visual
improvements but require significantly more performance.
You can set default rendering options in the settings panel on the
left. These apply when loading a new model. Medicalholodeck’s
recommended defaults are 10–14% volume quality and medium resolution for
headsets, and 50% volume quality with full resolution for PCs.
Note that quality settings above 50% offer only small visual
improvements but require significantly more performance.
You can set default rendering options in the settings panel on the
left. These apply when loading a new model. Medicalholodeck’s
recommended defaults are 10–14% volume quality and medium resolution for
headsets, and 50% volume quality with full resolution for PCs.
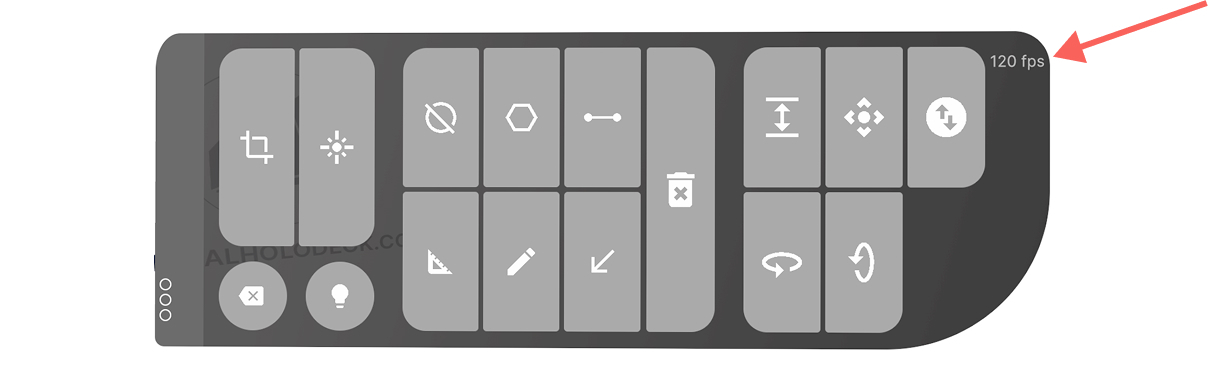
 Low framerate screen
You can keep an eye on your device's performance by checking the frames
per second (FPS), shown in the top-right corner of the object pad. It
shows how many images your device displays each second - higher FPS
means smoother motion in VR.
Low framerate screen
You can keep an eye on your device's performance by checking the frames
per second (FPS), shown in the top-right corner of the object pad. It
shows how many images your device displays each second - higher FPS
means smoother motion in VR.
 If the FPS drops below 10, a low FPS warning screen will appear to help
protect your device. This gives your system a chance to recover and
avoid becoming unresponsive or overheating. It’s also a sign that you
may need to lower the rendering quality. This screen isn’t just a
warning - it’s there to help prevent crashes and keep everything running
smoothly.
If the FPS drops below 10, a low FPS warning screen will appear to help
protect your device. This gives your system a chance to recover and
avoid becoming unresponsive or overheating. It’s also a sign that you
may need to lower the rendering quality. This screen isn’t just a
warning - it’s there to help prevent crashes and keep everything running
smoothly.
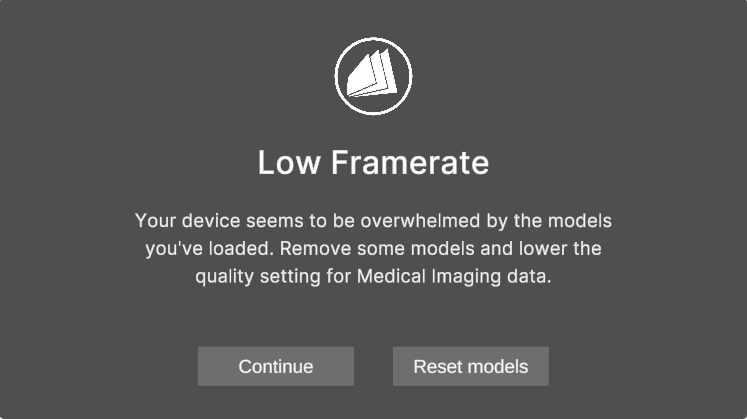 When this screen appears, you can:
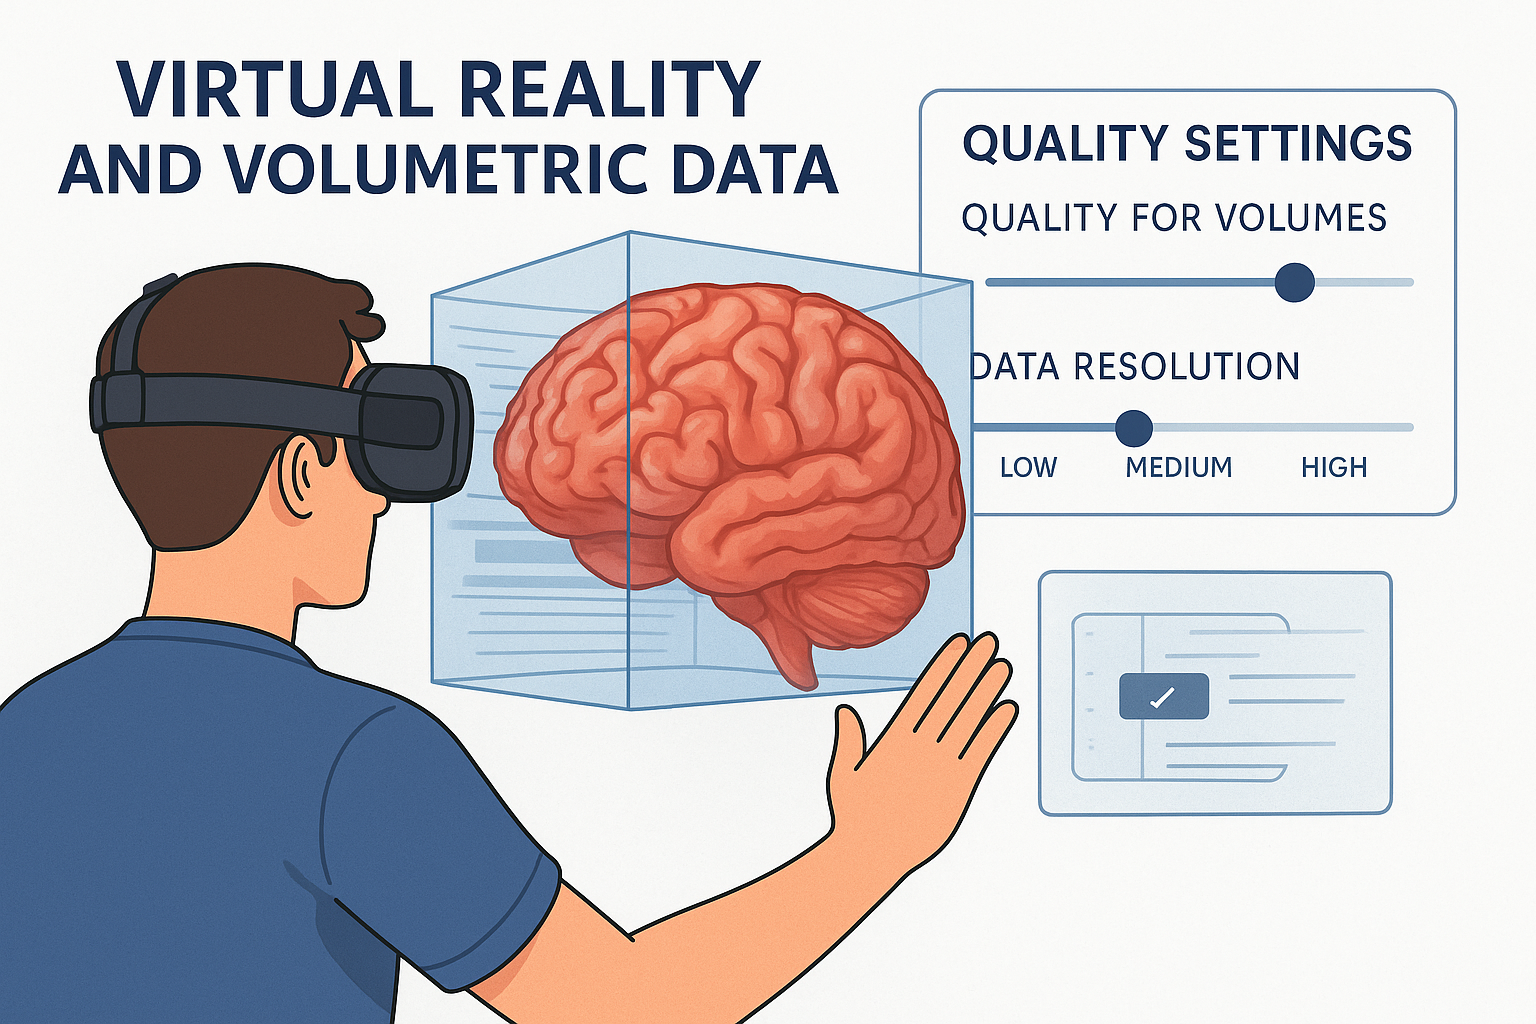 What is volumetric data?
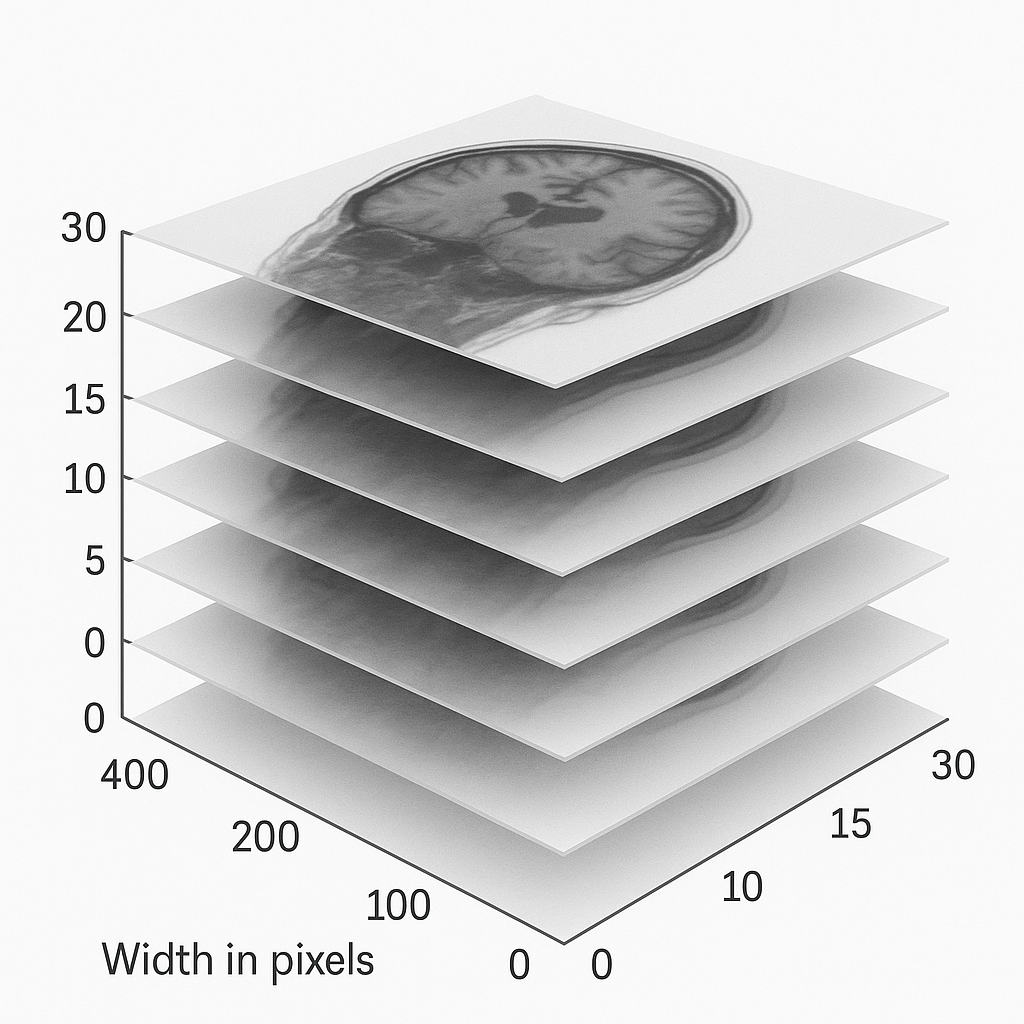
Volumetric data represents 3D anatomical structures by stacking 2D
image slices, typically obtained through CT or MRI scans. Each slice
captures a thin cross-section of the body at specific intervals. When
combined these slices form a full 3D volume. These datasets are usually
stored in the DICOM format, which includes both the images and the
metadata needed to interpret them properly.
What is volumetric data?
Volumetric data represents 3D anatomical structures by stacking 2D
image slices, typically obtained through CT or MRI scans. Each slice
captures a thin cross-section of the body at specific intervals. When
combined these slices form a full 3D volume. These datasets are usually
stored in the DICOM format, which includes both the images and the
metadata needed to interpret them properly.
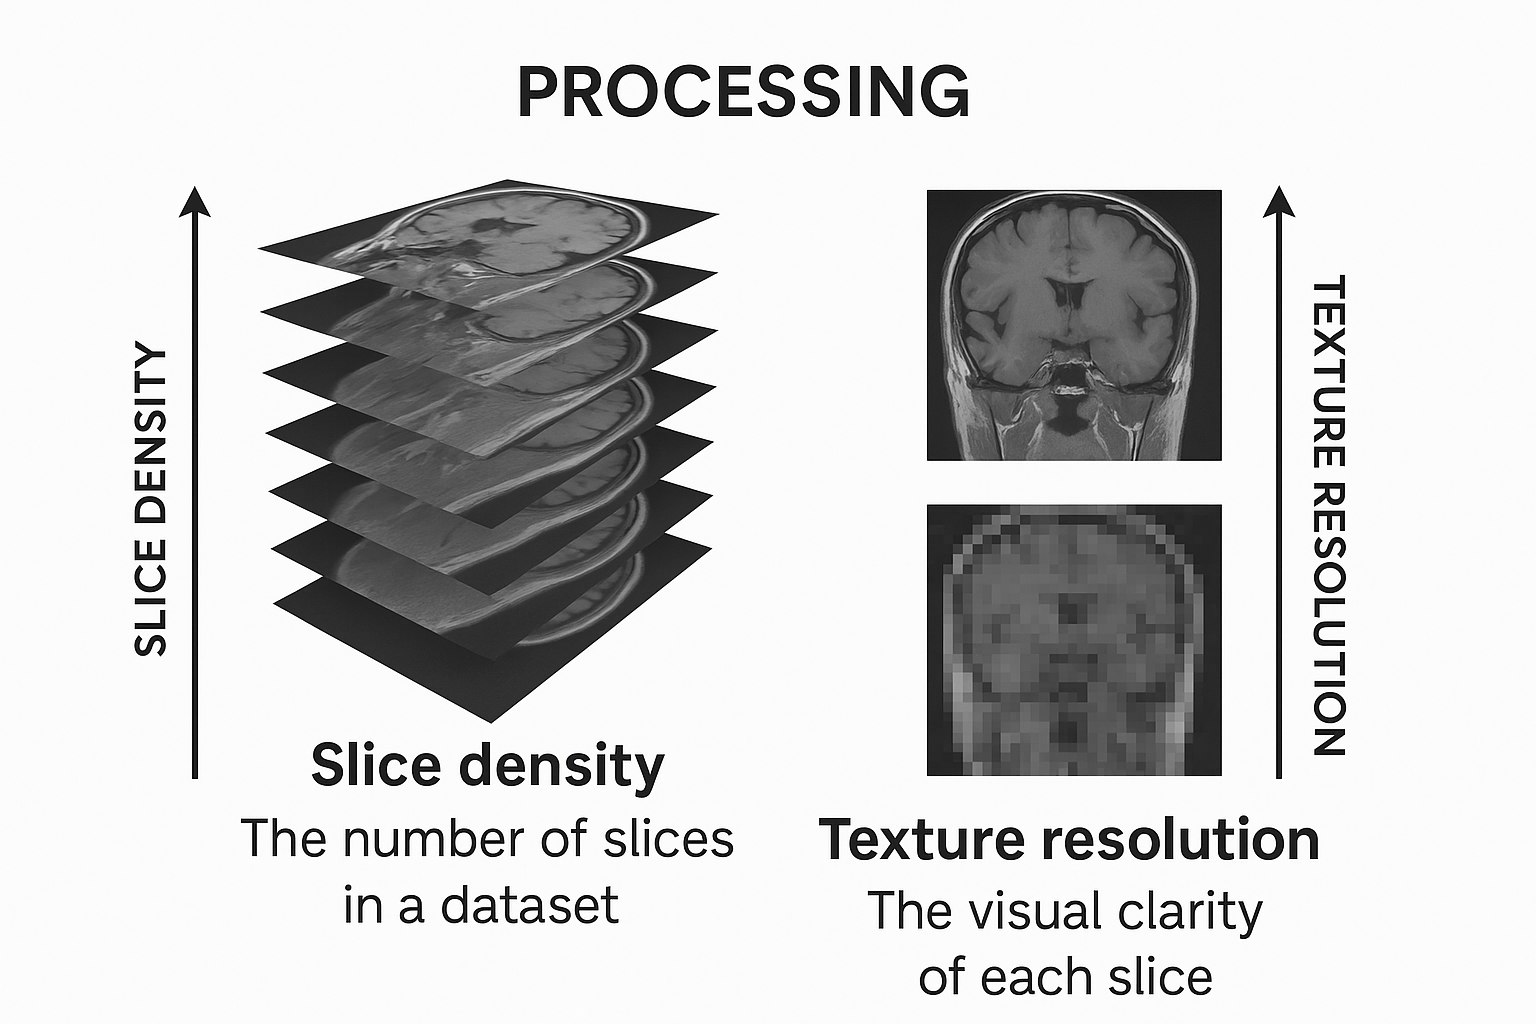
 From slices to 3D visualization: processing and texturing
Visualizing volumetric data in VR involves sophisticated processing
techniques. Texture maps are applied to each 2D slice, and algorithms
interpolate between them to generate a smooth, continuous 3D
representation. The more slices included-and the higher their
resolution-the more detailed the final rendering. However, this
increased fidelity comes with a computational cost.
Processing involves two key factors:
From slices to 3D visualization: processing and texturing
Visualizing volumetric data in VR involves sophisticated processing
techniques. Texture maps are applied to each 2D slice, and algorithms
interpolate between them to generate a smooth, continuous 3D
representation. The more slices included-and the higher their
resolution-the more detailed the final rendering. However, this
increased fidelity comes with a computational cost.
Processing involves two key factors:
 Challenges with large datasets in VR
Unlike conventional 2D image viewing, real-time 3D rendering in VR must
maintain high frame rates (ideally 60 FPS on a PC, 30 on a standalone
headset) to prevent motion sickness and ensure a smooth experience.
Large volumetric datasets, while visually impressive, can overwhelm
hardware if not managed properly. The larger the dataset - in physical
dimensions, not just file size - the more processing power is required
to render it effectively. This is where smart optimization and quality
settings become essential.
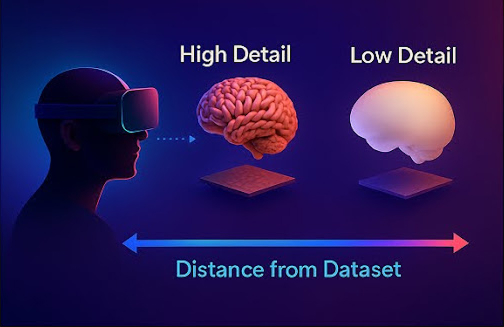
Adaptive detail rendering
To balance performance with visual quality, VR systems use level of
detail (LOD) techniques that adjust rendering based on the user’s
distance from the dataset. When the user is close, the system displays
high detail; when farther away, it switches to lower-resolution
textures, since fine details aren’t noticeable at a distance. This
approach preserves meaningful content while optimizing performance.
Challenges with large datasets in VR
Unlike conventional 2D image viewing, real-time 3D rendering in VR must
maintain high frame rates (ideally 60 FPS on a PC, 30 on a standalone
headset) to prevent motion sickness and ensure a smooth experience.
Large volumetric datasets, while visually impressive, can overwhelm
hardware if not managed properly. The larger the dataset - in physical
dimensions, not just file size - the more processing power is required
to render it effectively. This is where smart optimization and quality
settings become essential.
Adaptive detail rendering
To balance performance with visual quality, VR systems use level of
detail (LOD) techniques that adjust rendering based on the user’s
distance from the dataset. When the user is close, the system displays
high detail; when farther away, it switches to lower-resolution
textures, since fine details aren’t noticeable at a distance. This
approach preserves meaningful content while optimizing performance.
 Activate licenses
Start Free Trial
Activate licenses
Start Free Trial
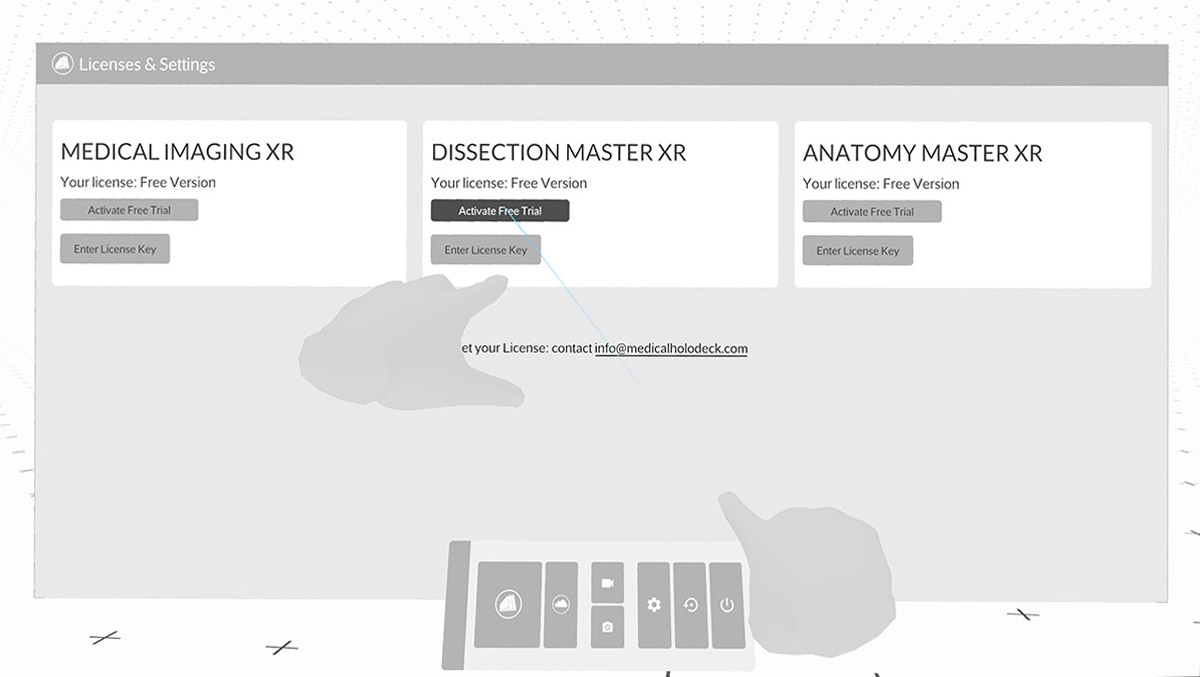 In VR, go to settings settings and click the 'Activate Free Trial'
button.
Activating License Keys on PC VR Systems
In the following tutorial, learn how to activate the license keys on PC
VR System. Start by copying the license key to your clipboard. Launch
Medicalholodeck and go to the settings page by clicking on the cog wheel
in the main menu. Next, go to 'Licenses' tab at the top and select
'Enter License Key'. Paste the license key by clicking on the paste
button and selecting 'Activate'.
Activating License Keys on PC VR Systems
In the following tutorial, learn how to activate the license keys on
Quest 2 standalone VR headsets. Connect your headset to the Internet and
launch Medicalholodeck. Go to the settings page by clicking on the cog
wheel in the main menu and select 'Licenses' tab at the top.
Note your 6-digit device ID from the bottom of the screen. You will need
it for connecting your VR headset to your computer. Open a web browser
on your computer, navigate to www.medicalholodeck.com/link, and add your
headset’s device ID from the previous step. Select 'License Management’
from the menu, add your keys, and click 'Activate'.
Use your hands to interact with data. Put your right hand into a dataset
until it's highlighted with a blue frame. Then pull the trigger to grab
and move it. To scale the data, put both hands into a dataset until they
are highlighted in blue. Then pull the triggers on both controllers and
move the hands apart to scale and rotate the data.
To use live cut, activate the function from the control panel. A cutter
is attached to your left hand. Move your hand into a dataset to see a
live cut. You can fix the live cut plane in place by pulling the
trigger. Hit the red x button with your laser to remove the cut.
Capture Screenshots and Videos
Capture Screenshots
Capture screenshots and videos from inside the app. A preview of the
captured screenshot will be visible on your right hand. Videos will
capture your VR view. Photos and videos are stored in HD format
(1920x1080) on your desktop. When using the screenshot or video function
for the first time after starting the app it will take a few seconds
until the camera is ready. Capture screenshots by clicking the function
button on your right controller.
Capture Videos
Capture videos by activating the video function on the home menu UI.
Stop recording by shooting with the laser on the button a second time.
Medicalholodeck AI
What is AI segmentation?
AI segmentation automatically identifies and separates anatomical
structures like organs, bones, and tissues, in CT or MRI scans. Instead
of manually outlining regions, AI models complete the task in seconds by
recognizing patterns learned from expert-labeled data.
How to run AI segmentation in the cloud?
In VR, go to settings settings and click the 'Activate Free Trial'
button.
Activating License Keys on PC VR Systems
In the following tutorial, learn how to activate the license keys on PC
VR System. Start by copying the license key to your clipboard. Launch
Medicalholodeck and go to the settings page by clicking on the cog wheel
in the main menu. Next, go to 'Licenses' tab at the top and select
'Enter License Key'. Paste the license key by clicking on the paste
button and selecting 'Activate'.
Activating License Keys on PC VR Systems
In the following tutorial, learn how to activate the license keys on
Quest 2 standalone VR headsets. Connect your headset to the Internet and
launch Medicalholodeck. Go to the settings page by clicking on the cog
wheel in the main menu and select 'Licenses' tab at the top.
Note your 6-digit device ID from the bottom of the screen. You will need
it for connecting your VR headset to your computer. Open a web browser
on your computer, navigate to www.medicalholodeck.com/link, and add your
headset’s device ID from the previous step. Select 'License Management’
from the menu, add your keys, and click 'Activate'.
Use your hands to interact with data. Put your right hand into a dataset
until it's highlighted with a blue frame. Then pull the trigger to grab
and move it. To scale the data, put both hands into a dataset until they
are highlighted in blue. Then pull the triggers on both controllers and
move the hands apart to scale and rotate the data.
To use live cut, activate the function from the control panel. A cutter
is attached to your left hand. Move your hand into a dataset to see a
live cut. You can fix the live cut plane in place by pulling the
trigger. Hit the red x button with your laser to remove the cut.
Capture Screenshots and Videos
Capture Screenshots
Capture screenshots and videos from inside the app. A preview of the
captured screenshot will be visible on your right hand. Videos will
capture your VR view. Photos and videos are stored in HD format
(1920x1080) on your desktop. When using the screenshot or video function
for the first time after starting the app it will take a few seconds
until the camera is ready. Capture screenshots by clicking the function
button on your right controller.
Capture Videos
Capture videos by activating the video function on the home menu UI.
Stop recording by shooting with the laser on the button a second time.
Medicalholodeck AI
What is AI segmentation?
AI segmentation automatically identifies and separates anatomical
structures like organs, bones, and tissues, in CT or MRI scans. Instead
of manually outlining regions, AI models complete the task in seconds by
recognizing patterns learned from expert-labeled data.
How to run AI segmentation in the cloud?
 2. Options

Collapses or expands the group section. 3. Handle Use the handle to move the segmentation control panel. Hover with your laser, hold the trigger to drag it, then release to set its position.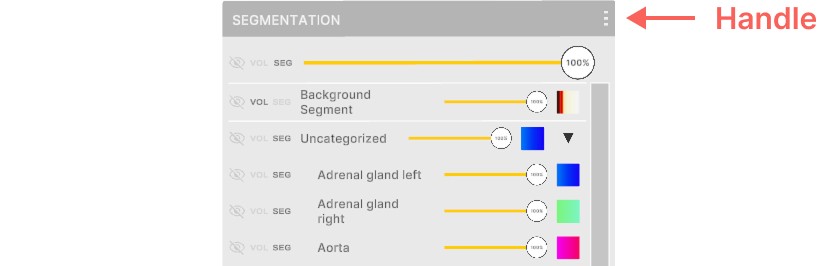 How to install TotalSegmentator
To install TotalSegmentator you need to first install Python, PyTorch
and add python to the PATH. TotalSegmentator works on Ubuntu, macOS, and
Windows, and supports both CPU and GPU. Performance on CPU is
significantly slower.
1. Installing Python
If you already have Python on your device you can skip this step.
How to check if you have Python installed?
How to install TotalSegmentator
To install TotalSegmentator you need to first install Python, PyTorch
and add python to the PATH. TotalSegmentator works on Ubuntu, macOS, and
Windows, and supports both CPU and GPU. Performance on CPU is
significantly slower.
1. Installing Python
If you already have Python on your device you can skip this step.
How to check if you have Python installed?
Note, that it’s very important to have Python added to the environmental variable PATH. To see if you have it in PATH type ‘python’ in the command prompt. If it’s added you will see it ‘open’ in the command prompt. If not, a message like that will appear ‘python is not recognized as an internal or external variable. See here how to add Python to the PATH. 2. Installing PyTorch If you already have PyTorch on your device you can skip this step. How to check if you have PyTorch installed?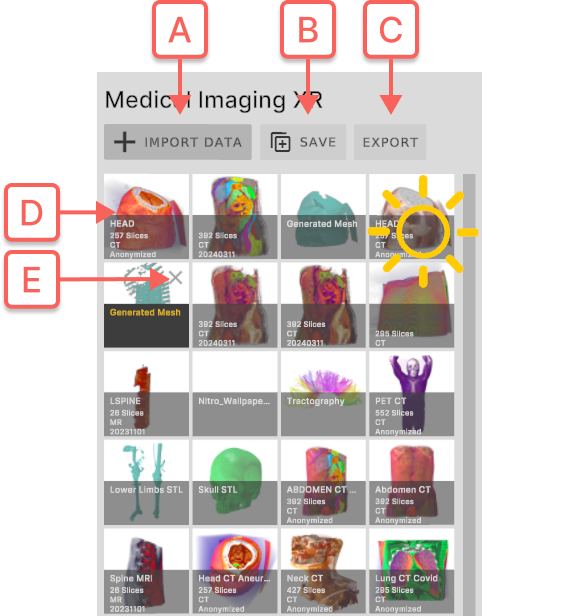
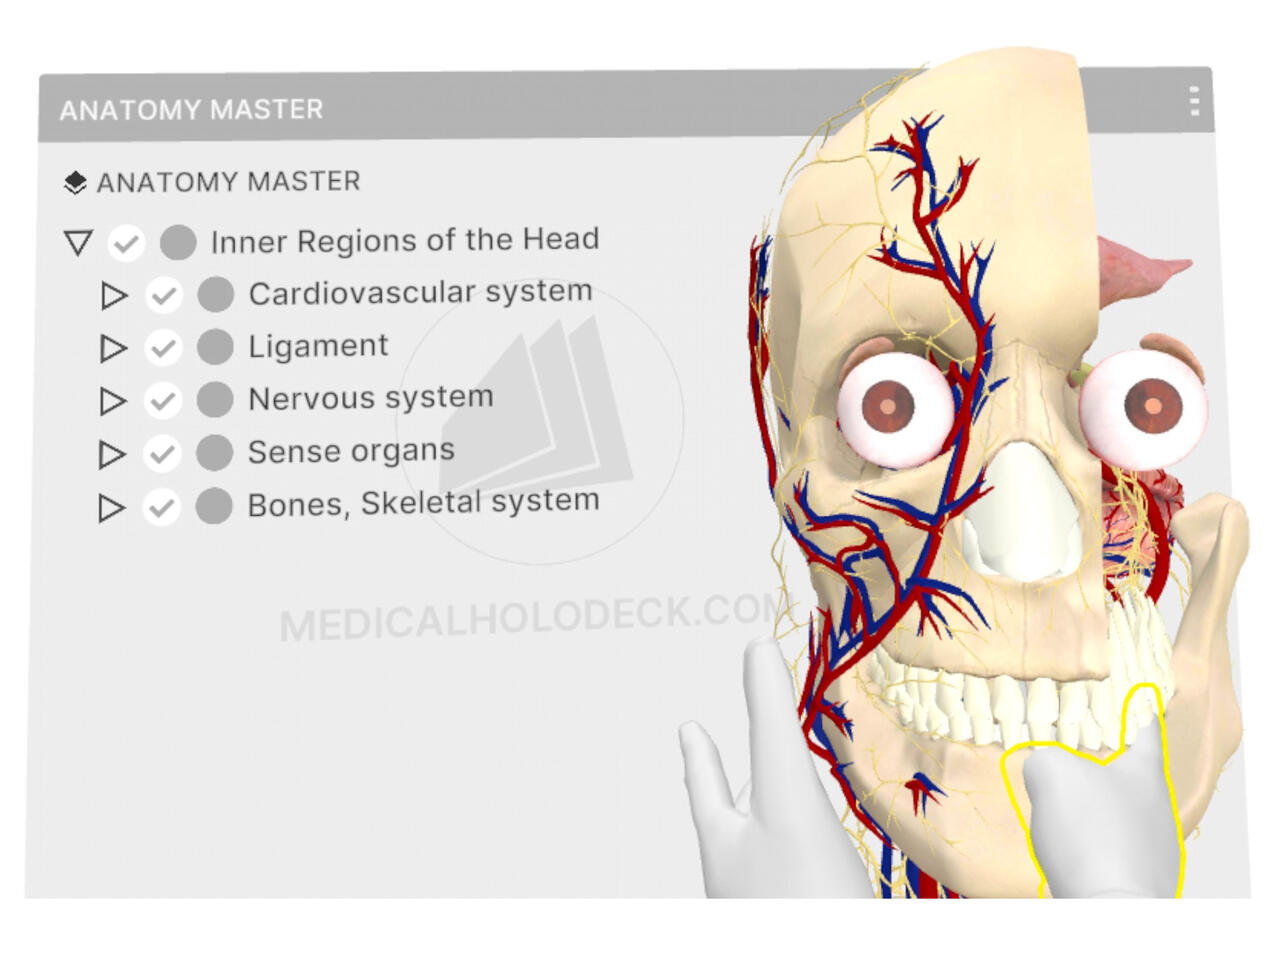
 Navigating the Anatomy Master 2 models
1. Model
Anatomy Master 2 models are detailed 3D human body reconstructions
based on CT and MRI data. They feature 2,000+ labeled structures, full
scaling, part-by-part manipulation, and tools like visibility controls
and an object marker.
Navigating the Anatomy Master 2 models
1. Model
Anatomy Master 2 models are detailed 3D human body reconstructions
based on CT and MRI data. They feature 2,000+ labeled structures, full
scaling, part-by-part manipulation, and tools like visibility controls
and an object marker.
Place one or both hands in the model until it’s framed in blue. Pull the
trigger and rotate with your hand movement
1.5 Cutting
Press the left grip or select the cutter tool from the object pad. Move
your hand into the model to see a live cut. Pull the trigger to fix the
cut.
To remove it, point your laser at the red X. Use the marker’s cut visibility button to show/hide cuts. 1.6 Annotations
Point the laser at a part to view its annotation. Press the trigger to
pin it. You can also change the part’s visibility here.
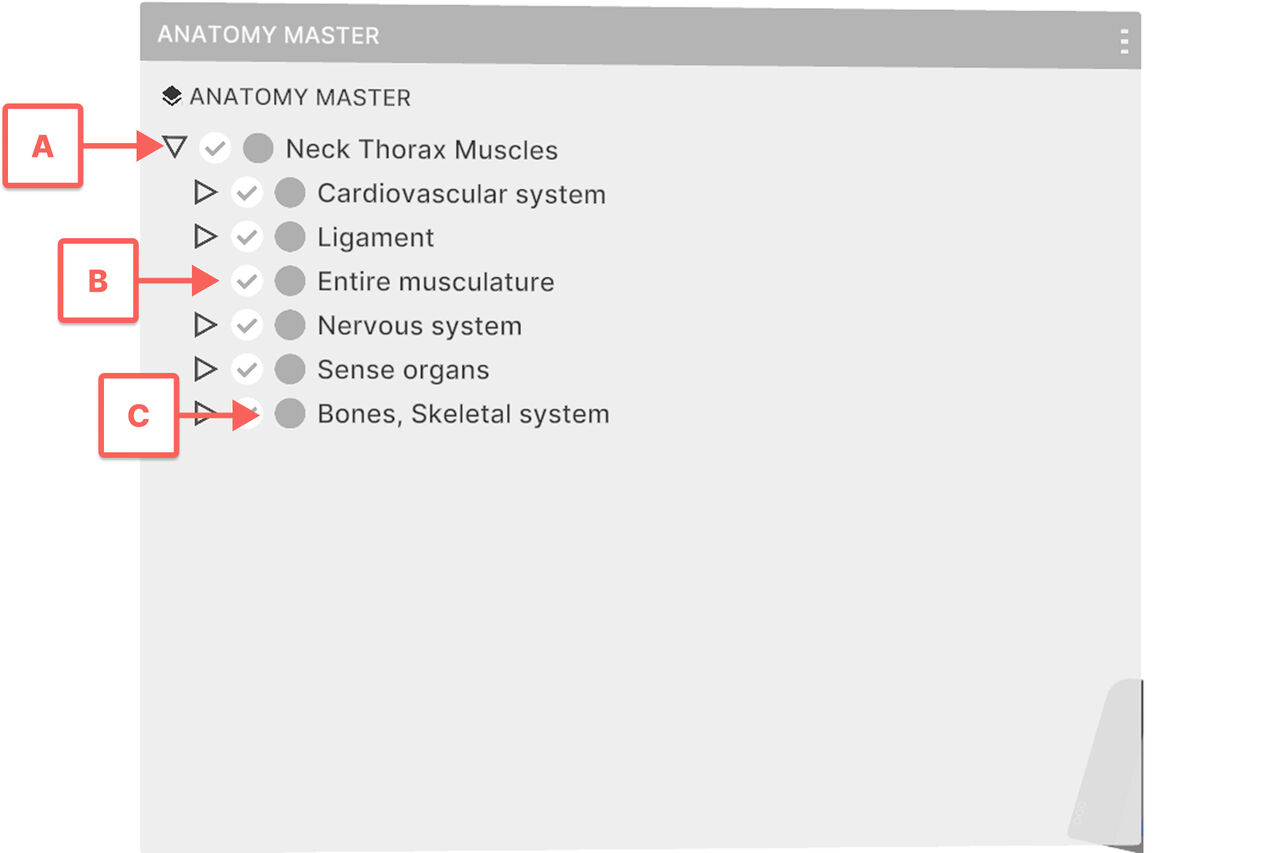
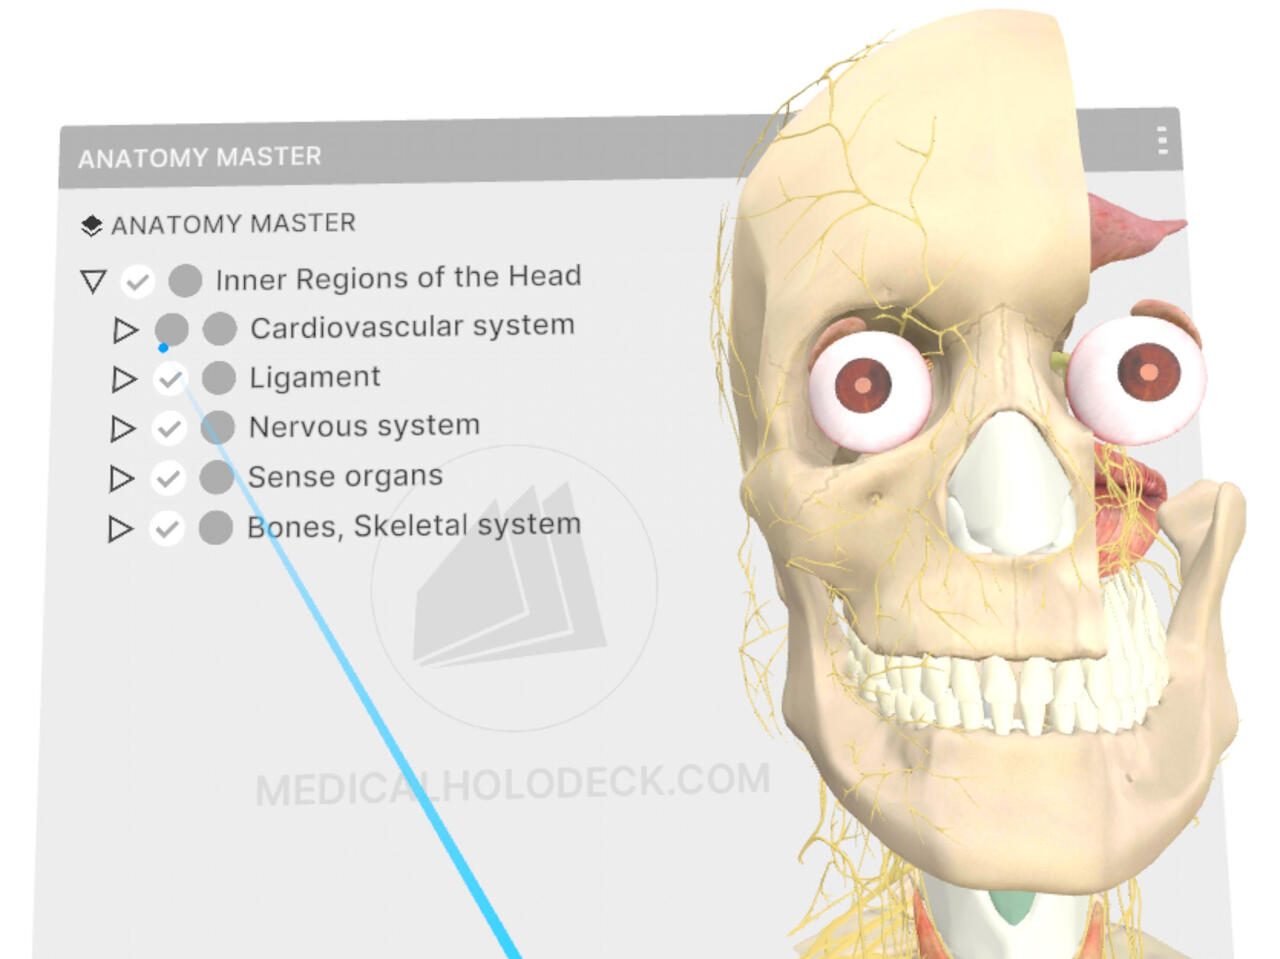
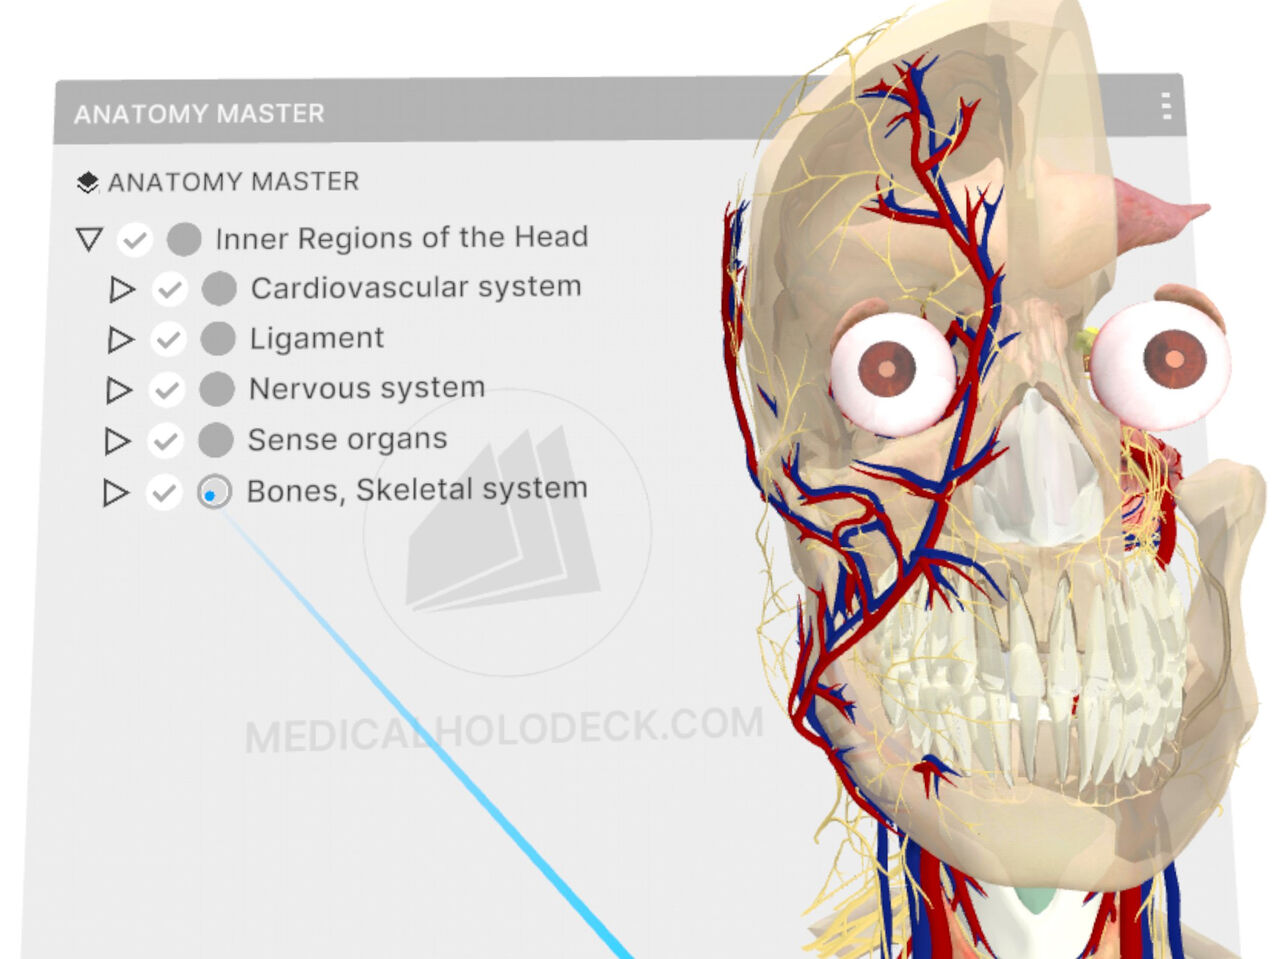 With multiple models loaded, point the laser at one to access its
visibility controls.
With multiple models loaded, point the laser at one to access its
visibility controls.
To move visibility controls, grab the top bar with the trigger. Drag to a new spot and release. Dissection Master XR Manual Dissection Master XR is a VR tool for exploring human anatomy in detailed 3D, based on real bodies. It lets you interact with dissections and scale anatomical structures. Find it in the top-right of the library. Point your laser at a model’s button and pull the trigger to load it.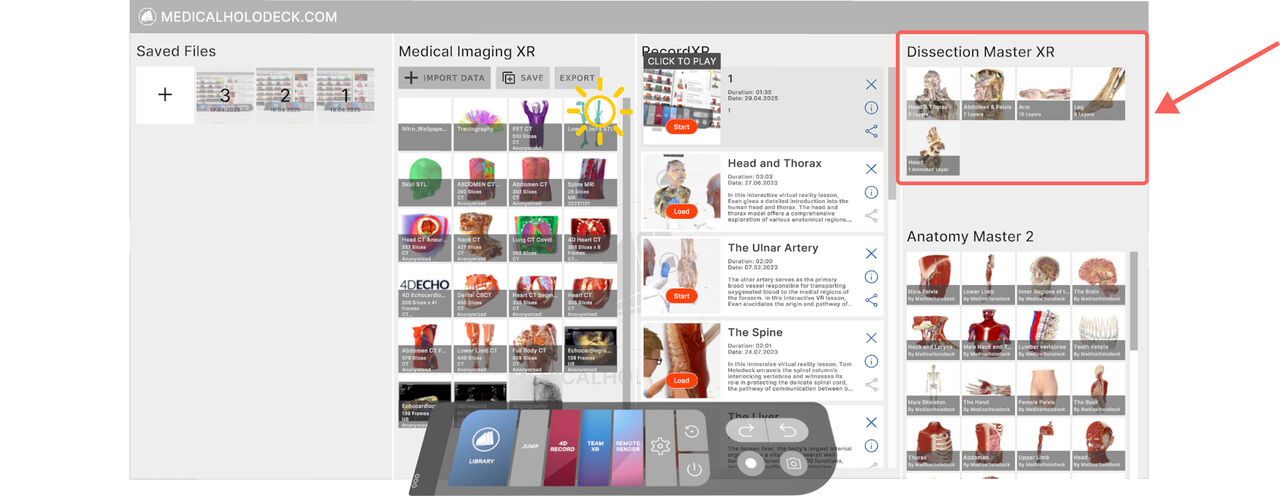 Navigating the Dissection Master models
1. Model
Dissection Master models show the full human body in 10 interactive layers, with 3,000+ labeled structures
linked to extra information. They are created from real dissections and digitized for precision. Each model
includes visibility controls and an object marker.
Navigating the Dissection Master models
1. Model
Dissection Master models show the full human body in 10 interactive layers, with 3,000+ labeled structures
linked to extra information. They are created from real dissections and digitized for precision. Each model
includes visibility controls and an object marker.
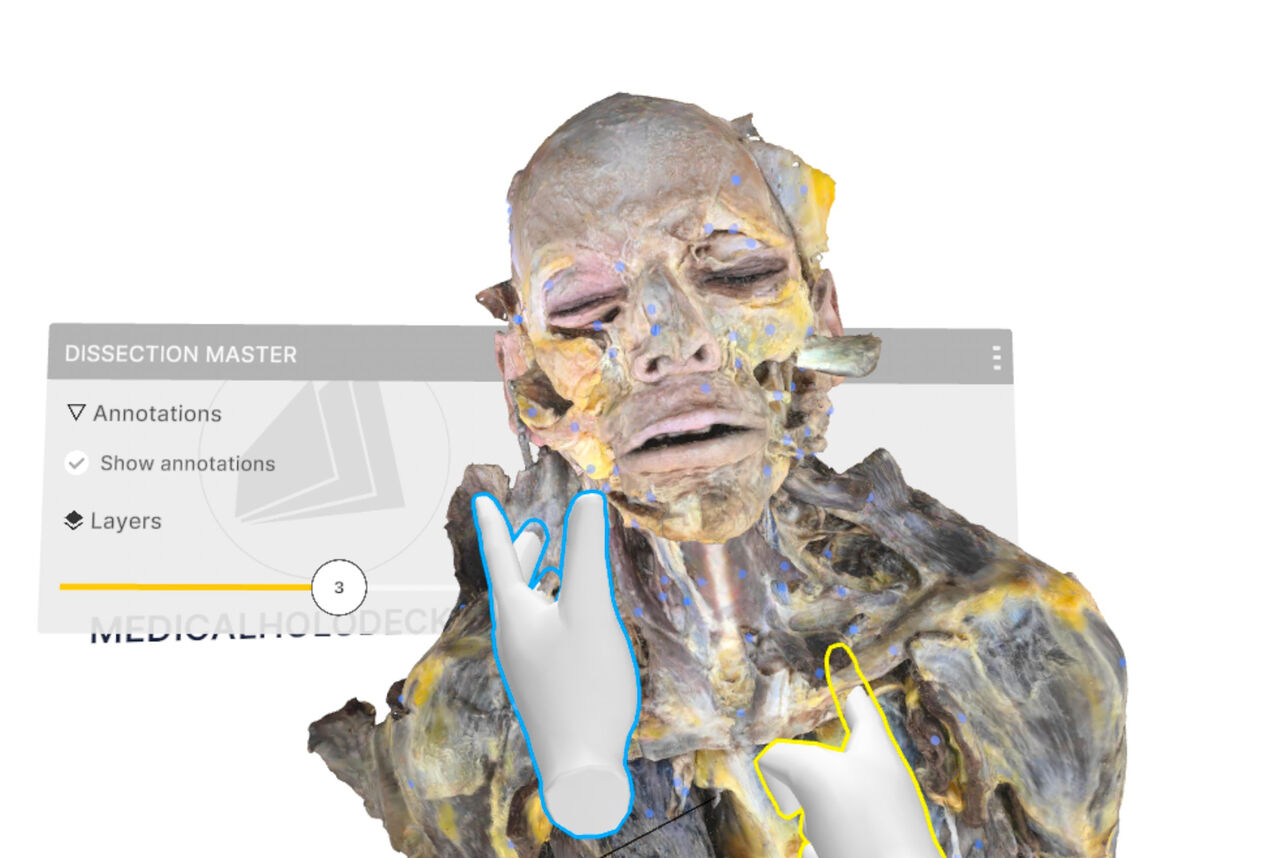
Place one or both hands in the model until it’s framed in blue. Pull the trigger and rotate with your hand
movement
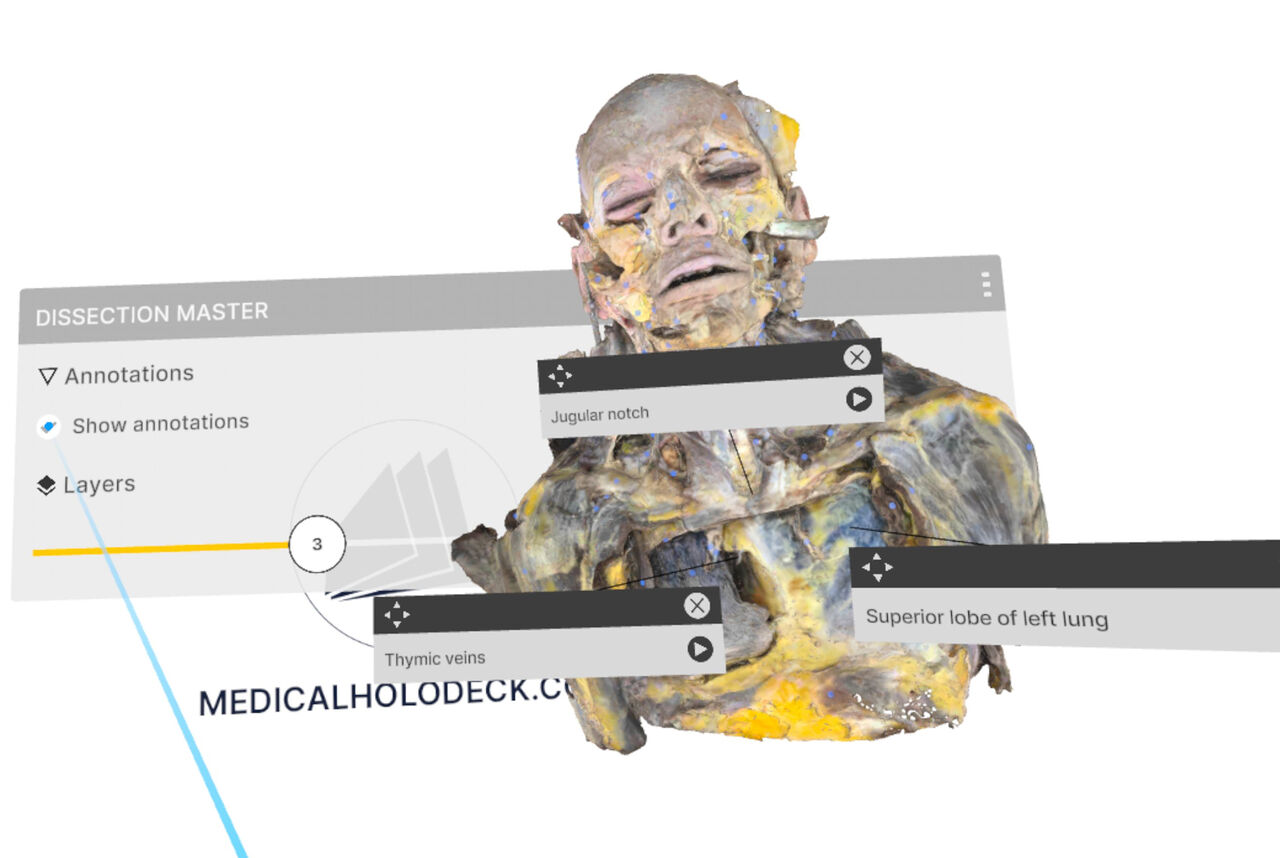
1.5 Annotations
Point the laser at a part to view its annotation. Click to pin it.
1.6 Dissection Master visibility controls
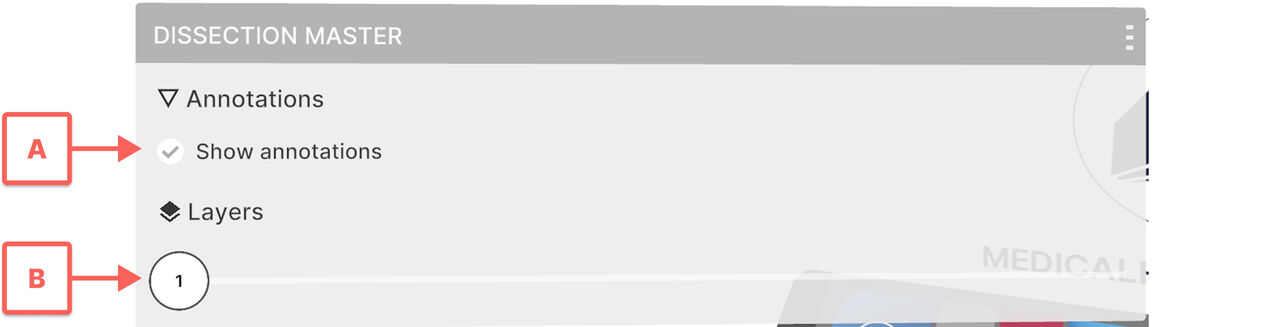
 With multiple models loaded, point the laser at one to access its visibility controls.
To move visibility controls, grab the top bar with the trigger. Drag to a new spot and release.
RecordXR Manual
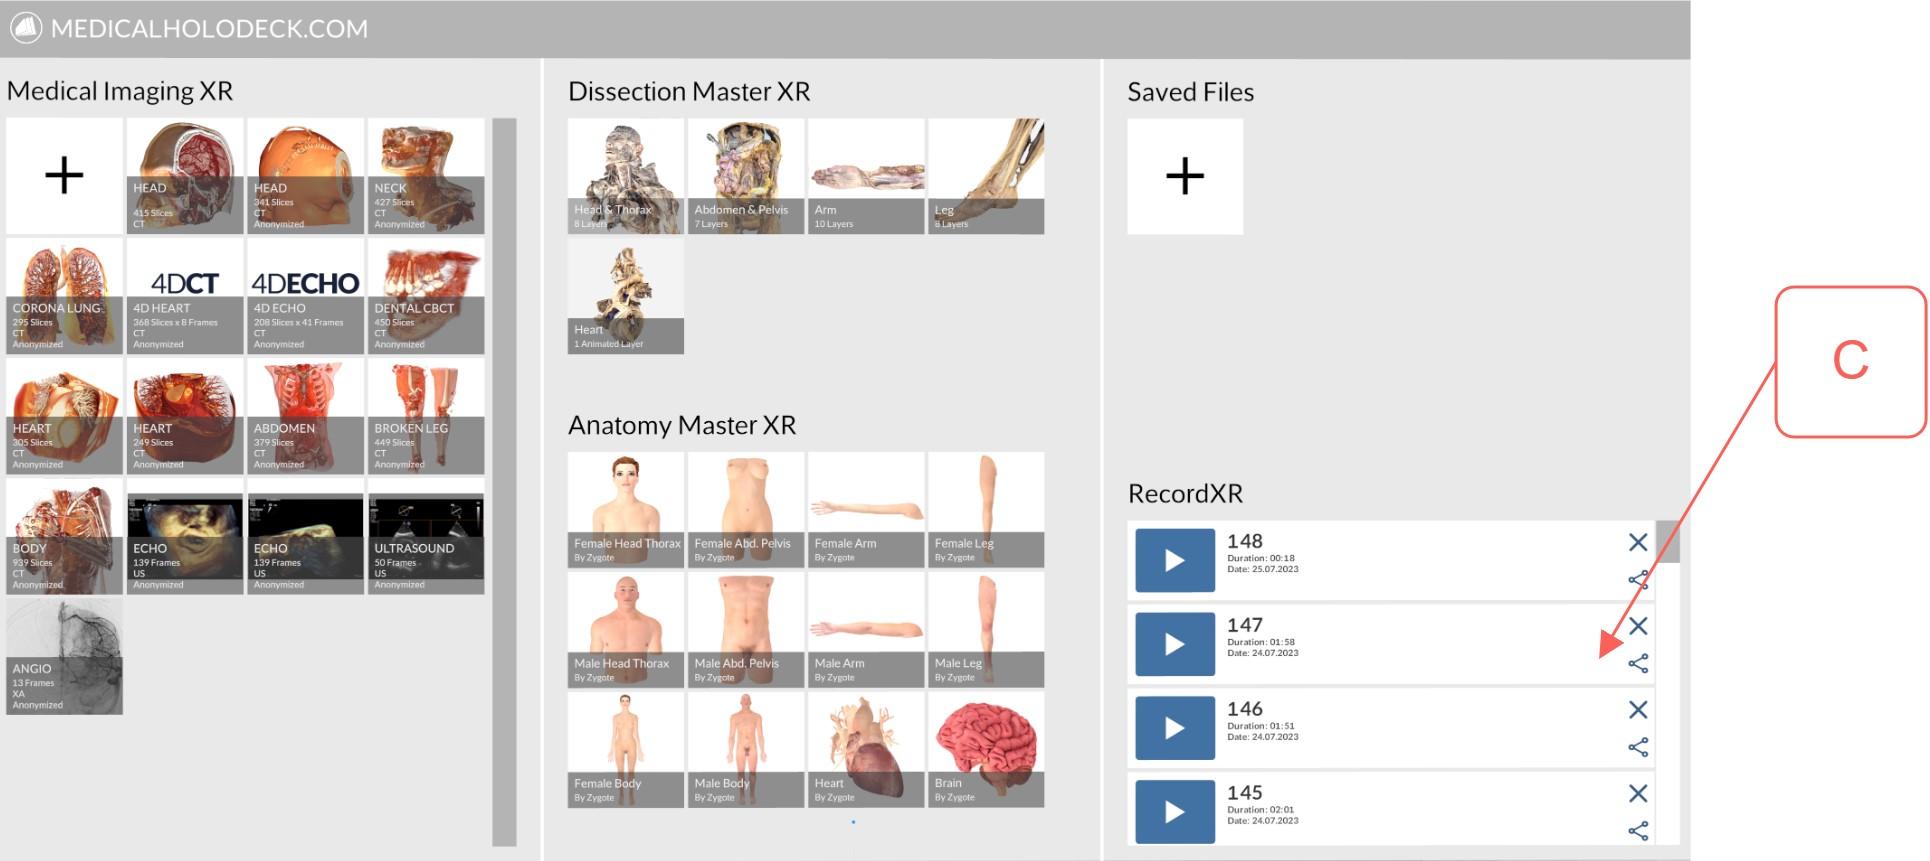
1. User Interface
The RecordXR User Interface consists of the Main Control Pad (A), the
RecordXR Panel (B), and the RecordXR Section in the Library Panel (C).
With multiple models loaded, point the laser at one to access its visibility controls.
To move visibility controls, grab the top bar with the trigger. Drag to a new spot and release.
RecordXR Manual
1. User Interface
The RecordXR User Interface consists of the Main Control Pad (A), the
RecordXR Panel (B), and the RecordXR Section in the Library Panel (C).

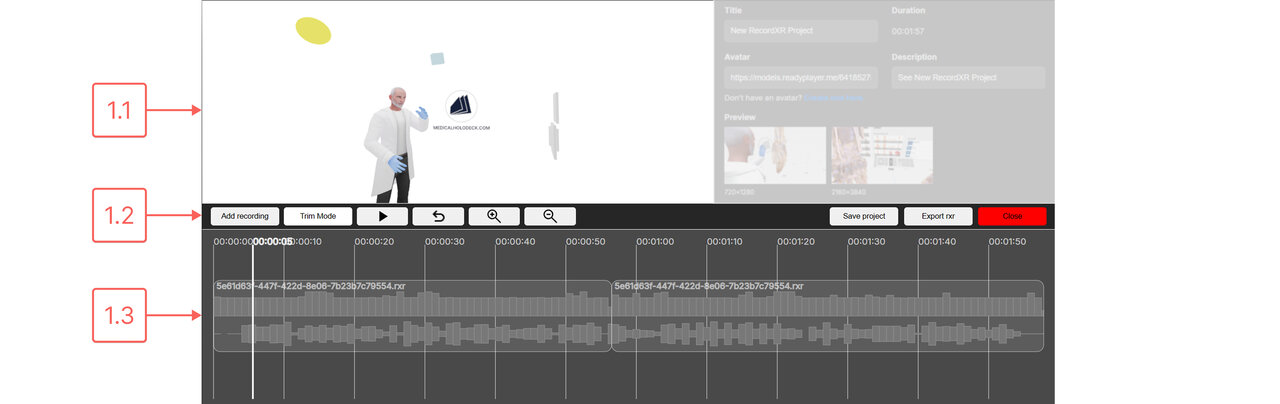
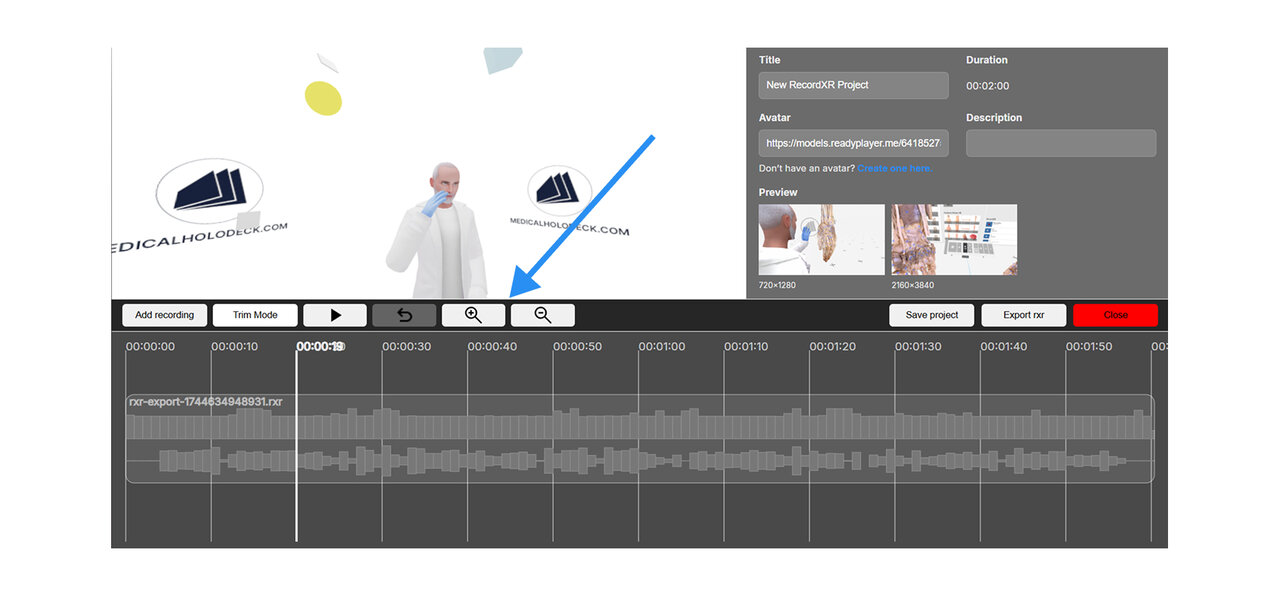
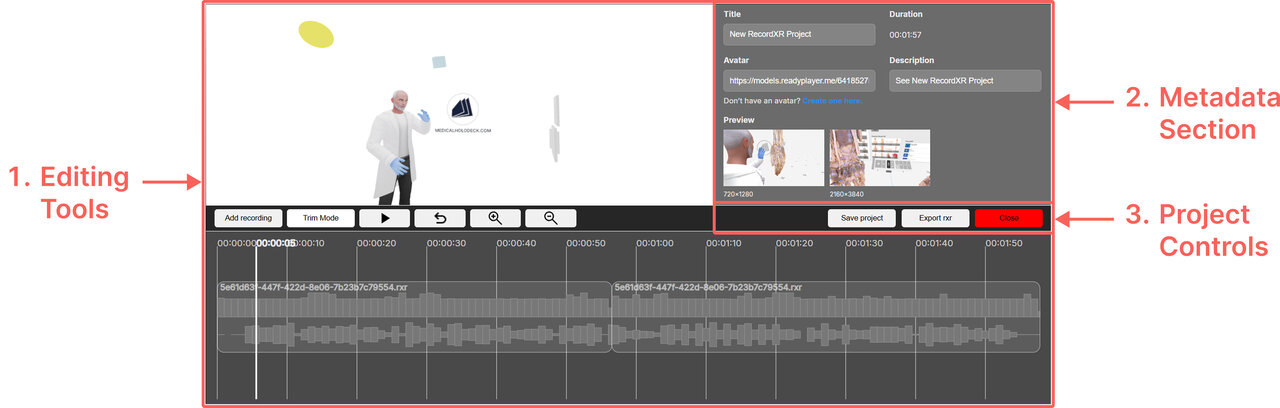 1. Editing tools
The editing tools section includes three main components: the preview
window, the timeline toolbar, and the timeline.
1. Editing tools
The editing tools section includes three main components: the preview
window, the timeline toolbar, and the timeline.

 To learn more about creating recordings in Medicalholodeck App, check
the
manual for RecordXR on the website.
2. Open RecordXR Studio
Access RecordXR Studio
here.
3. Open a project
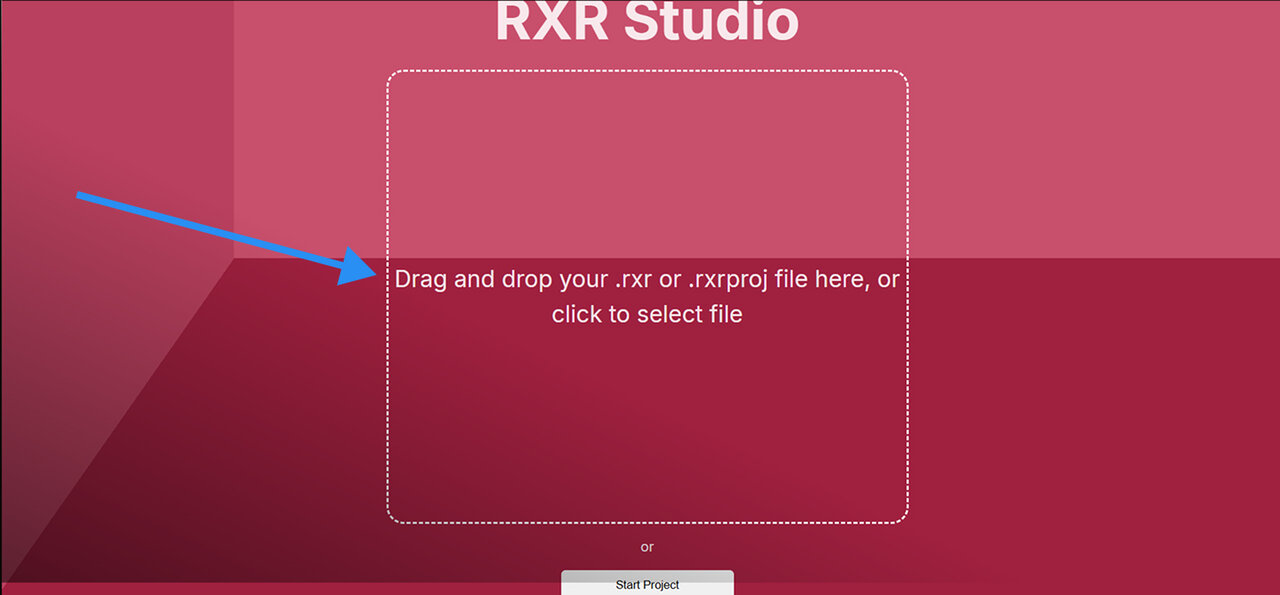
There are two ways to start a project:
Option 1: Drag & drop
Drop a .RXR or .rxrproj file into the designated area to start.
To learn more about creating recordings in Medicalholodeck App, check
the
manual for RecordXR on the website.
2. Open RecordXR Studio
Access RecordXR Studio
here.
3. Open a project
There are two ways to start a project:
Option 1: Drag & drop
Drop a .RXR or .rxrproj file into the designated area to start.
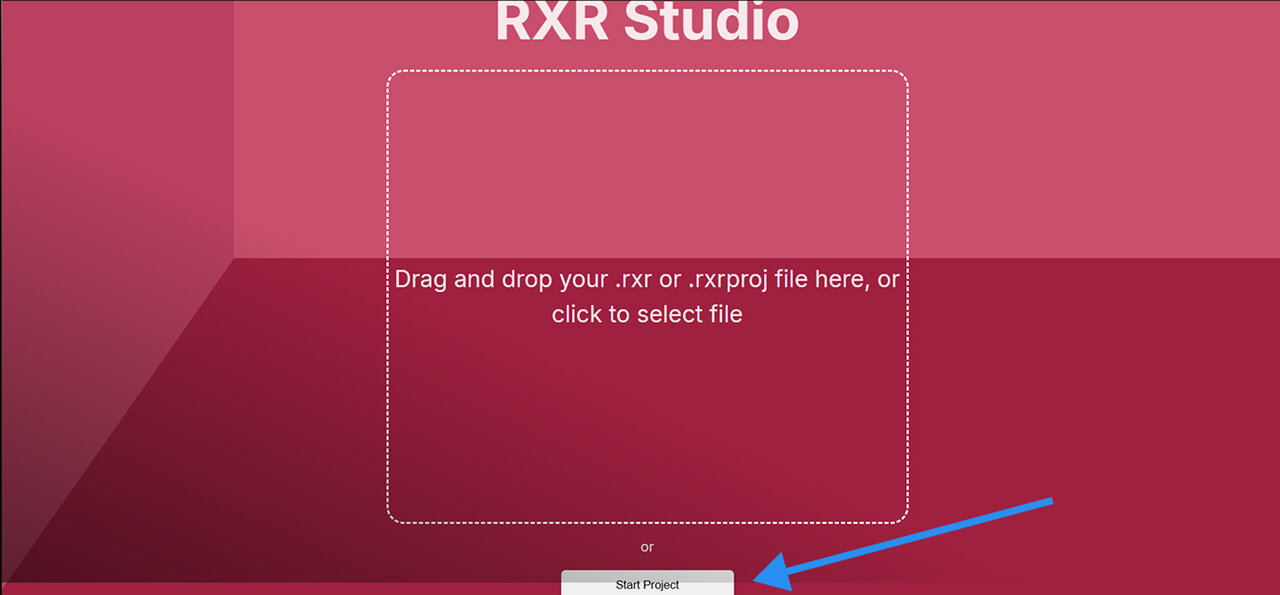
 Option 2: Start new
Click the start project button to open a new project.
Option 2: Start new
Click the start project button to open a new project.
 4. Add recordings
To add a recording to your project, click the
add recording button and browse for the desired .RXR file on your
computer. Recordings must be added one at a time.
Note that the project automatically keeps the metadata from the first
recording uploaded. It can be changed later in the metadata section.
New recordings are placed at the end of the timeline.
4. Add recordings
To add a recording to your project, click the
add recording button and browse for the desired .RXR file on your
computer. Recordings must be added one at a time.
Note that the project automatically keeps the metadata from the first
recording uploaded. It can be changed later in the metadata section.
New recordings are placed at the end of the timeline.
 5. Zoom in/ zoom out
To adjust the timeline view use zoom in/out. Zooming in for precise
edits or out for a full view is especially helpful when trimming or
rearranging.
5. Zoom in/ zoom out
To adjust the timeline view use zoom in/out. Zooming in for precise
edits or out for a full view is especially helpful when trimming or
rearranging.
 6. Change the order
To reorder recordings within the timeline, click and drag a recording to
the desired position marked by a yellow vertical line. Use the keyboard
arrow keys to move across the timeline as the timeline does not scroll
automatically.
6. Change the order
To reorder recordings within the timeline, click and drag a recording to
the desired position marked by a yellow vertical line. Use the keyboard
arrow keys to move across the timeline as the timeline does not scroll
automatically.
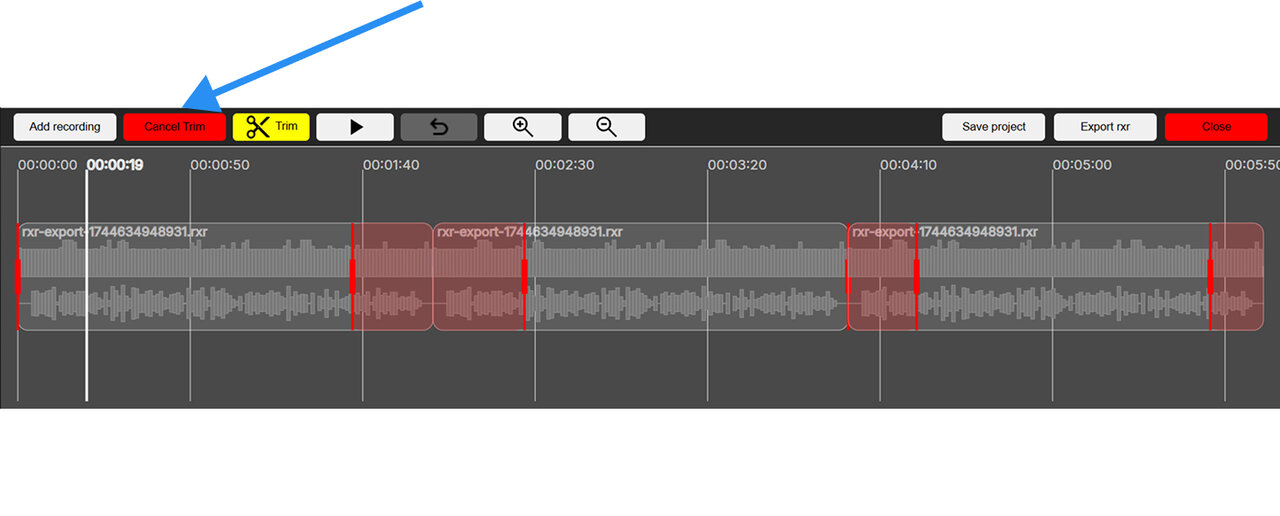
 7. Trim
To trim a recording, click the trim mode button. Red handles will
appear at the beginning and end of each file. Drag these handles to
select the segment to be cut off and click the yellow trim button
to apply the changes.
7. Trim
To trim a recording, click the trim mode button. Red handles will
appear at the beginning and end of each file. Drag these handles to
select the segment to be cut off and click the yellow trim button
to apply the changes.
 To exit trim mode without applying any changes, click the red
cancel trim button.
To exit trim mode without applying any changes, click the red
cancel trim button.
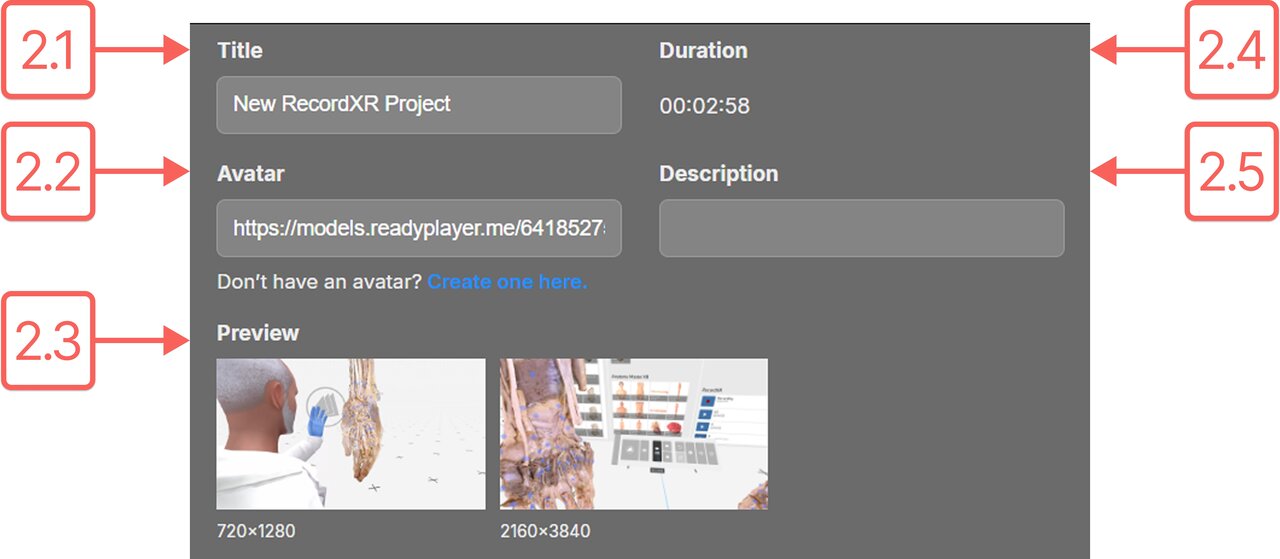
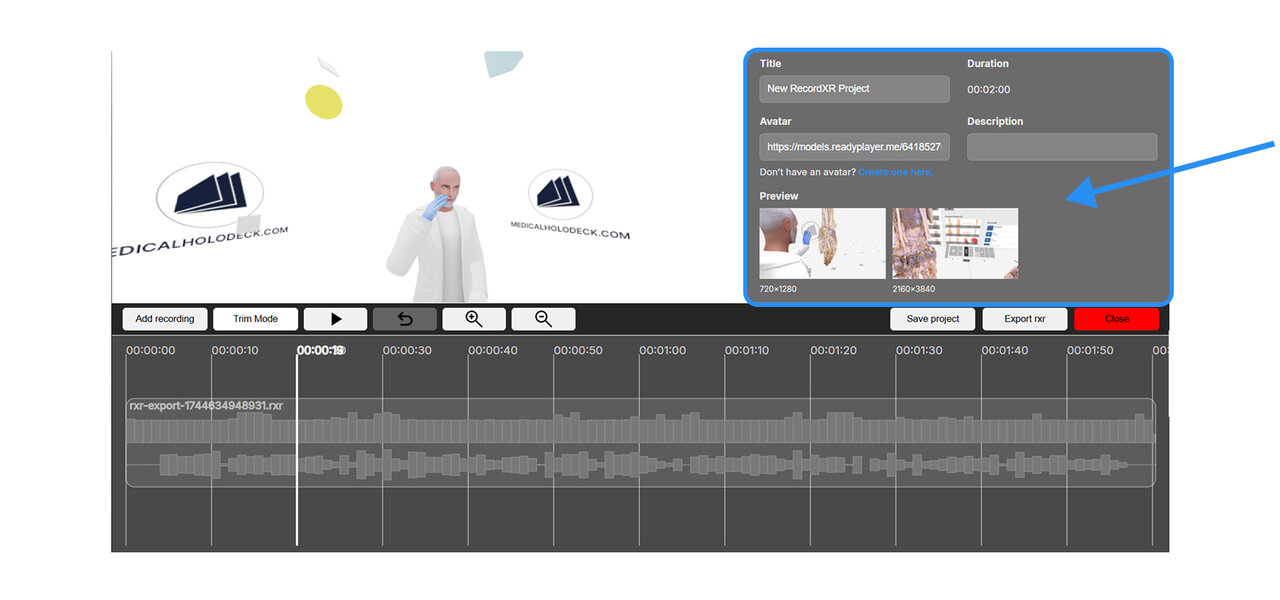
 8. Set the metadata
The title, description, and preview icons for your
project can be edited in the metadata section.
8. Set the metadata
The title, description, and preview icons for your
project can be edited in the metadata section.
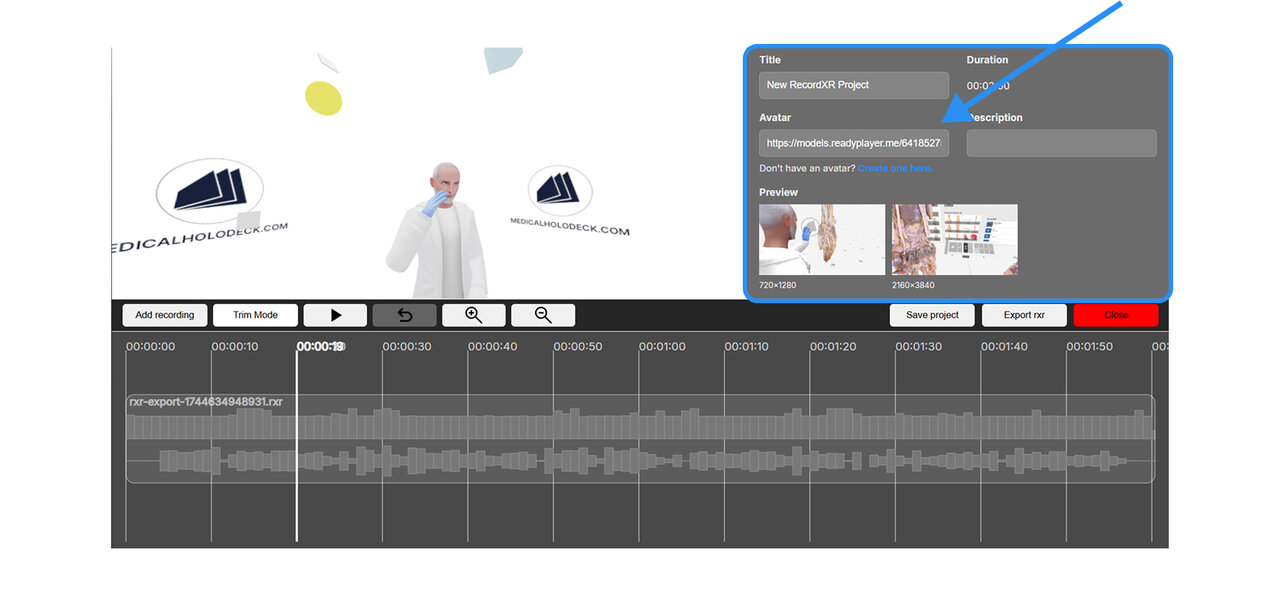
 9. Add an avatar
A customized avatar can be added to your recording. Click the
“Create one here” link below the field to design your avatar. Once
ready, copy its URL and paste it into the avatar field within the
metadata section.
9. Add an avatar
A customized avatar can be added to your recording. Click the
“Create one here” link below the field to design your avatar. Once
ready, copy its URL and paste it into the avatar field within the
metadata section.
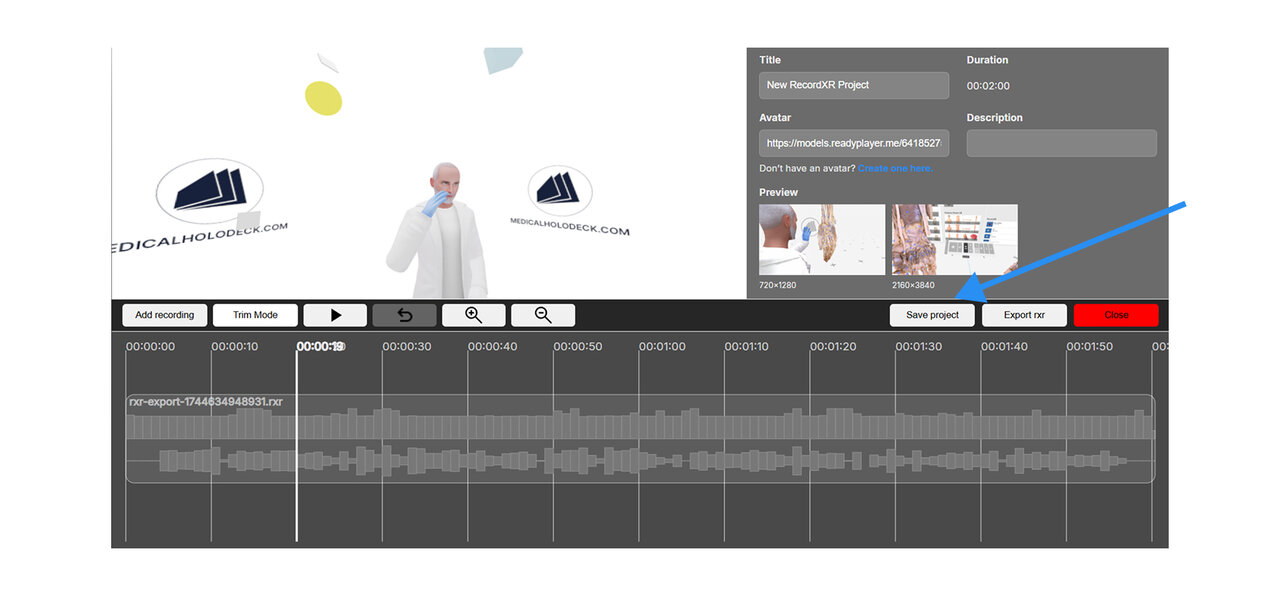
 10. Saving the project
To save your project, click the save project button. The project
will be downloaded to your computer with the .rxrproj extension.
Note that this is a project file, not a recording. It can only be
reopened within RecordXR Studio.
10. Saving the project
To save your project, click the save project button. The project
will be downloaded to your computer with the .rxrproj extension.
Note that this is a project file, not a recording. It can only be
reopened within RecordXR Studio.
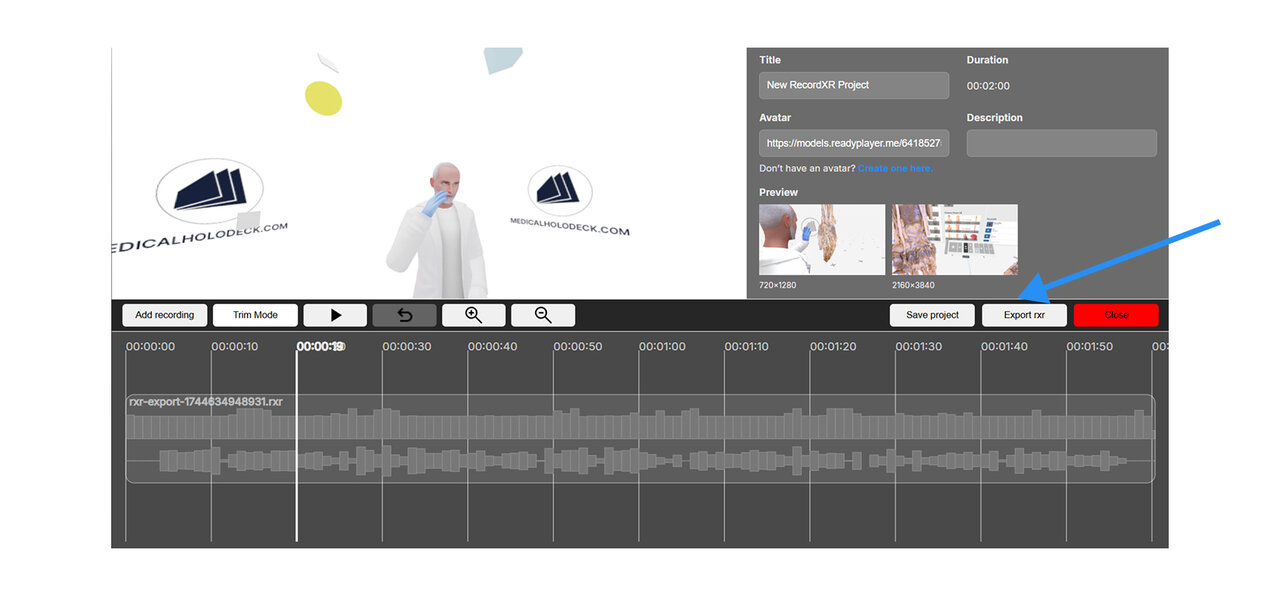
 11. Export a .RXR file
To export a recording from the opened project, click the
export RXR button. The recording will be saved to your computer
as a .RXR file and can then be opened in Medicalholodeck.
11. Export a .RXR file
To export a recording from the opened project, click the
export RXR button. The recording will be saved to your computer
as a .RXR file and can then be opened in Medicalholodeck.
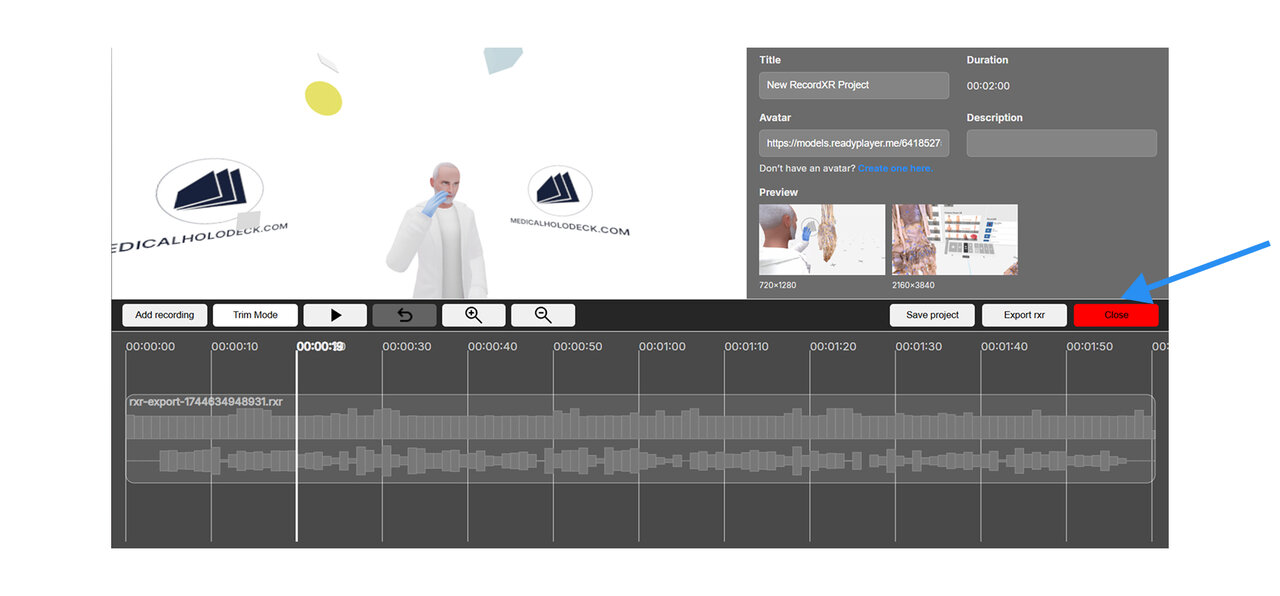
 12. Exit the platform
To exit RecordXR Studio, either click the close button or close
the browser tab.
Be sure to save your work before exiting to avoid losing any progress.
12. Exit the platform
To exit RecordXR Studio, either click the close button or close
the browser tab.
Be sure to save your work before exiting to avoid losing any progress.
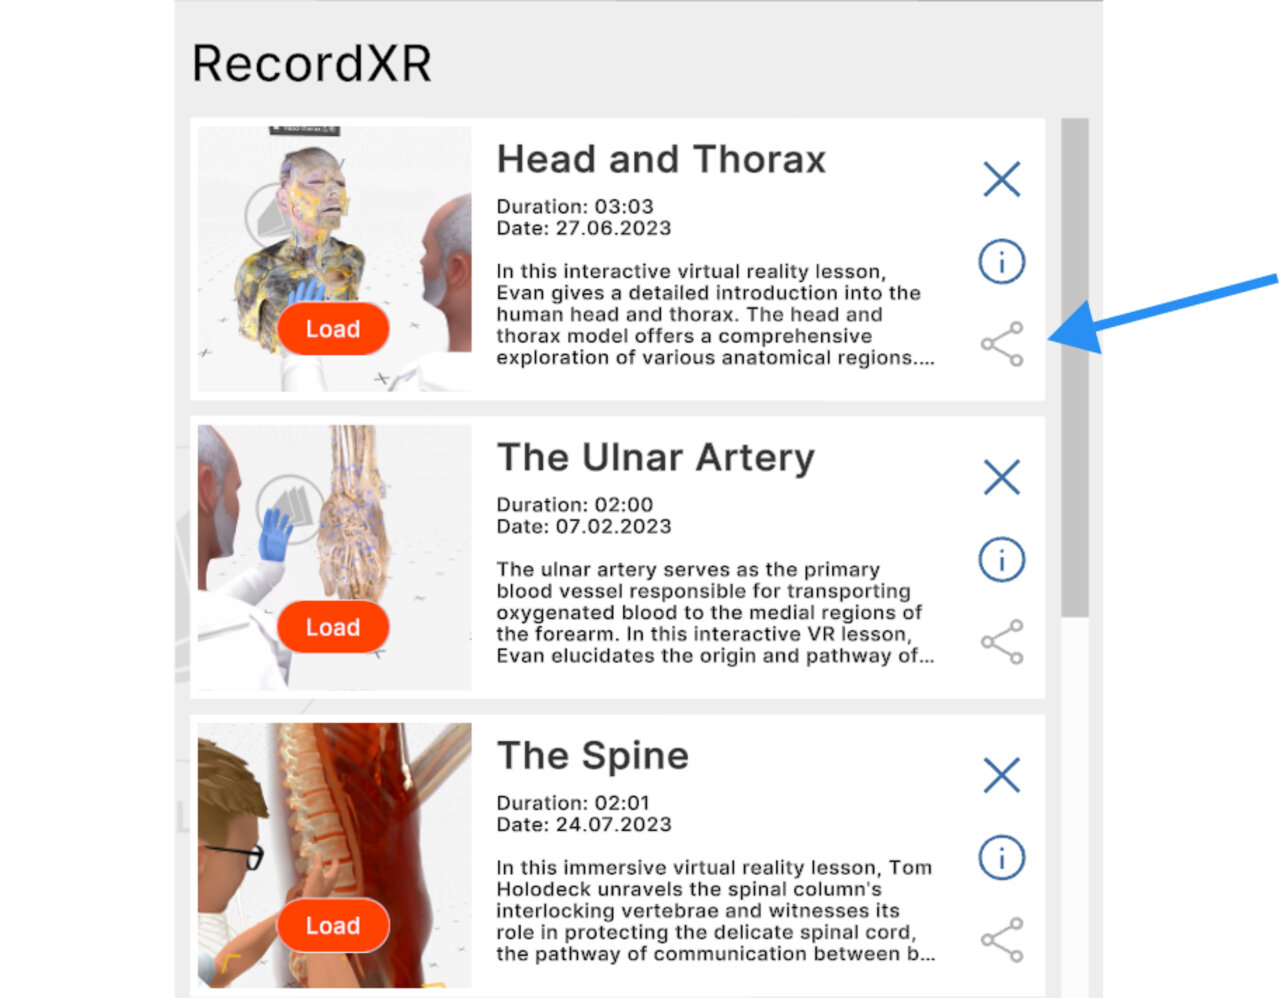
 13. Open the recording
To import your newly created recording into the Medicalholodeck:
1. Open the app and navigate to the library panel.
13. Open the recording
To import your newly created recording into the Medicalholodeck:
1. Open the app and navigate to the library panel.
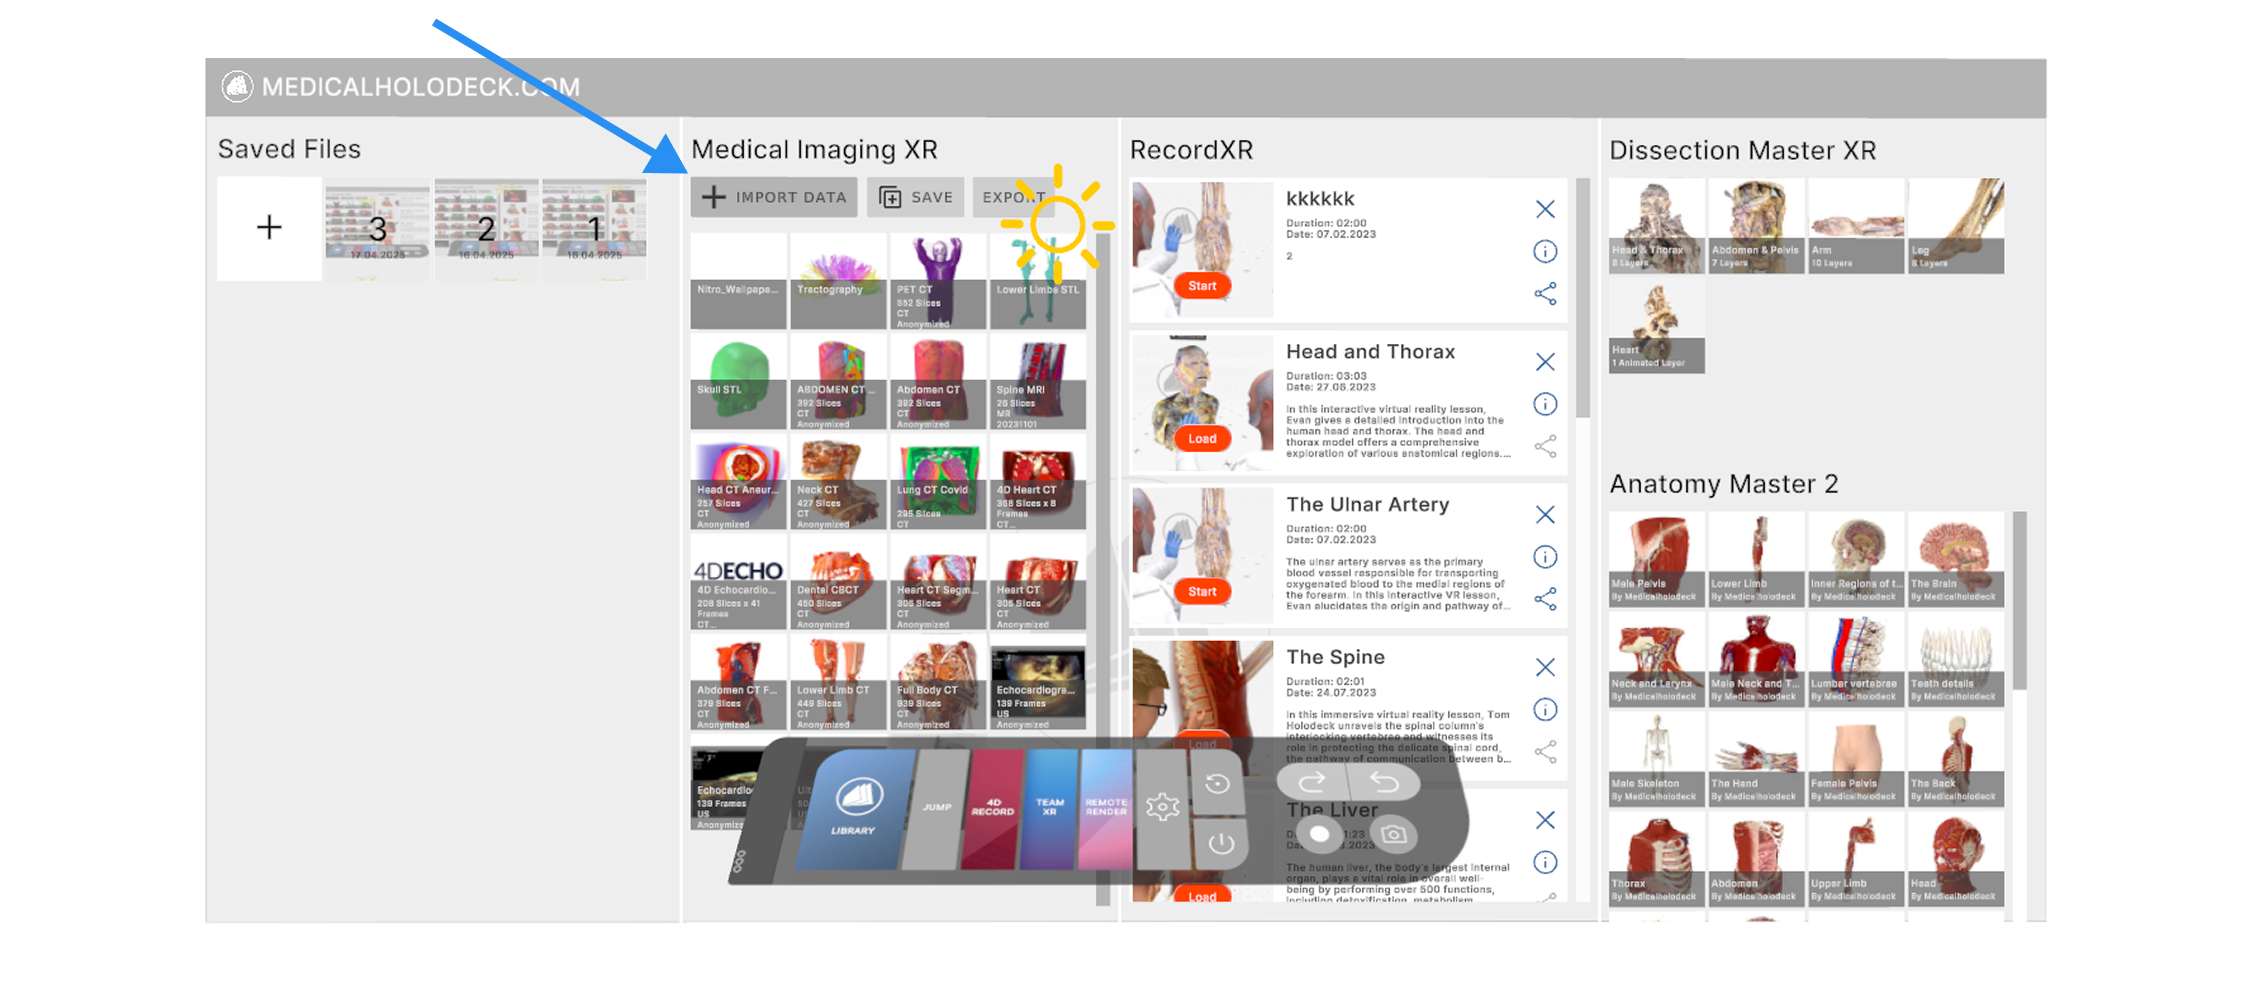
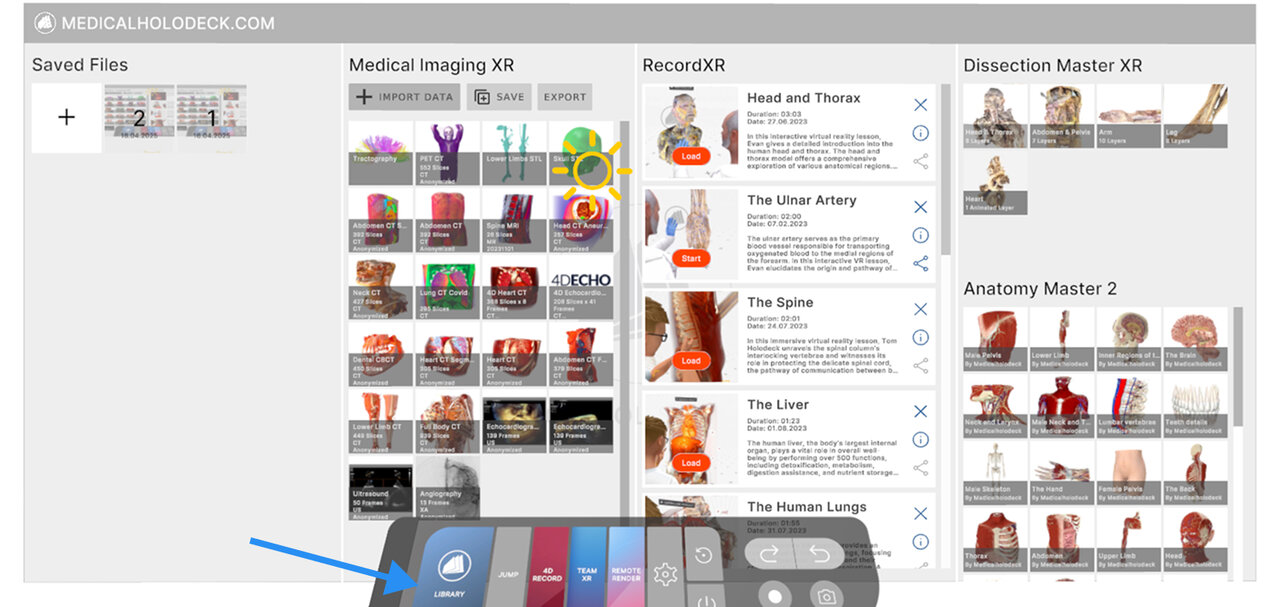 2. Locate the Medical Imaging XR section and click the
import data button.
2. Locate the Medical Imaging XR section and click the
import data button.
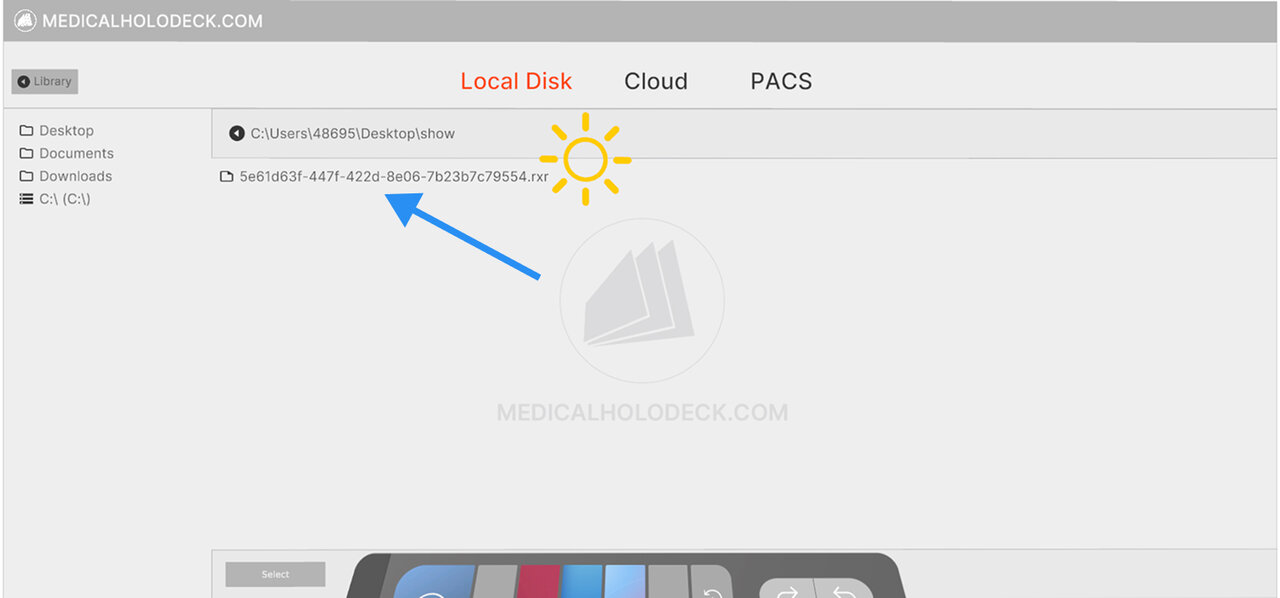
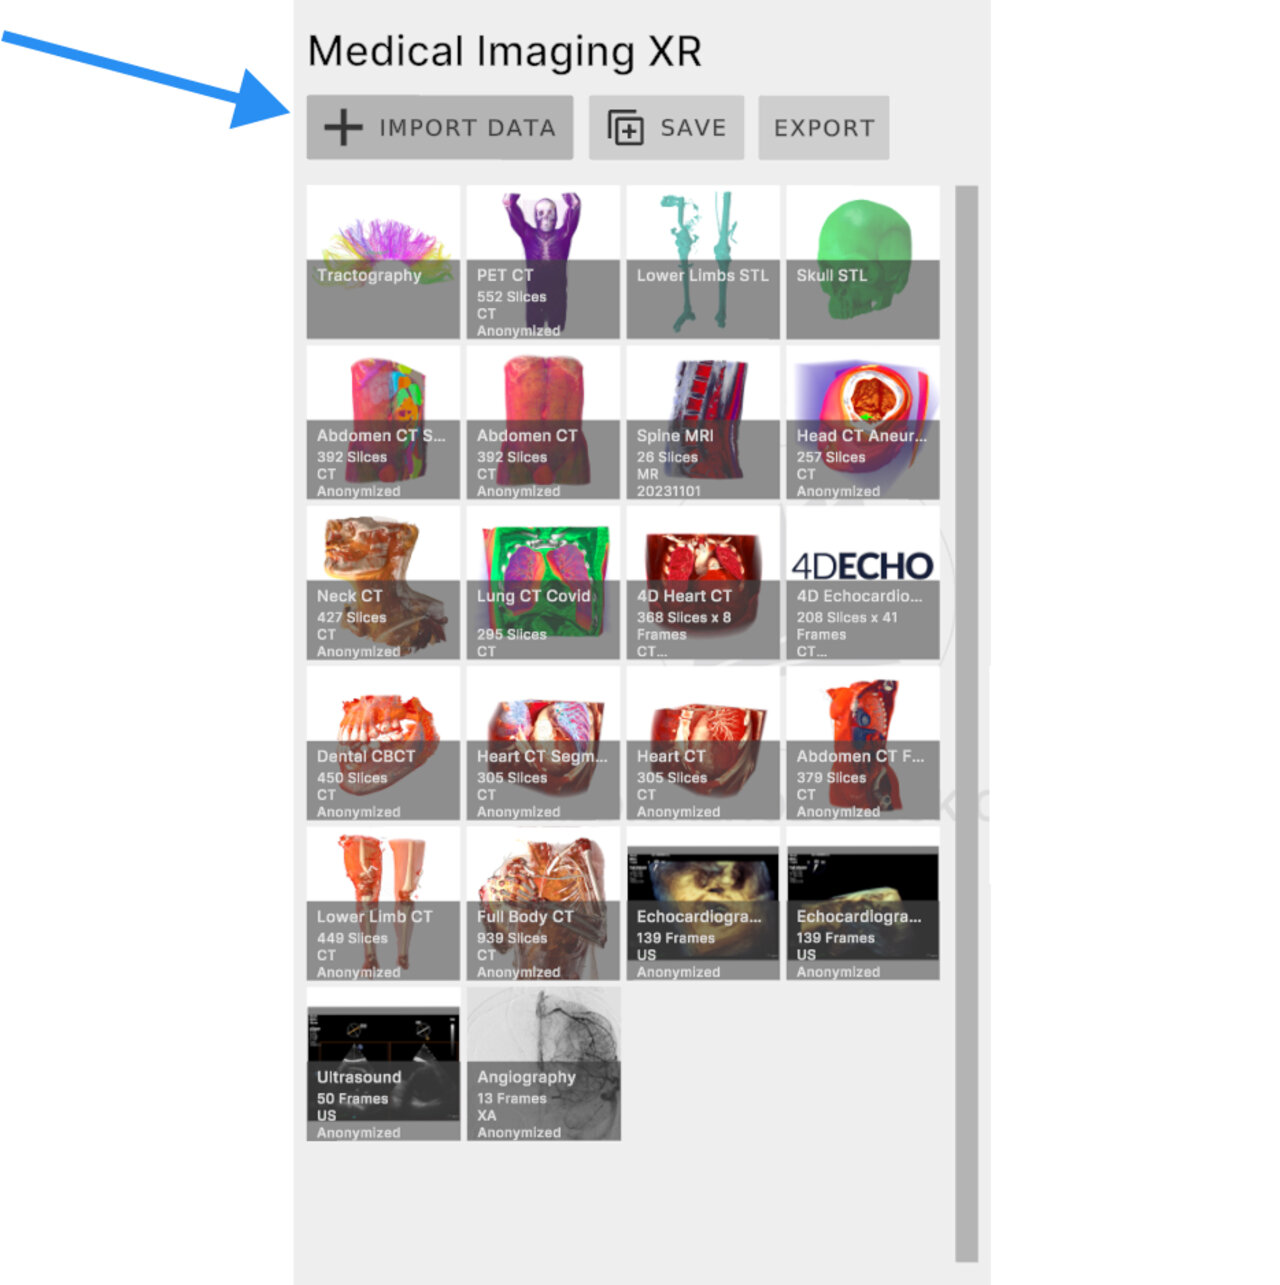 3. Find and select your .RXR recording file from your computer.
 4. Confirm the import. The record will appear at the top position under
the RecordXR section.
4. Confirm the import. The record will appear at the top position under
the RecordXR section.
 Medicalholodeck Link Manual
What is Medicalholodeck Link
Medicalholodeck Link is a web dashboard for managing VR and PC devices. Use it to activate licenses,
organize content, and upload files. Devices connect via a 6-digit code and are managed through the device bar.
Supported file types include DICOM, STL, OBJ, RXR, PDF, JPG, and MP4.
Device dashboard
Link’s device dashboard consists of the device bar and 7 sections: license management, datasets, RecordXR,
presets, transfer functions, upload and support.
Medicalholodeck Link Manual
What is Medicalholodeck Link
Medicalholodeck Link is a web dashboard for managing VR and PC devices. Use it to activate licenses,
organize content, and upload files. Devices connect via a 6-digit code and are managed through the device bar.
Supported file types include DICOM, STL, OBJ, RXR, PDF, JPG, and MP4.
Device dashboard
Link’s device dashboard consists of the device bar and 7 sections: license management, datasets, RecordXR,
presets, transfer functions, upload and support.
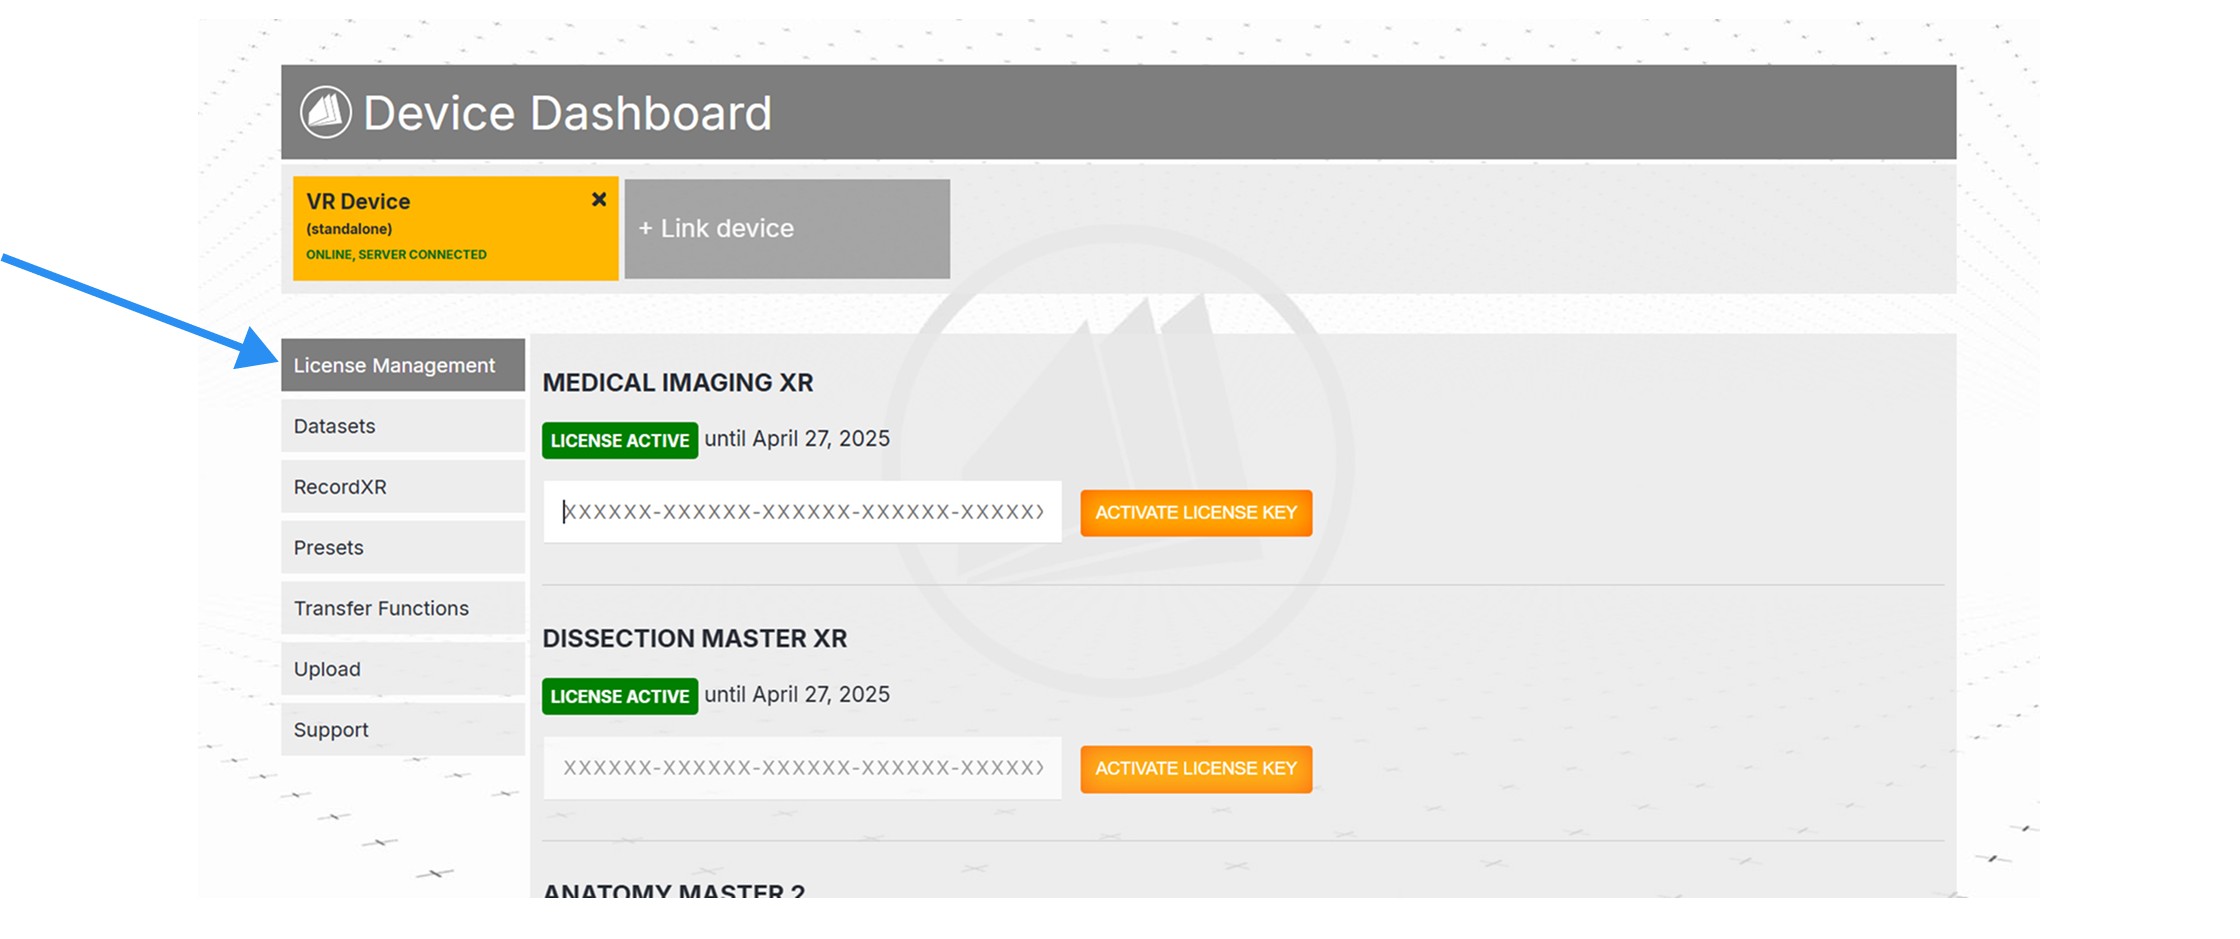
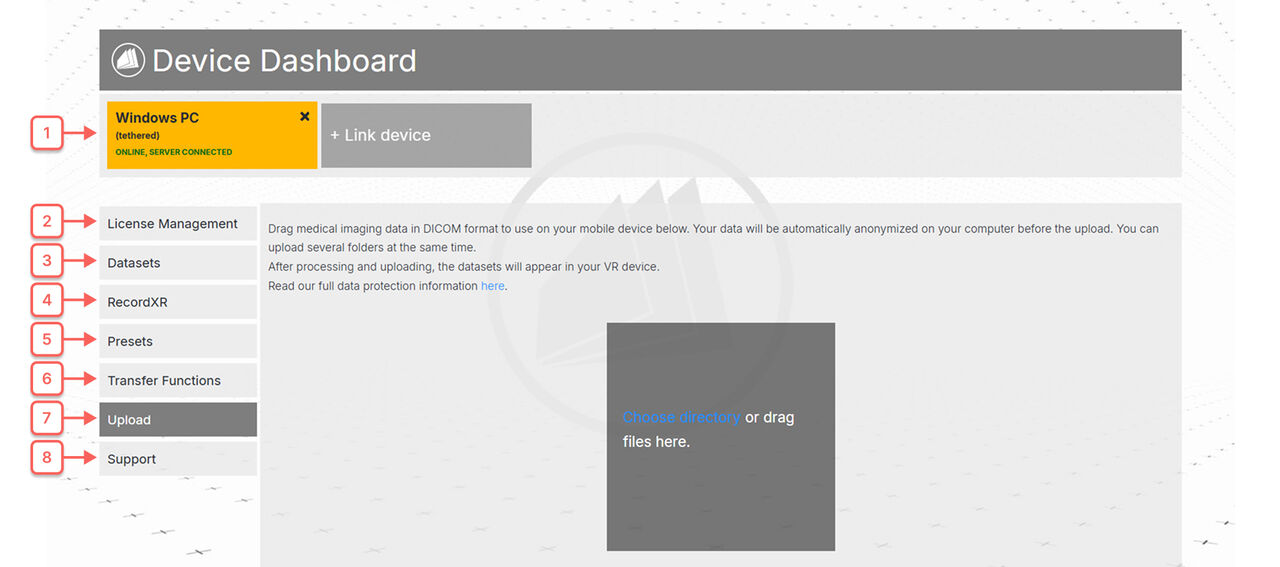 1. Device bar
Shows connected devices and their status. The active device is highlighted in yellow. Click another device to
switch control.
1. Device bar
Shows connected devices and their status. The active device is highlighted in yellow. Click another device to
switch control.
 1.1 Link a device
Connect your device using the 6 digit code. See here how to get/where to find the code.
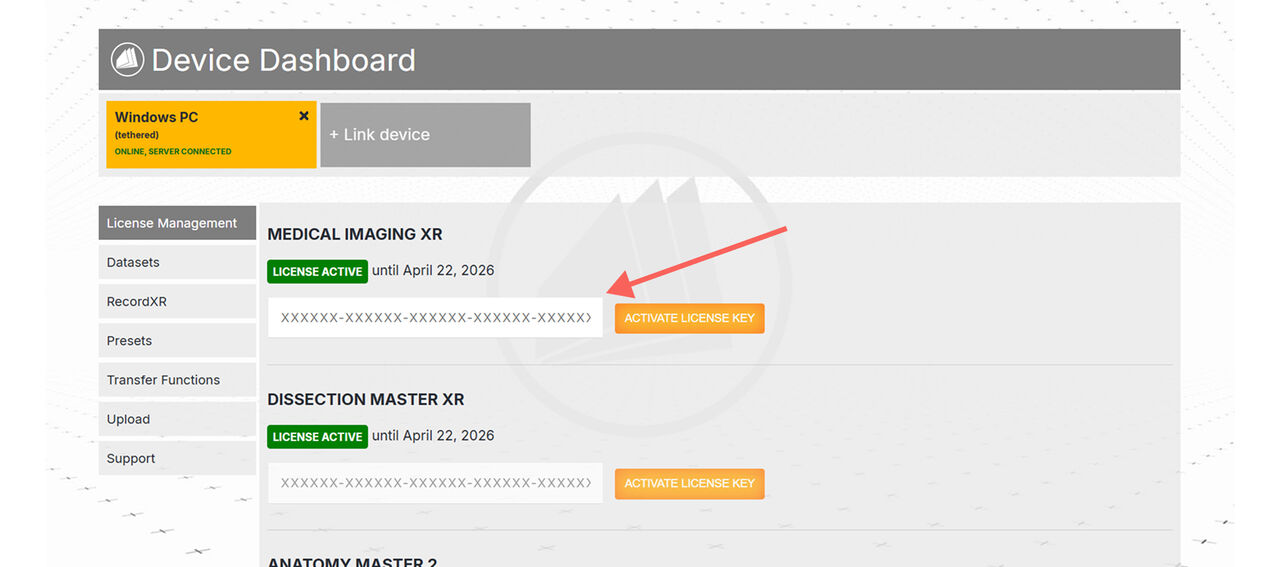
2. License management
Activate licenses by pasting your code you received by email into the field. Click the activate button. Works
for both VR headsets and PCs.
1.1 Link a device
Connect your device using the 6 digit code. See here how to get/where to find the code.
2. License management
Activate licenses by pasting your code you received by email into the field. Click the activate button. Works
for both VR headsets and PCs.
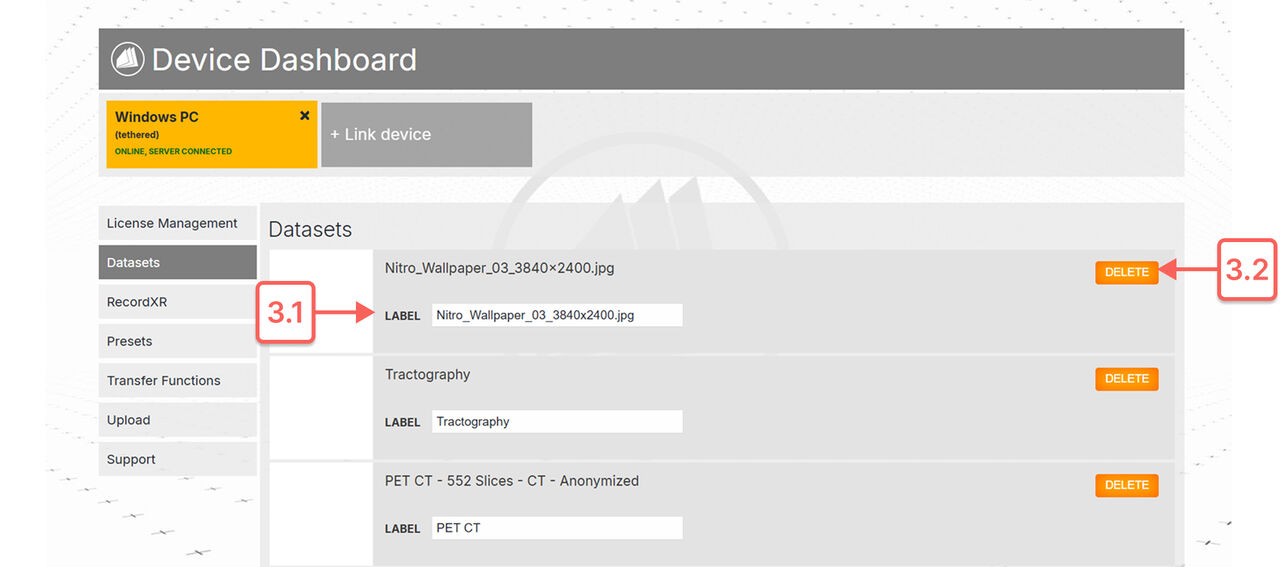
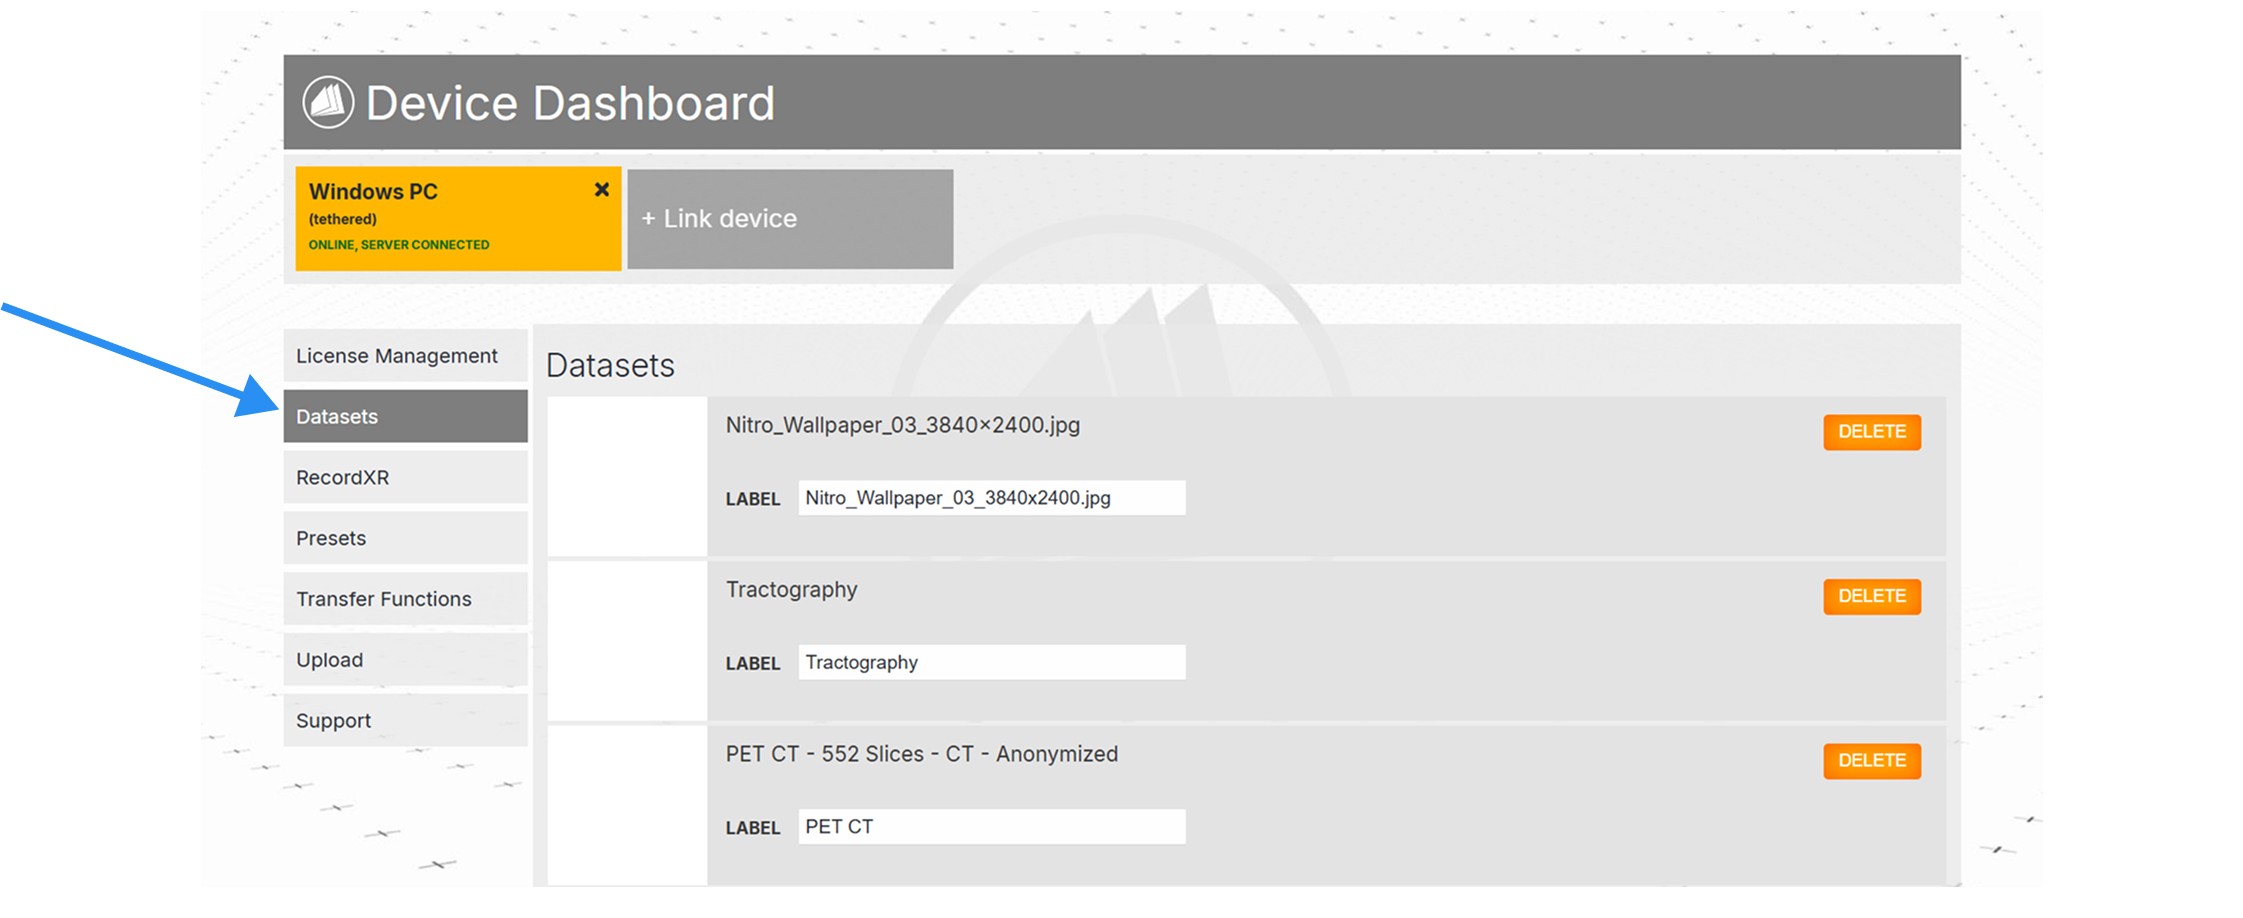
 3. Datasets
Displays datasets saved on the connected device.
3. Datasets
Displays datasets saved on the connected device.
 How to use Medicalholodeck Link
What is Medicalholodeck Link?
Medicalholodeck Link is a web dashboard for managing VR and PC
devices. Use it to activate licenses, organize content, and upload
files. Devices connect via a 6-digit code and are managed through the
device bar. Supported file types include DICOM, STL, OBJ, RXR, PDF, JPG,
and MP4.
How to add your device
1. Open Medicalholodeck, navigate to the
Medical Imaging XR section and press the
import data button.
How to use Medicalholodeck Link
What is Medicalholodeck Link?
Medicalholodeck Link is a web dashboard for managing VR and PC
devices. Use it to activate licenses, organize content, and upload
files. Devices connect via a 6-digit code and are managed through the
device bar. Supported file types include DICOM, STL, OBJ, RXR, PDF, JPG,
and MP4.
How to add your device
1. Open Medicalholodeck, navigate to the
Medical Imaging XR section and press the
import data button.
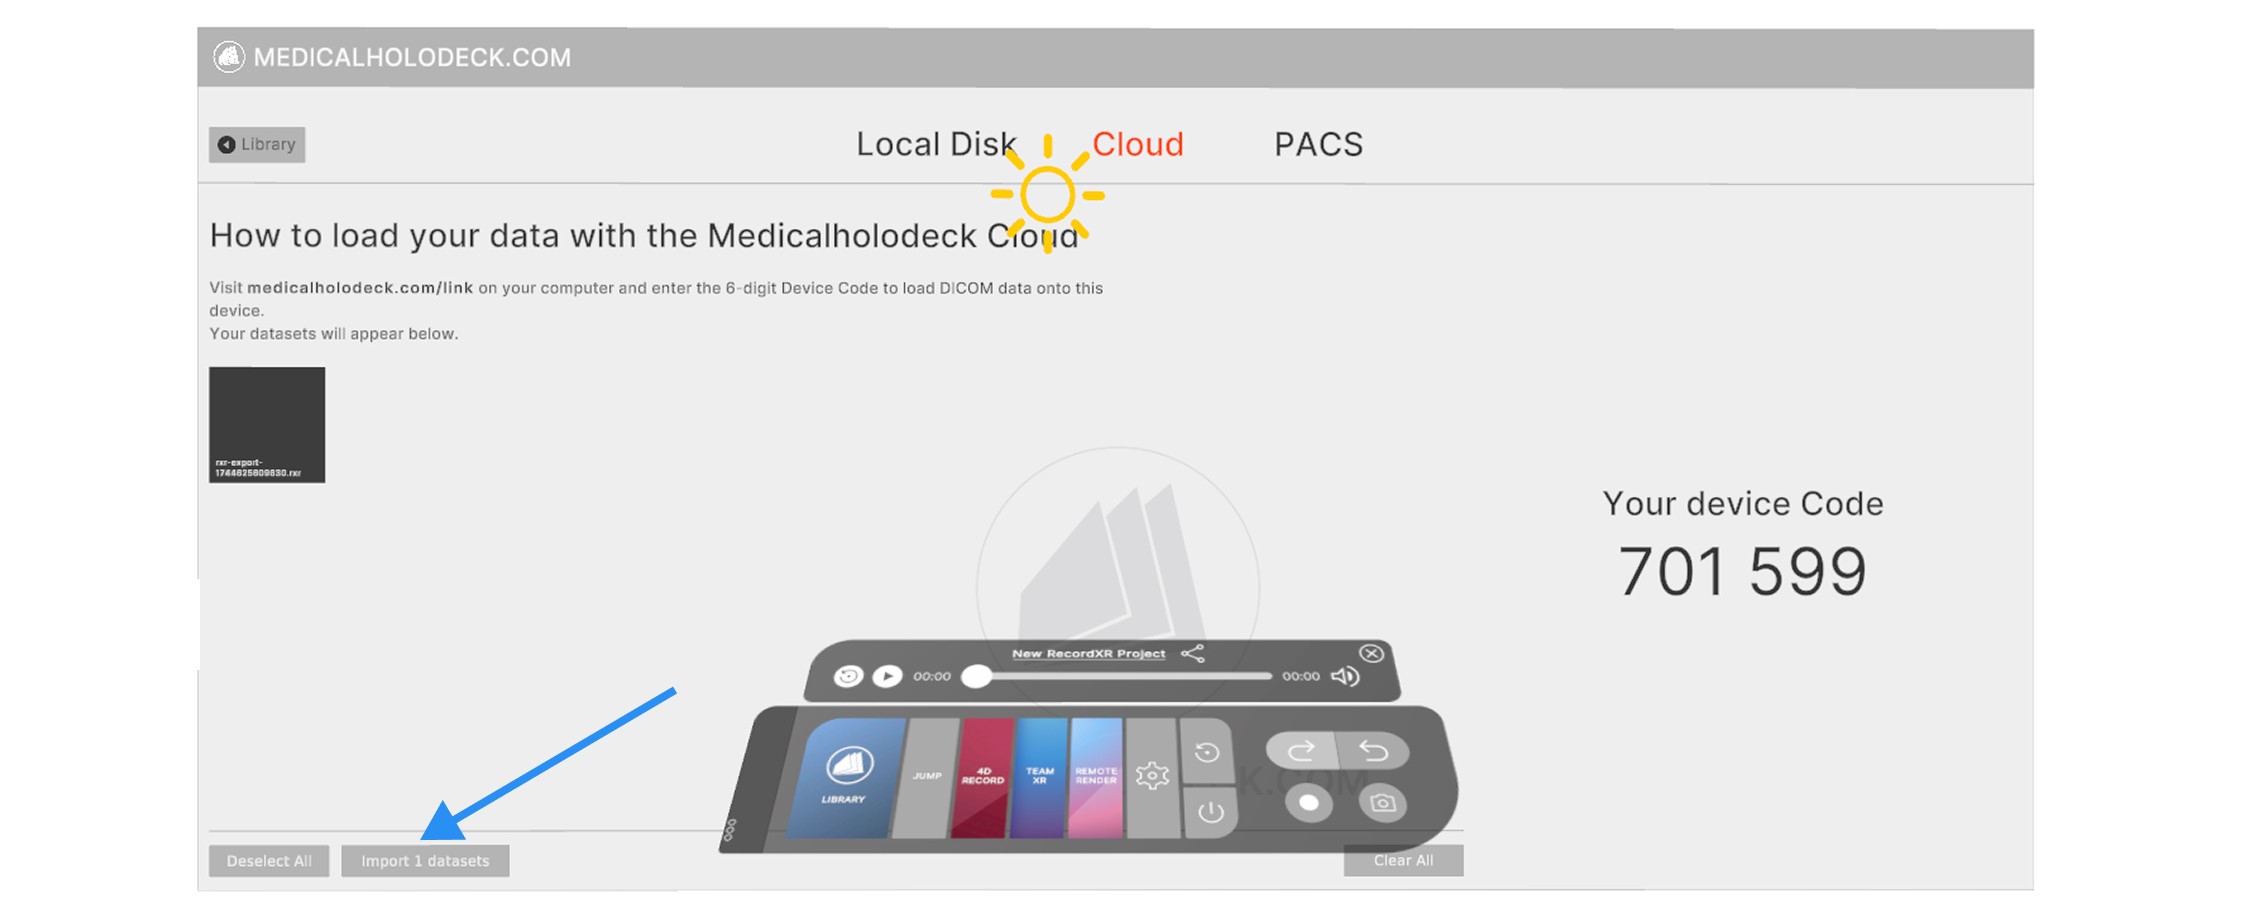
 2. Click the cloud tab and find your device number on the right side.
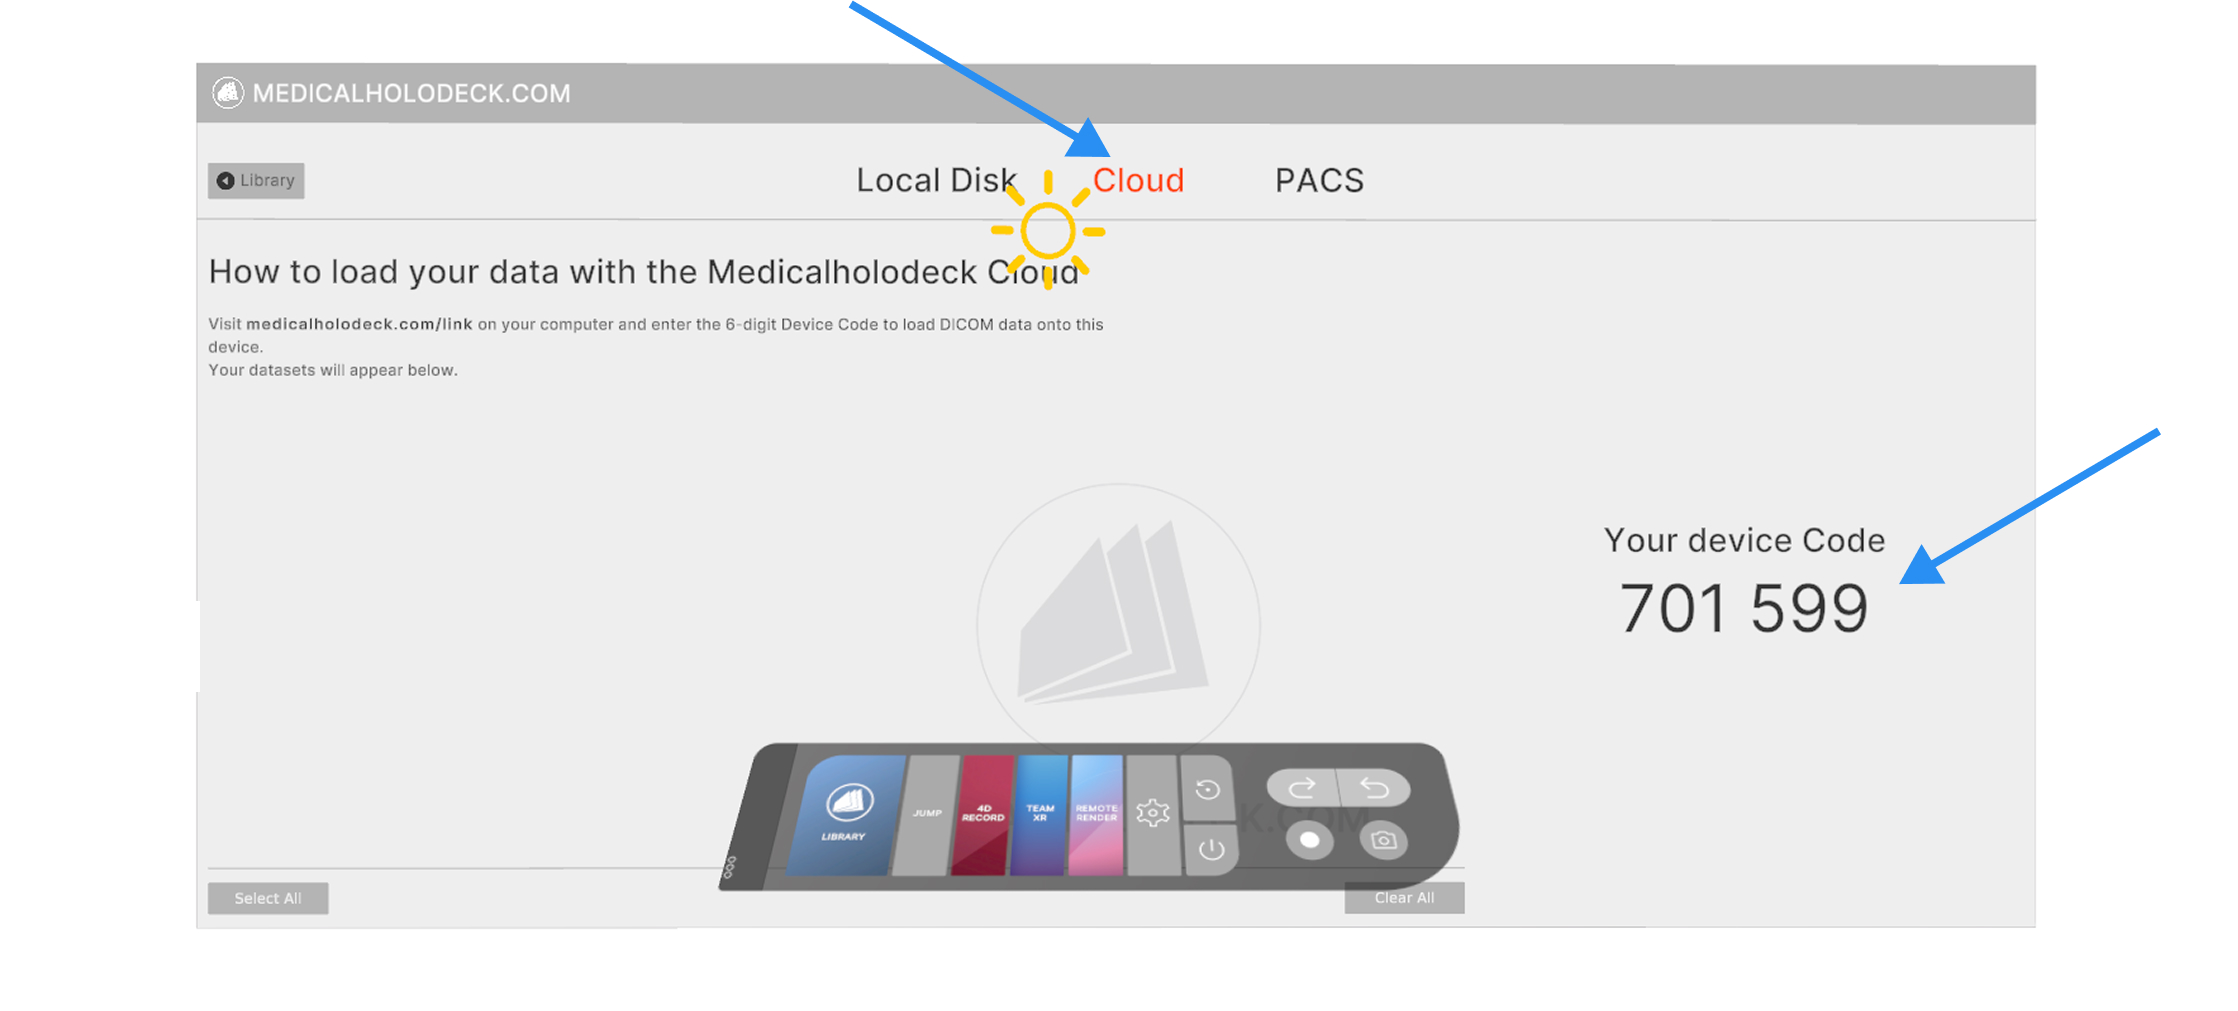 3. Visit
medicalholodeck.com/link
on your computer and enter the 6 digit code.
3. Visit
medicalholodeck.com/link
on your computer and enter the 6 digit code.
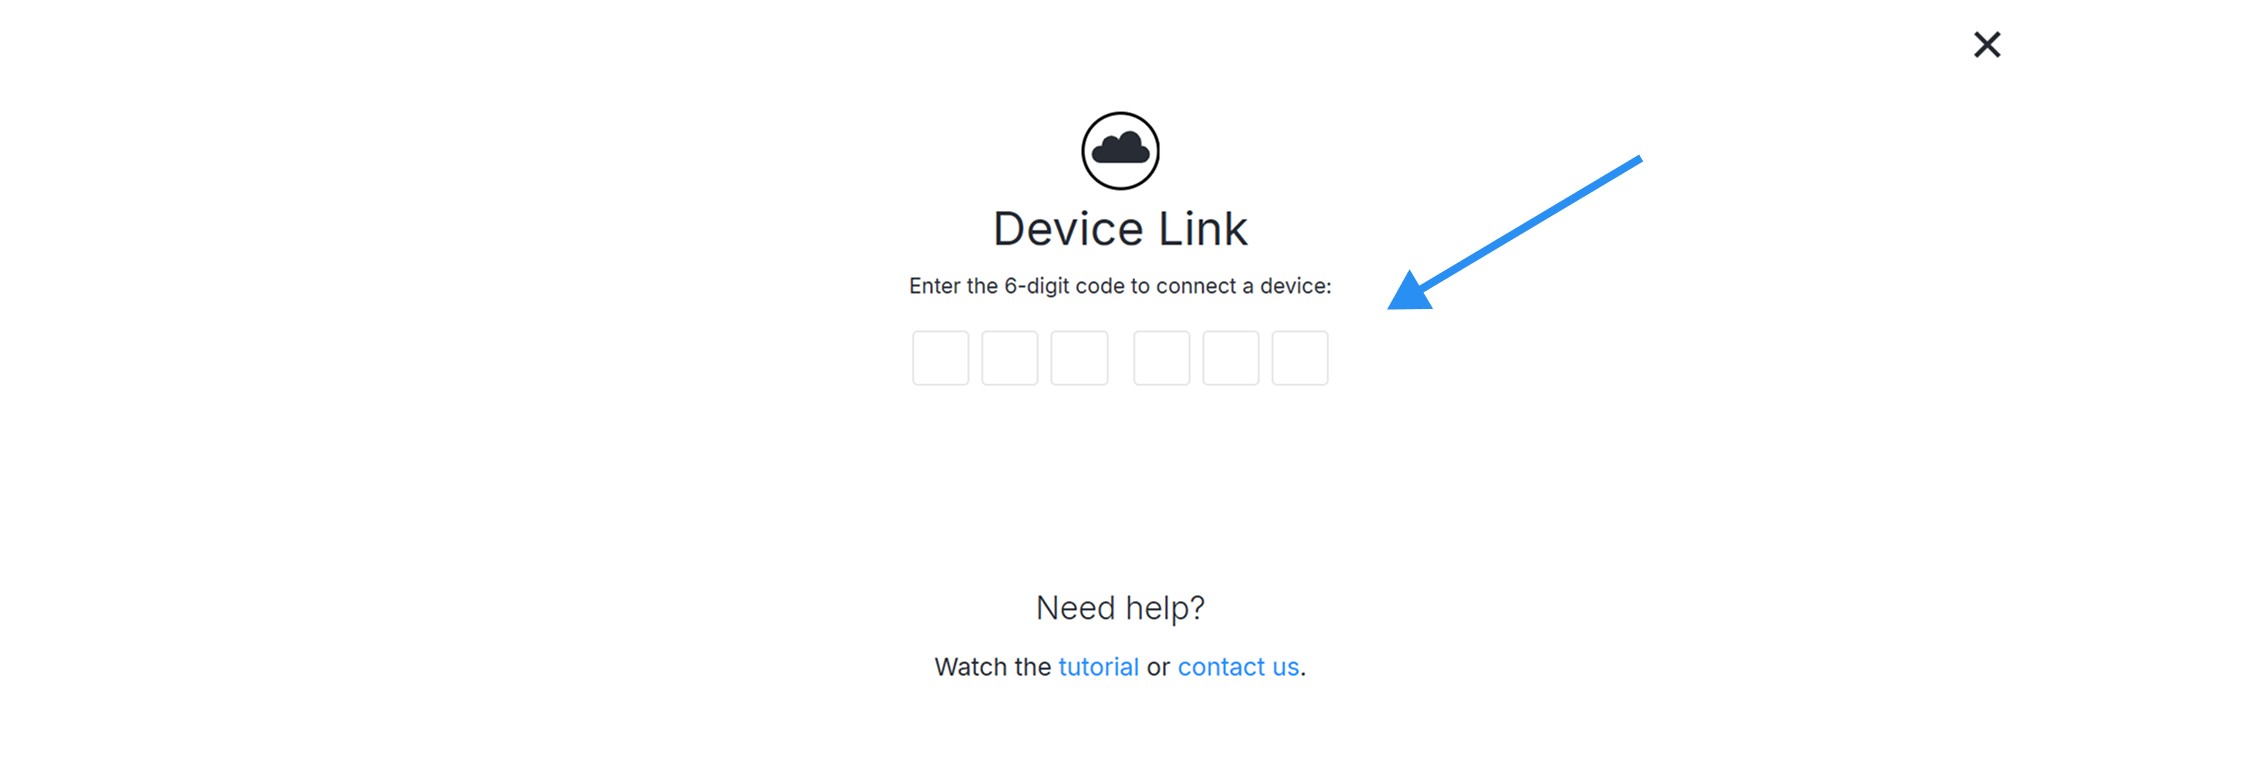 If you're on the Device Dashboard page, click +link device. A window
will appear where you can enter the 6-digit code.
If you're on the Device Dashboard page, click +link device. A window
will appear where you can enter the 6-digit code.
 Please note that multiple devices can be connected simultaneously, but
the device dashboard will operate only on the selected device.
Activating a license via Link
1. Connect your device to Link. See here how
to link your device.
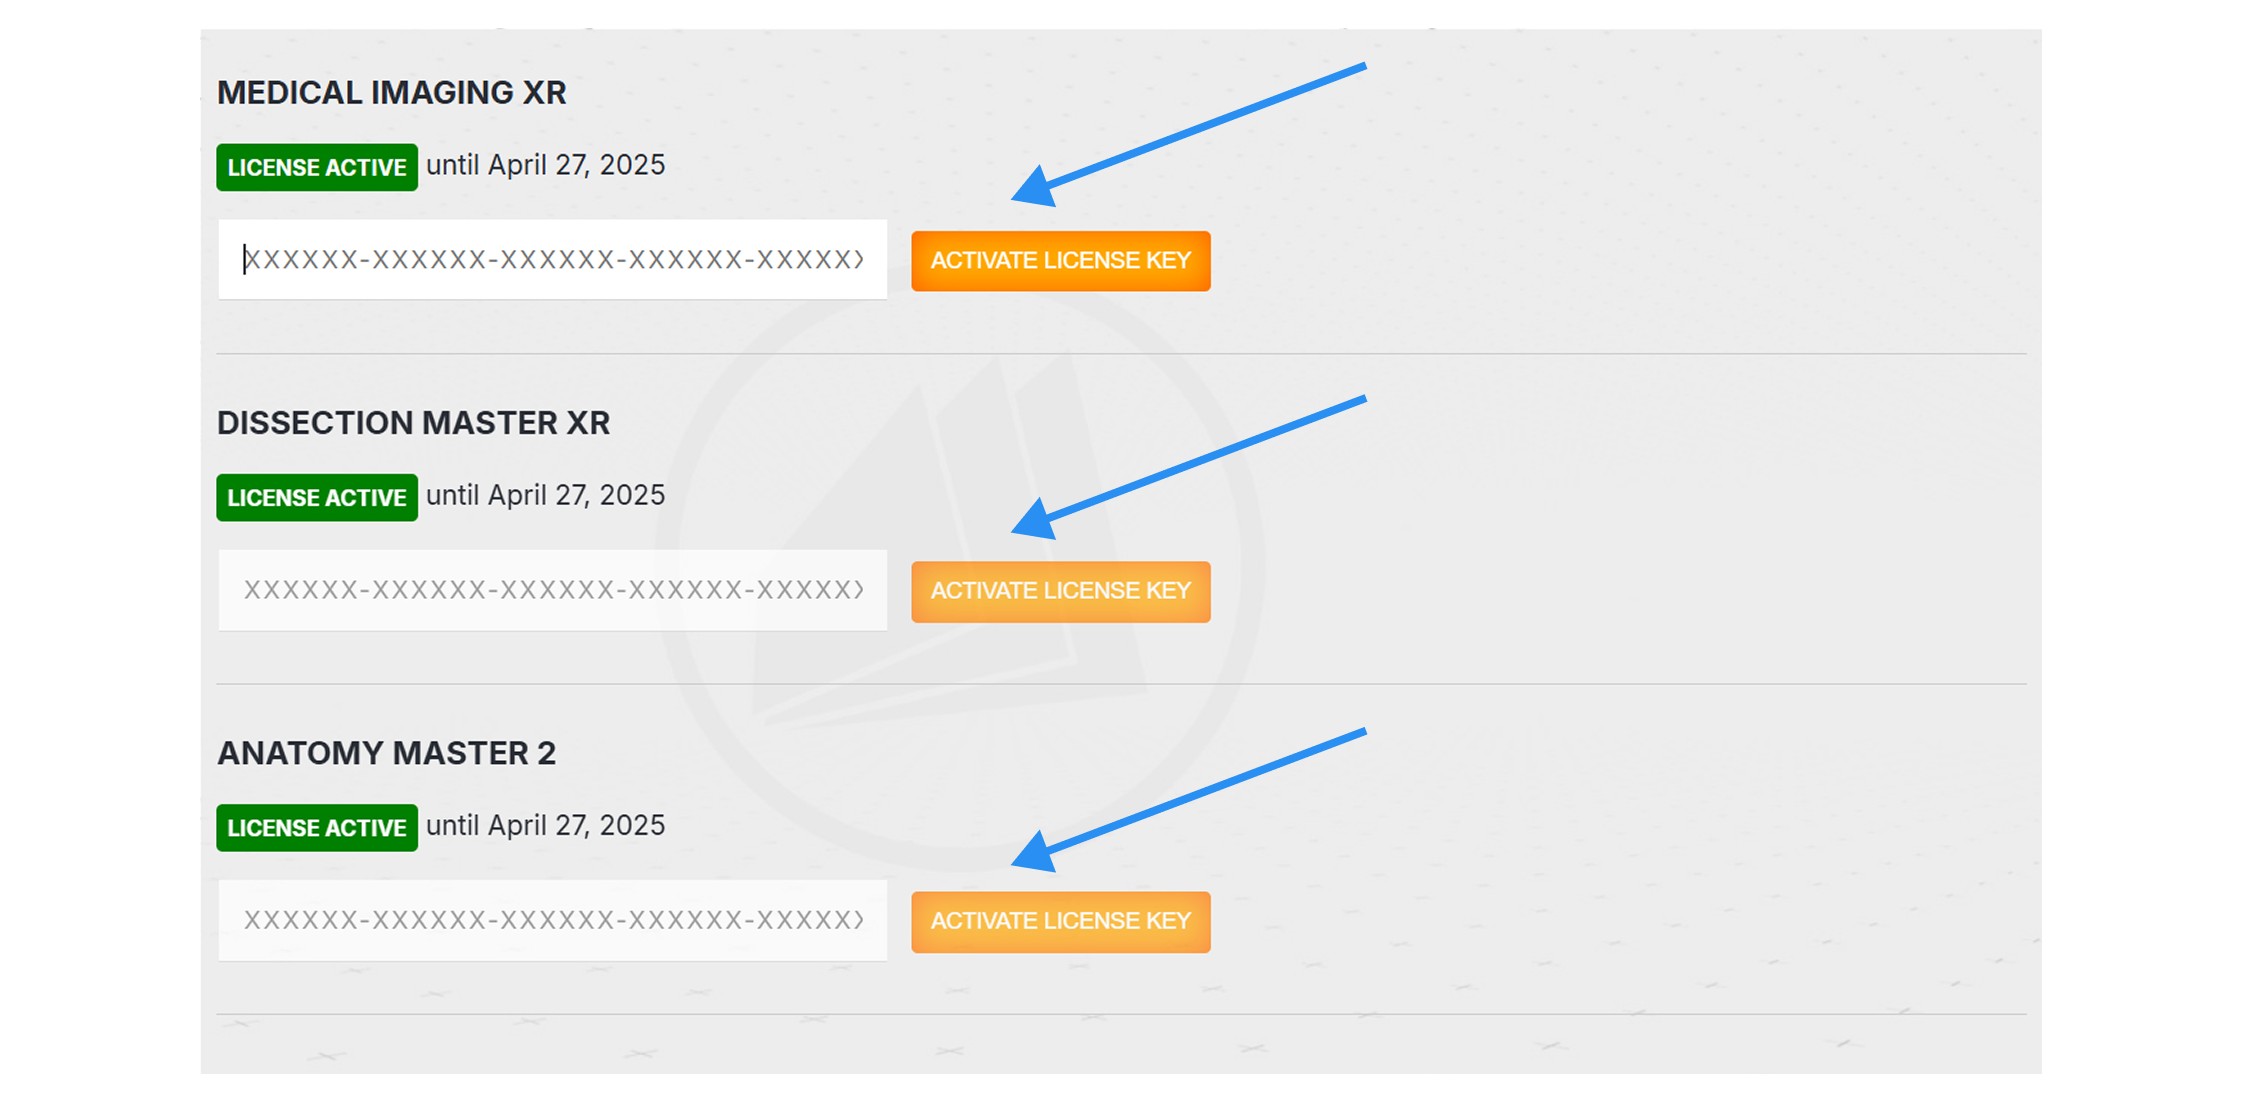
2. On the dashboard navigate to the license management section.
Please note that multiple devices can be connected simultaneously, but
the device dashboard will operate only on the selected device.
Activating a license via Link
1. Connect your device to Link. See here how
to link your device.
2. On the dashboard navigate to the license management section.
 3. Enter the license keys in the appropriate fields and press the
activate button.
3. Enter the license keys in the appropriate fields and press the
activate button.
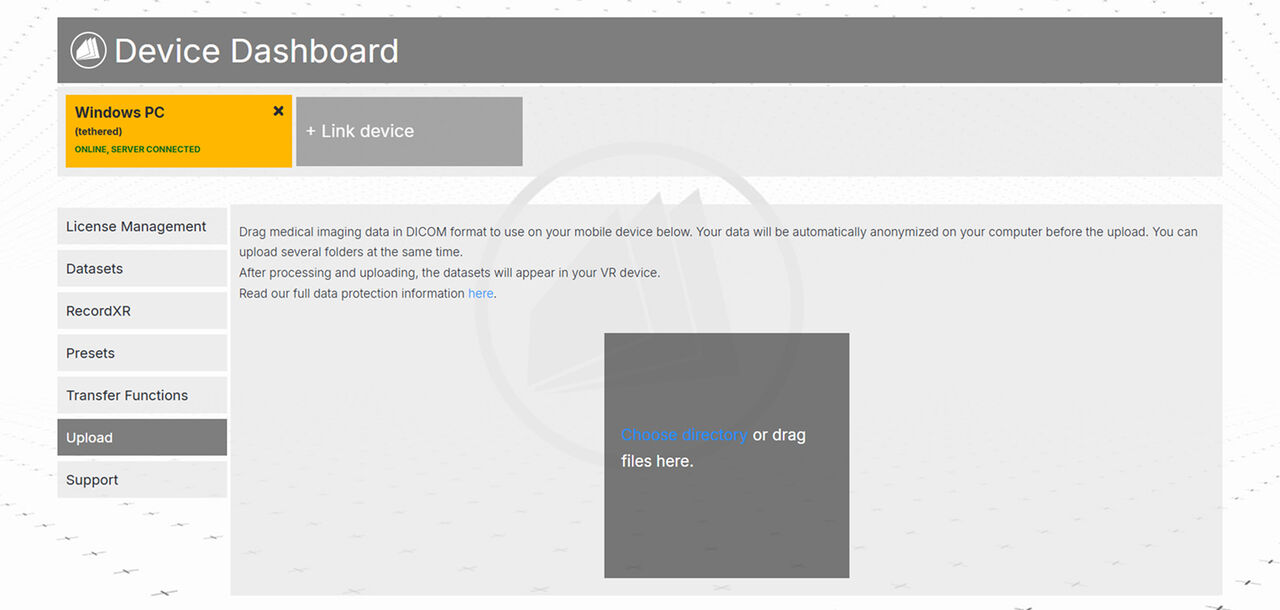
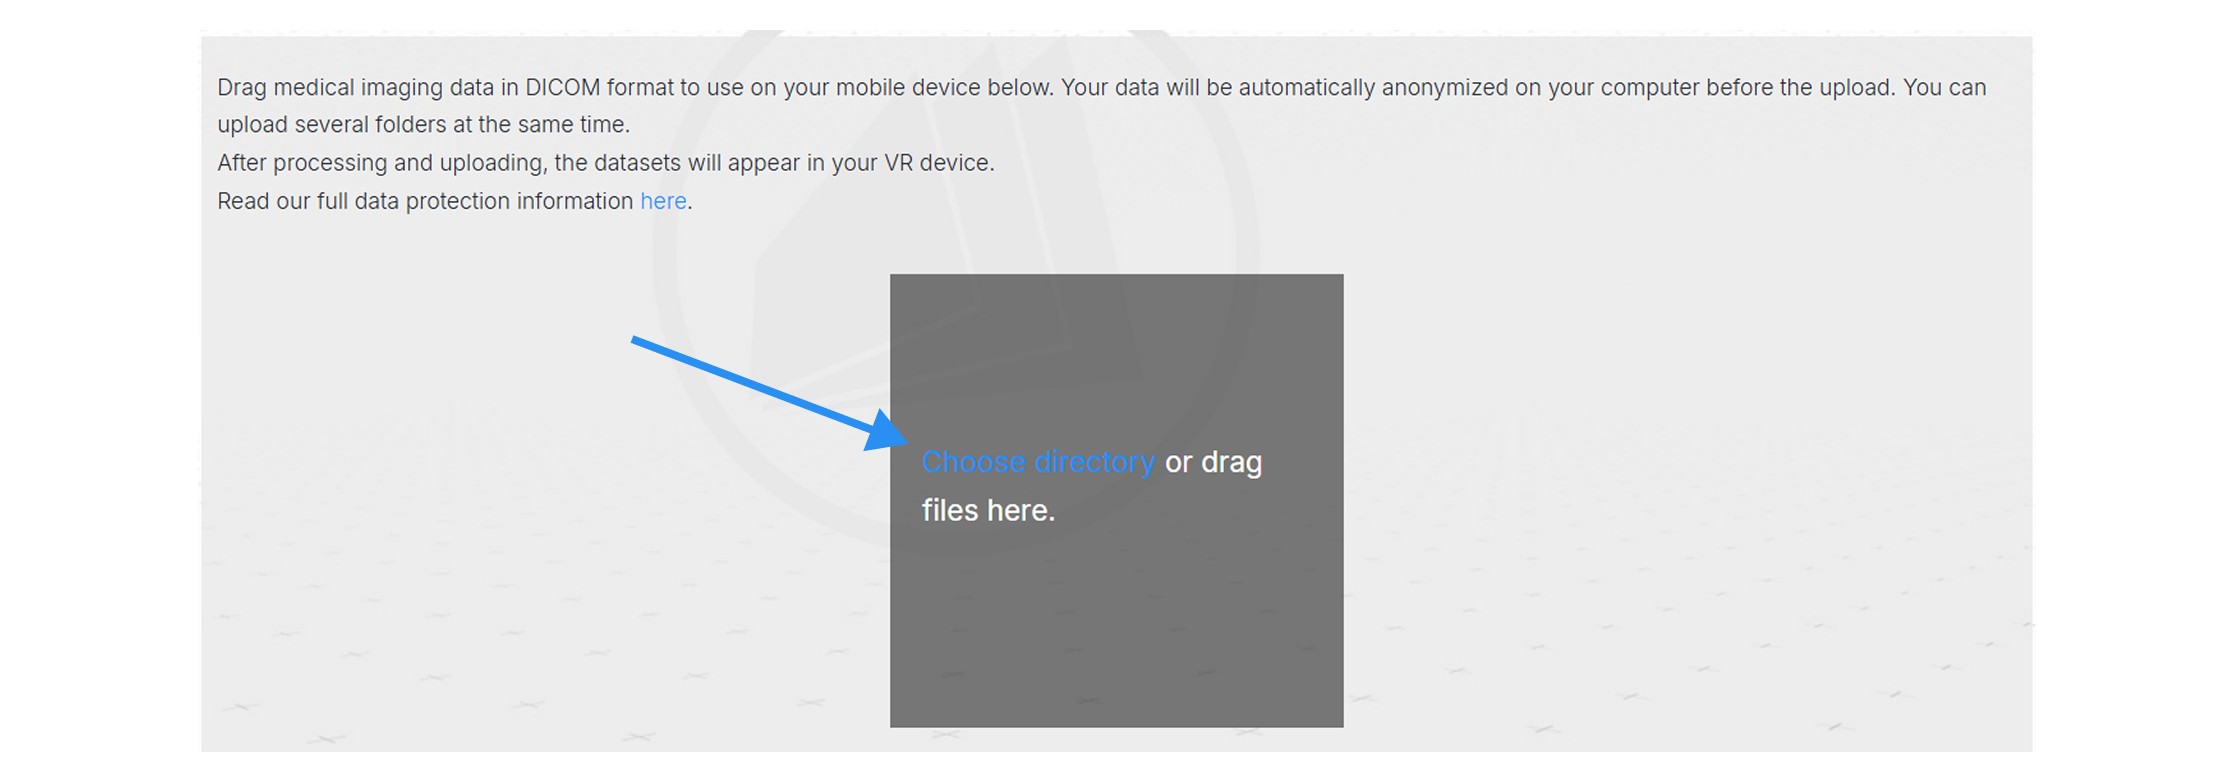
 Uploading data from your computer to your headset
1. Connect your device to Link. See here how
to link your device.
2. On the dashboard navigate to the upload section.
Uploading data from your computer to your headset
1. Connect your device to Link. See here how
to link your device.
2. On the dashboard navigate to the upload section.
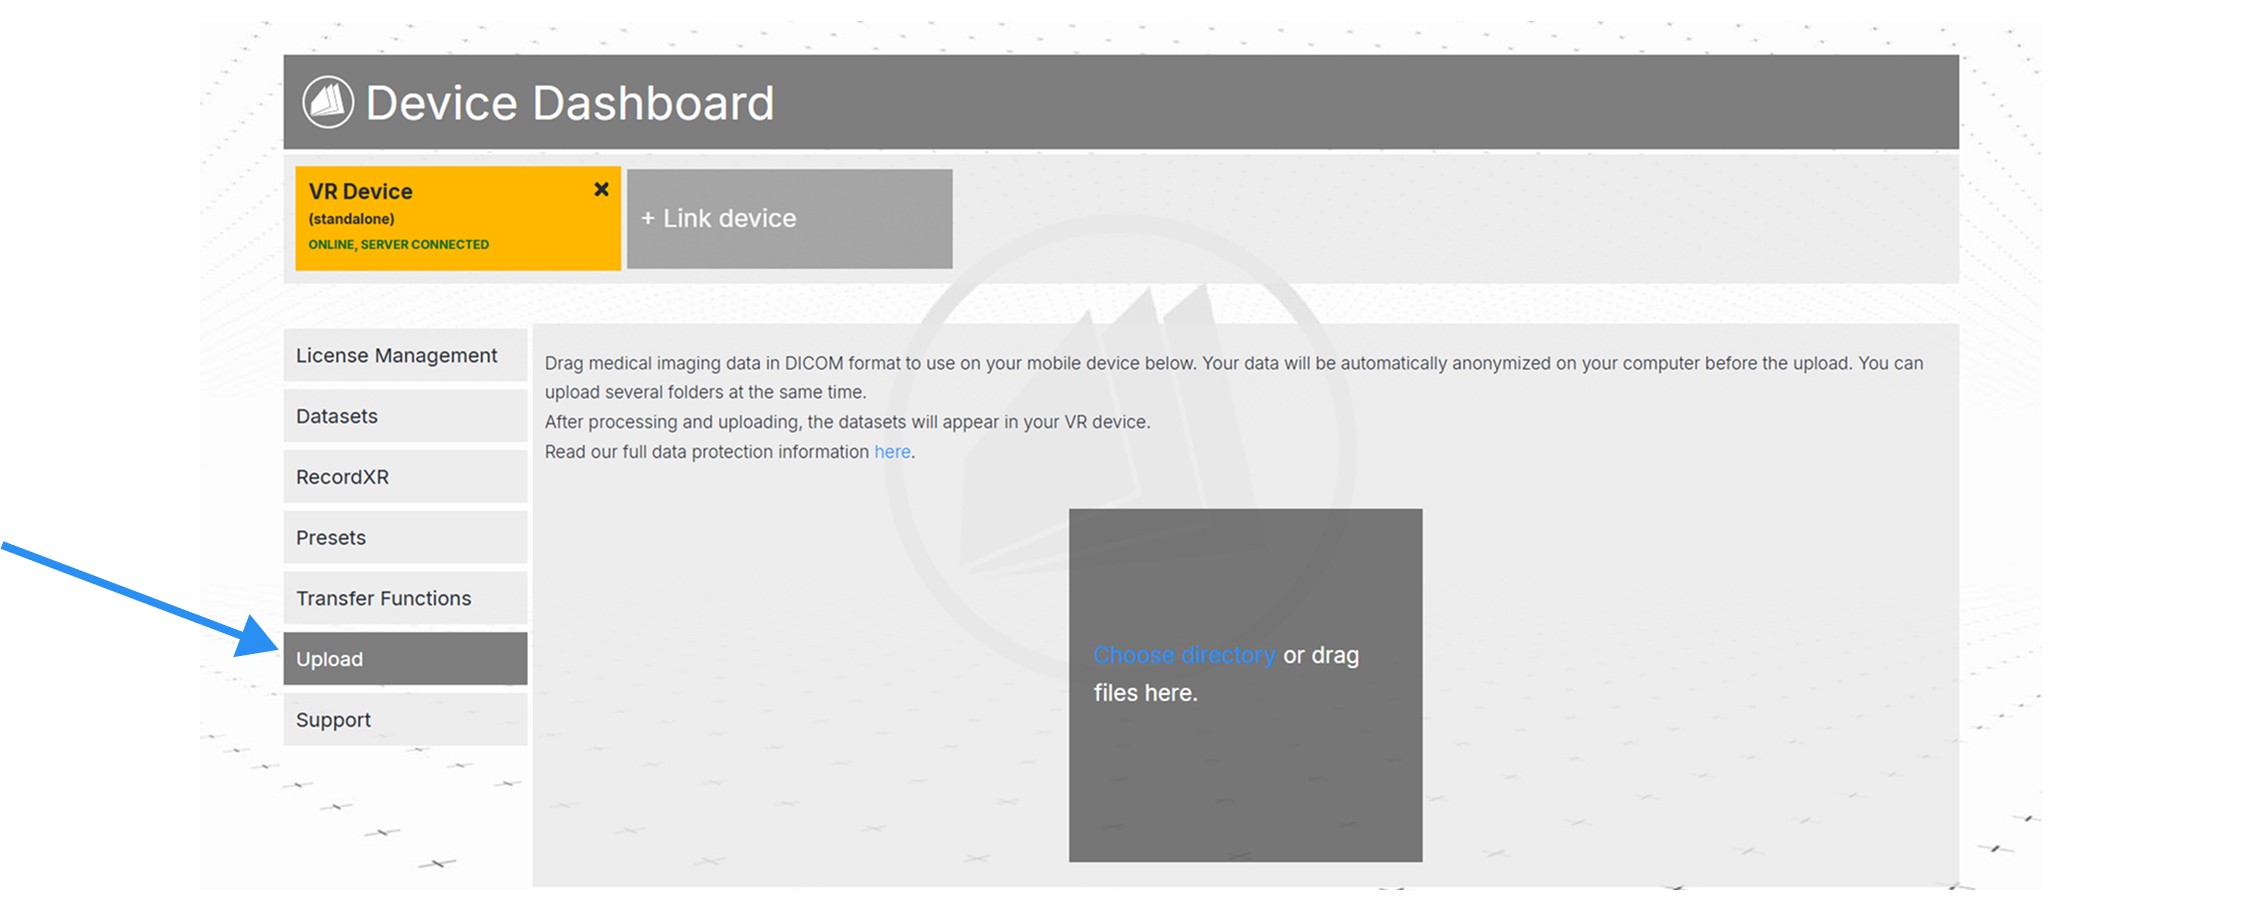 3. Drop the file in the designated section or click
choose directory to load from your computer.
3. Drop the file in the designated section or click
choose directory to load from your computer.
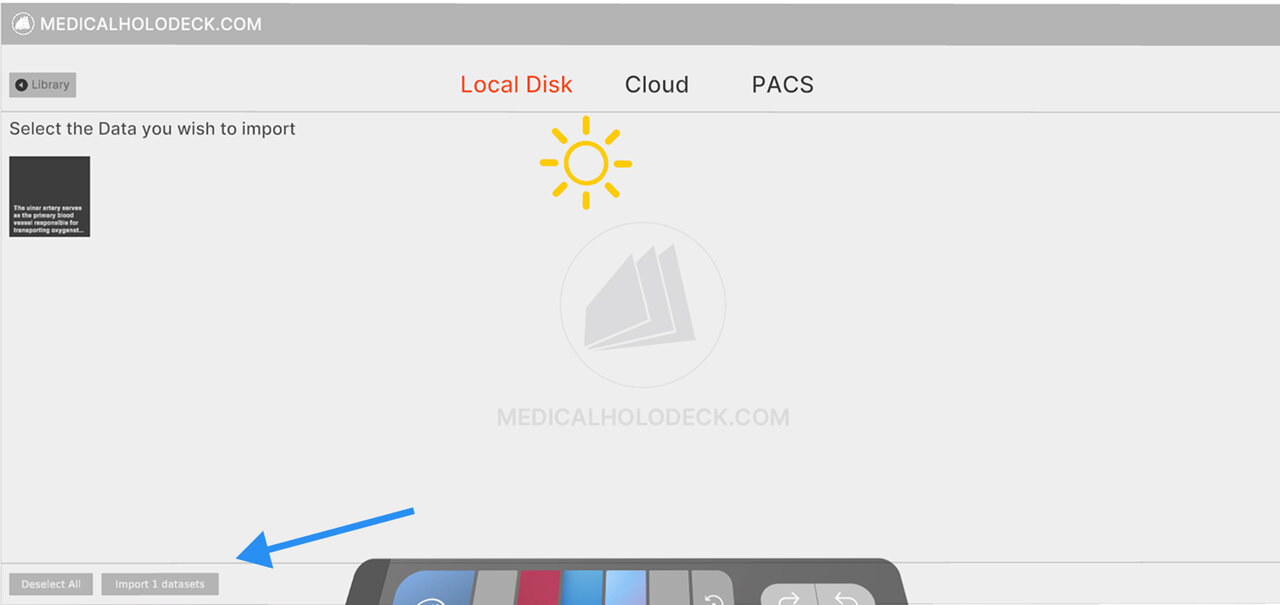
 4. To complete the process, continue in your headset.
5. Select the data you wish to import or click on the
select all
button.
6. Then click the import datasets button.
4. To complete the process, continue in your headset.
5. Select the data you wish to import or click on the
select all
button.
6. Then click the import datasets button.
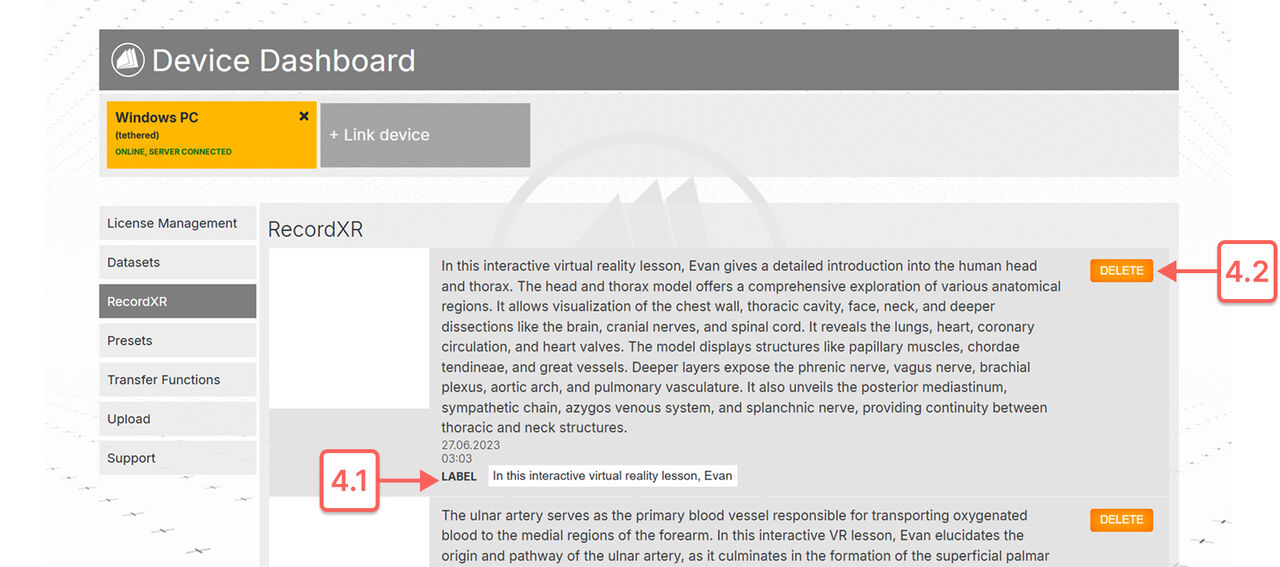
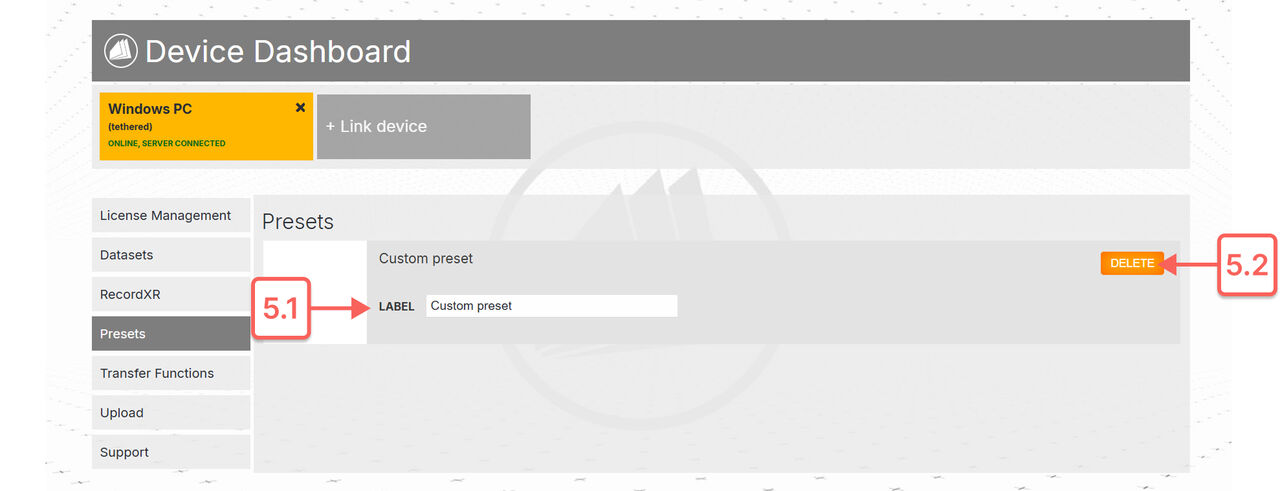
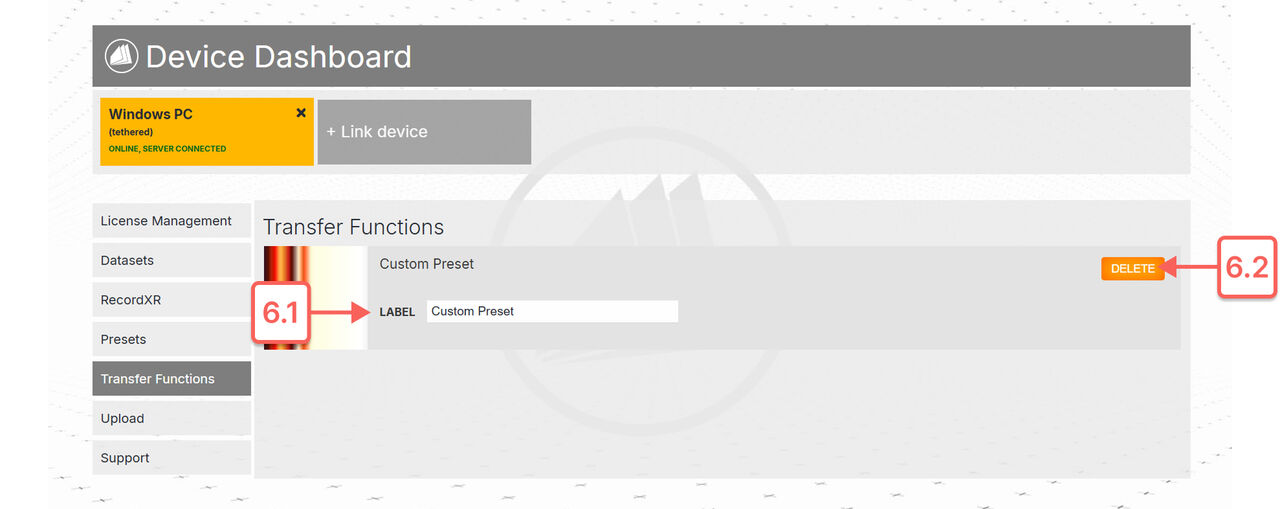
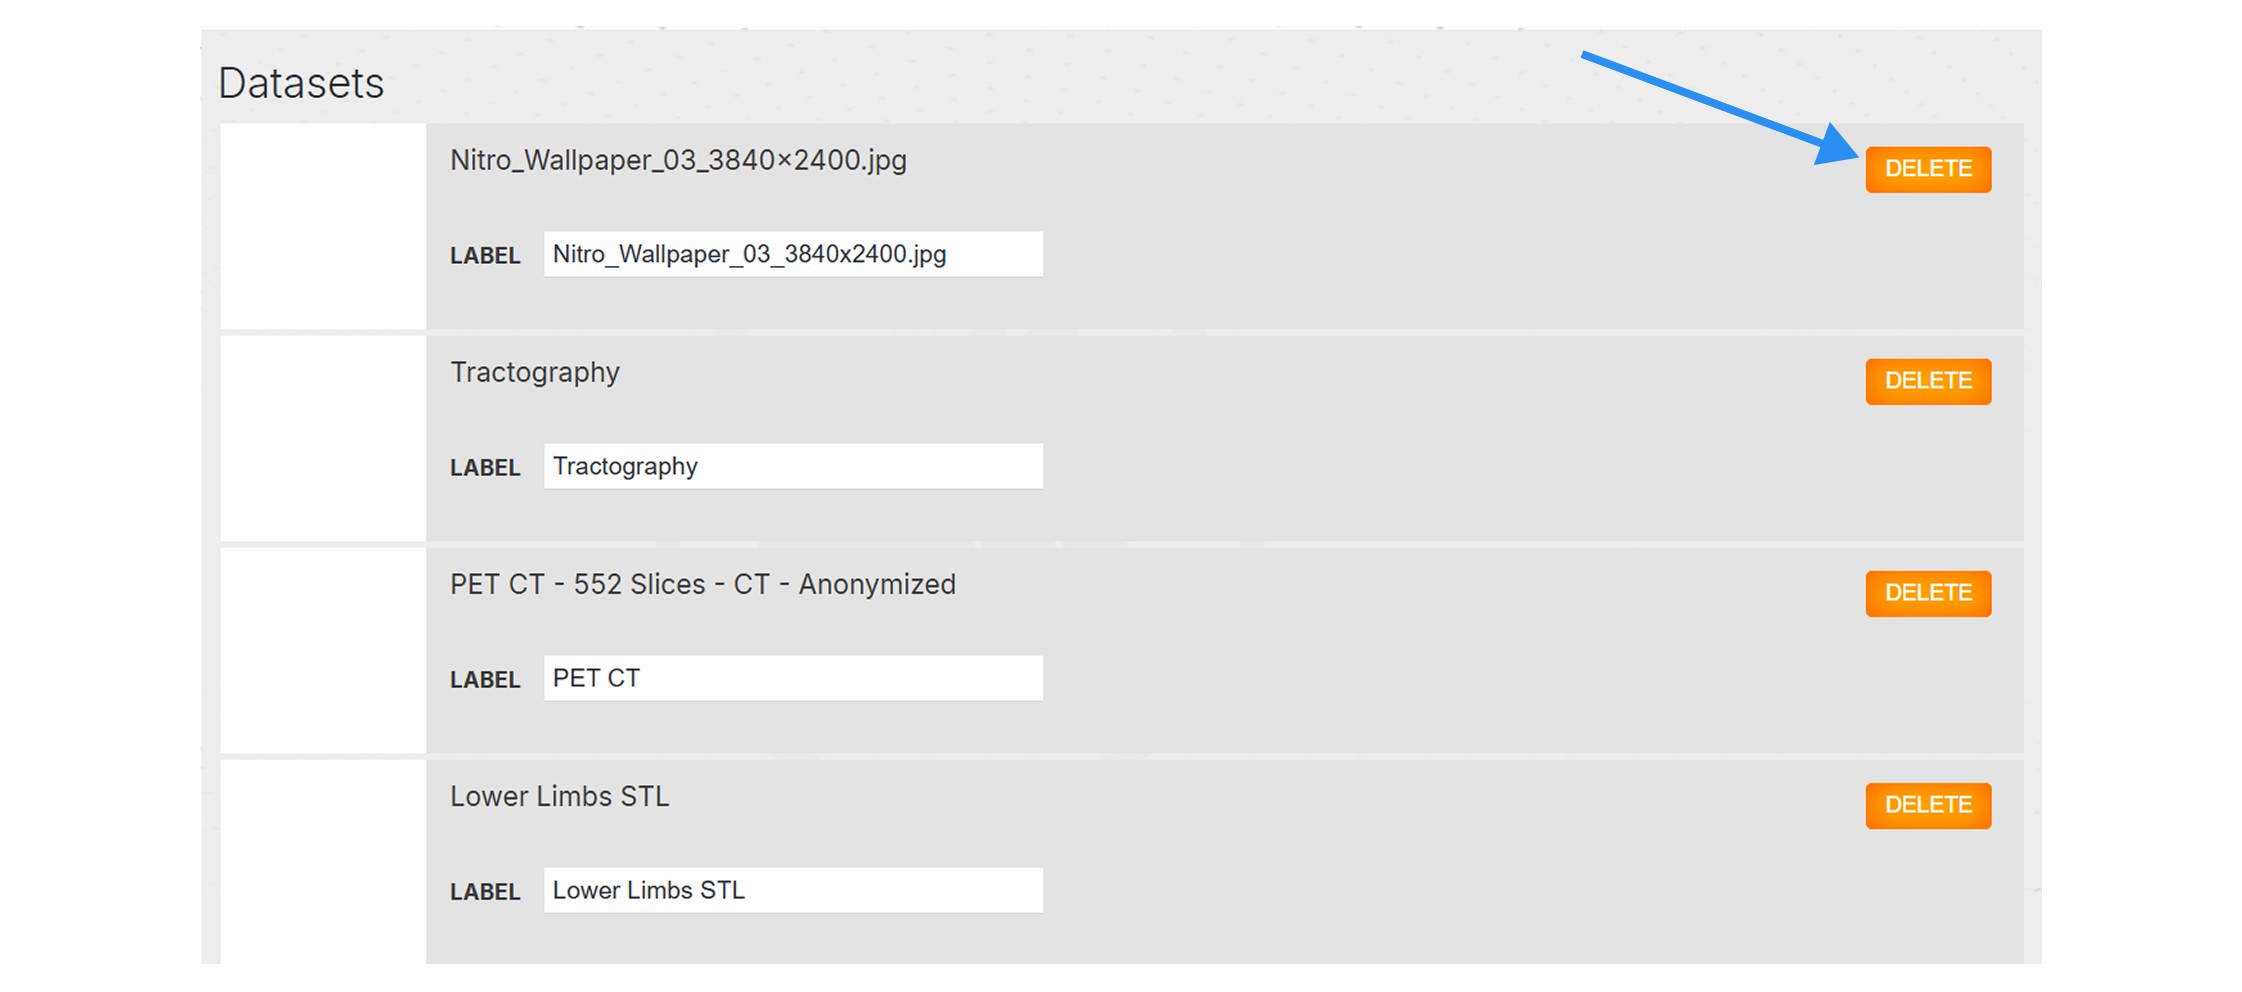
 Accessing files via Link
You can edit metadata for datasets, RXR recordings, presets, and
transfer functions. You can also remove files from here.
1. Connect your device to Link. See here how
to link your device.
2. On the dashboard navigate to the datasets.
Accessing files via Link
You can edit metadata for datasets, RXR recordings, presets, and
transfer functions. You can also remove files from here.
1. Connect your device to Link. See here how
to link your device.
2. On the dashboard navigate to the datasets.
 3. You can edit the file feature in the text field named label. In case
of datasets - name.
3. You can edit the file feature in the text field named label. In case
of datasets - name.
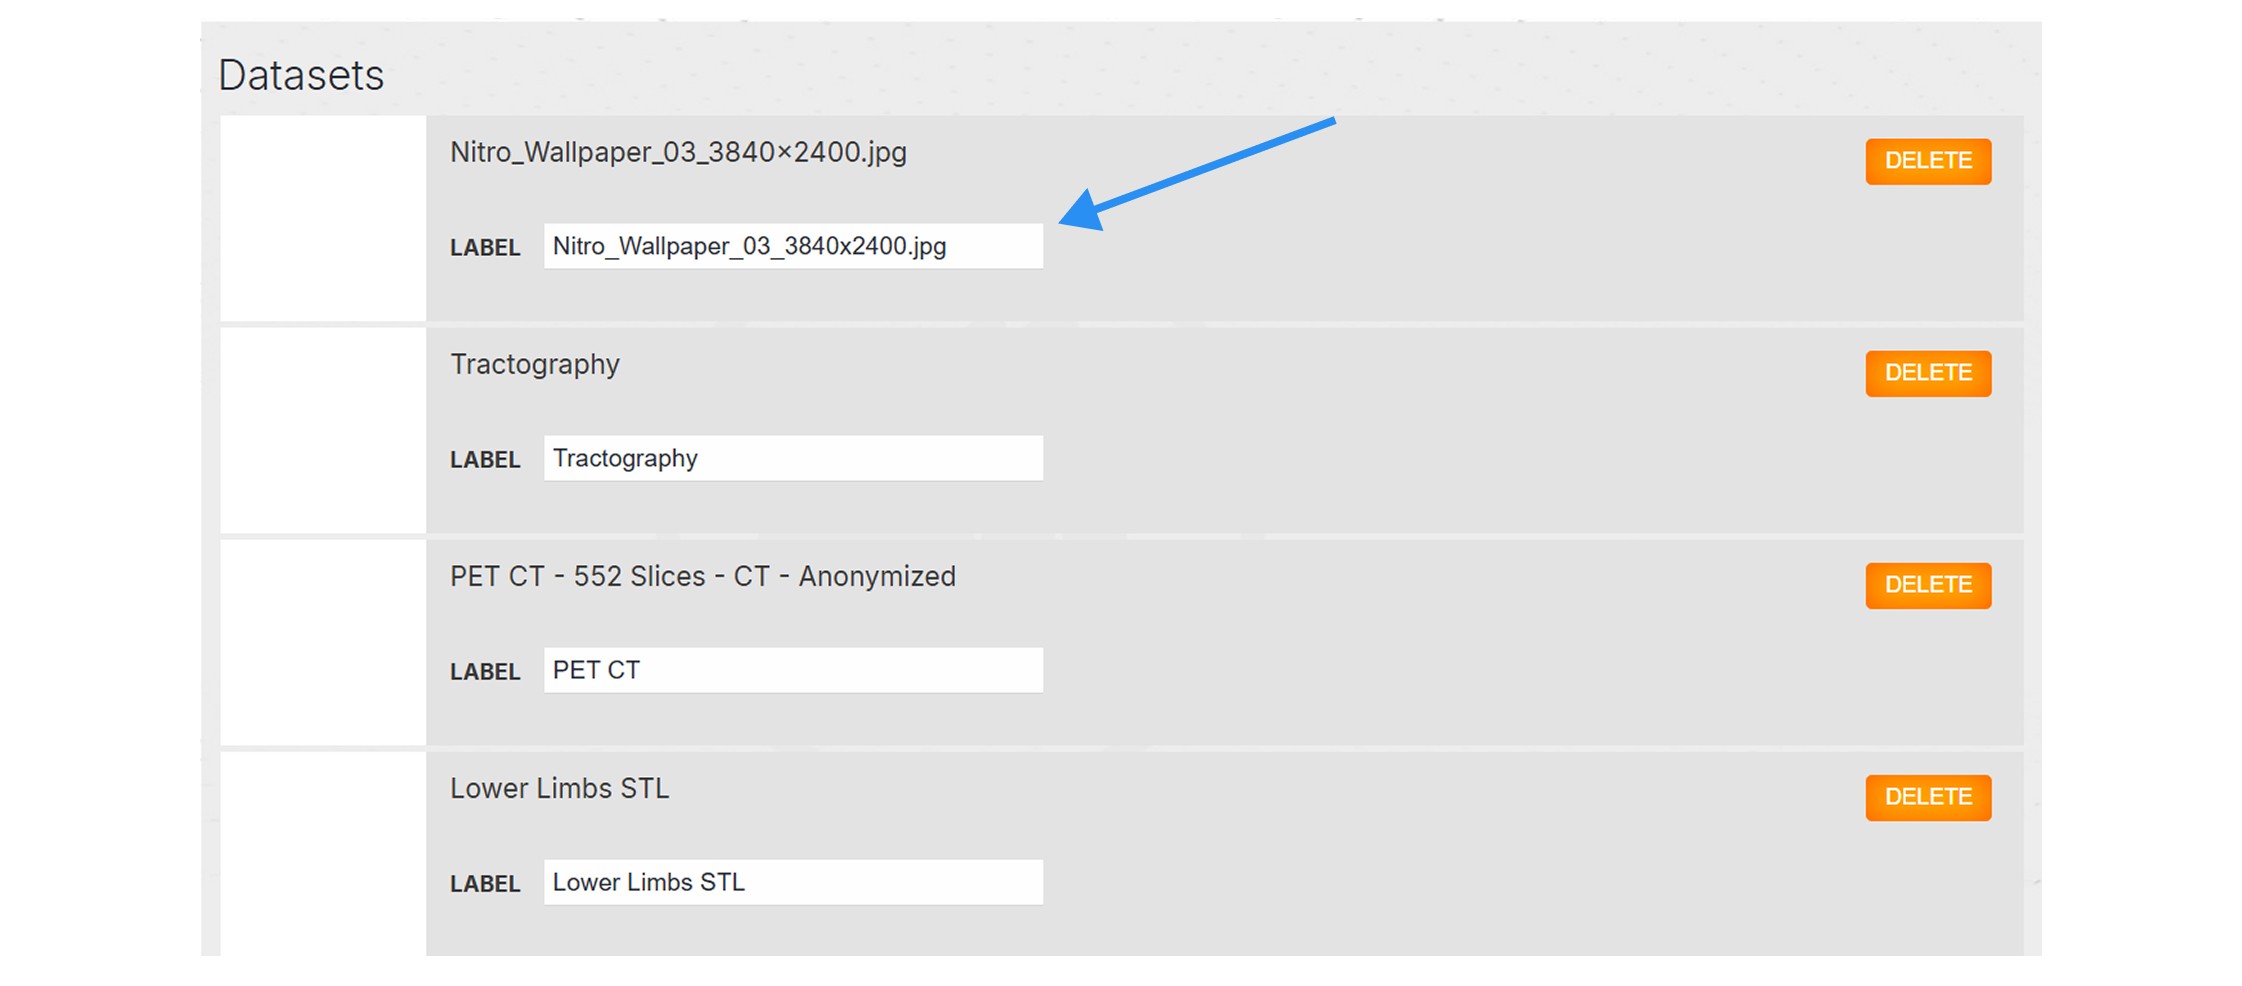 4. To delete a file press the delete button on the right.
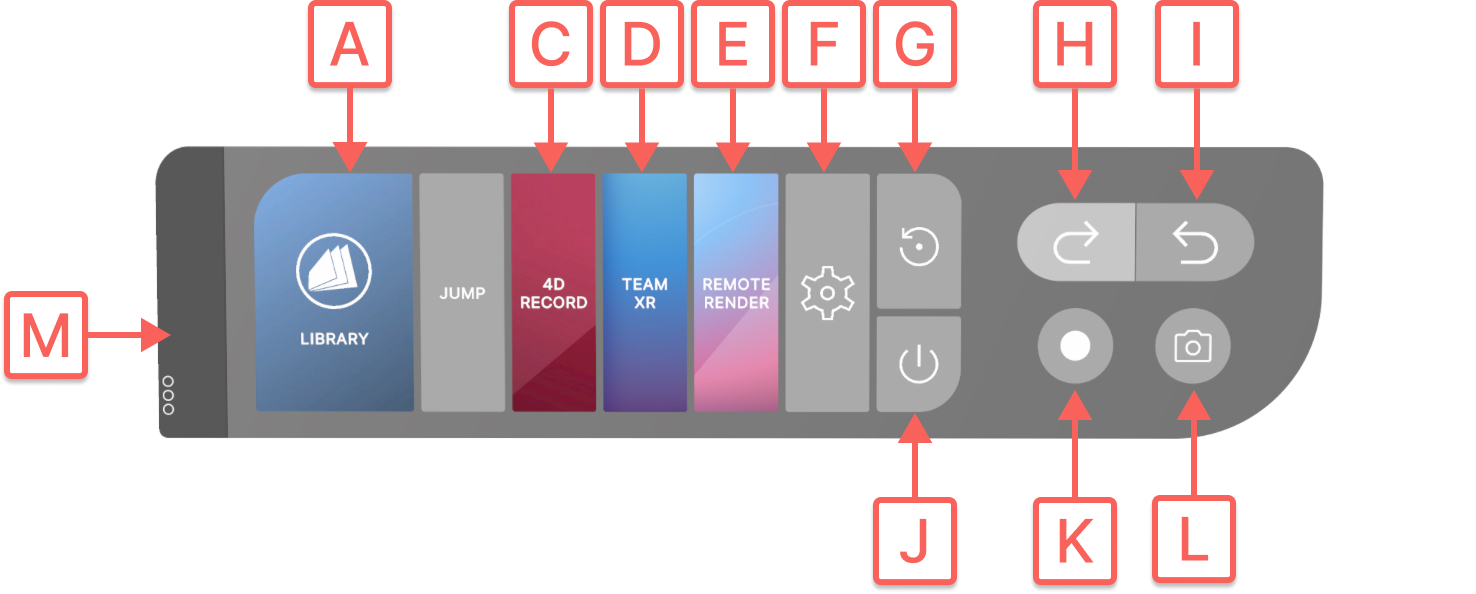
A
Library
Select this button with the trigger to toggle the library's visibility. B Jump
Enables movement in the workspace. Select with the trigger, then point to your desired location. Select again to disable the function. C 4D Record
Creates immersive VR recordings. Select it with the trigger to start recording and again to stop. The recording will then appear in the RecordXR section of the library. D Team XR
Opens TeamXR settings. Select with the trigger to start, join, or manage a VR session. E Remote Render
Launches the rendering environment. Requires a separate app and currently supports only standalone VR headsets. F Settings
Opens Medicalholodeck’s settings. G Reset workspace
Clears all models and data from the workspaces. H Undo
Reverts your last action in the VR environment. Press repeatedly with the trigger to undo multiple actions in order. I Redo
Restores previously undone actions. Press repeatedly with the trigger to redo multiple actions in order. J Exit
Closes the application. Press it with the trigger to exit. K Capture a movie
Records your VR experience. Press it with the trigger to start and again to stop. The video will be saved to your desktop. Only active on the PC-VR mode. In standalone mode, press the Oculus button and open the camera icon from the menu. Then select “Record Video” or “Take Photo.” L Take a photo
Captures an image of your VR experience. Press it with the trigger to take a photo. The screenshot will be saved to your desktop. Only active on the PC-VR mode. In standalone mode, press the Oculus button and open the camera icon from the menu. Then select “Record Video” or “Take Photo.” M Handle
Repositions the panel. Select it with trigger and release to set it to a new position.
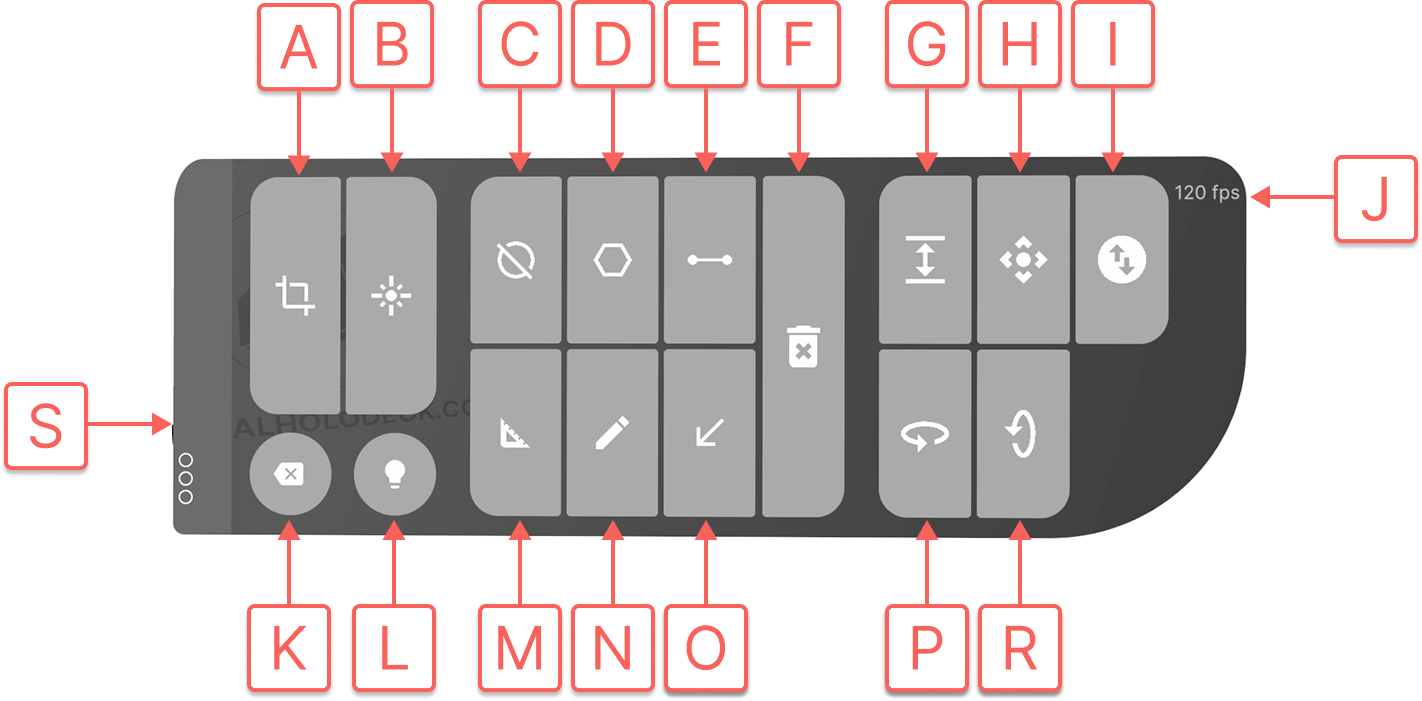
2. Object pad
The object pad provides tools for manipulating, measuring, and
annotating datasets. It appears when a dataset is loaded from the
library.
Select this button with the trigger to toggle the library's visibility. B Jump
Enables movement in the workspace. Select with the trigger, then point to your desired location. Select again to disable the function. C 4D Record
Creates immersive VR recordings. Select it with the trigger to start recording and again to stop. The recording will then appear in the RecordXR section of the library. D Team XR
Opens TeamXR settings. Select with the trigger to start, join, or manage a VR session. E Remote Render
Launches the rendering environment. Requires a separate app and currently supports only standalone VR headsets. F Settings
Opens Medicalholodeck’s settings. G Reset workspace
Clears all models and data from the workspaces. H Undo
Reverts your last action in the VR environment. Press repeatedly with the trigger to undo multiple actions in order. I Redo
Restores previously undone actions. Press repeatedly with the trigger to redo multiple actions in order. J Exit
Closes the application. Press it with the trigger to exit. K Capture a movie
Records your VR experience. Press it with the trigger to start and again to stop. The video will be saved to your desktop. Only active on the PC-VR mode. In standalone mode, press the Oculus button and open the camera icon from the menu. Then select “Record Video” or “Take Photo.” L Take a photo
Captures an image of your VR experience. Press it with the trigger to take a photo. The screenshot will be saved to your desktop. Only active on the PC-VR mode. In standalone mode, press the Oculus button and open the camera icon from the menu. Then select “Record Video” or “Take Photo.” M Handle
Repositions the panel. Select it with trigger and release to set it to a new position.
A
Cutter
Enables precise cuts through the datasets. Select it with the right trigger to activate the cutter on your left controller; press again to switch it to the right. Move your hand into the model to see a live cut. Pull the left trigger to fix the cut. To remove it, point your laser at the red X. Use the marker’s cut visibility button to show/hide cuts. B Laser
Turns on the laser, by default on your right controller. Use the laser to point at interface elements, and press the trigger to select or activate them. C Masking
Lets you focus on specific regions of a DICOM dataset by modifying their visibility. Use your controller like a brush to 'paint' areas in the 3D image - depending on the selected mode, the marked region will be hidden, isolated, or highlighted. Pressing the mask button with the trigger opens an additional panel and displays a red ball at your controller’s fingertip. Masking requires a lot of rendering power so it is recommended for PC-VR setup.
Allows area measurement. Press it with the trigger and a black cone will appear at your controller’s fingertip. Press the trigger to place points and outline your shape. To close the shape, move the cone near the first point and press the trigger when the click to close the shape prompt appears. The surface area will then be displayed in square millimeters (mm²). E Measure distance
Allows distance measurement. Press it with the trigger and a black cone will appear at your controller’s fingertip. Press the trigger to set the start point, move to the endpoint, and press again to display the distance in millimeters. F Delete
Removes objects like measurements, shapes, or drawings from the workspace. A red X will appear on your controller - aim at the object and press the trigger to delete it. G Scale
Resizes the active dataset. Press it with the trigger to enter scaling mode. Move the controller up or down while holding the trigger to adjust the size, then release the trigger to set it. H Move
Repositions the active dataset. Aim at the button, hold the trigger to move the dataset, and release to place it. I Move backward
Adjusts the dataset’s distance. Aim at the button, hold the trigger and move the controller up or down to bring it closer or farther while holding the trigger. Release to set the position. J Frame rate
Displays performance in FPS, helping you monitor app smoothness. K Remove dataset
Deletes the active dataset. Press it with the trigger to remove it from the scene. L Light on/off
Controls dataset lighting. Press the trigger to toggle the light on or off. In Medical Imaging XR, lighting is available only in PC-VR mode due to performance limitations. M Measure angle
Measures angles in VR. Press the trigger to set the angle’s vertex, then define the two line endpoints. The angle in degrees appears instantly once both lines are placed. N Draw
Enables drawing. Aim your laser at the button, press the trigger, and move your controller to draw lines. An additional panel will appear. Release the trigger to stop drawing.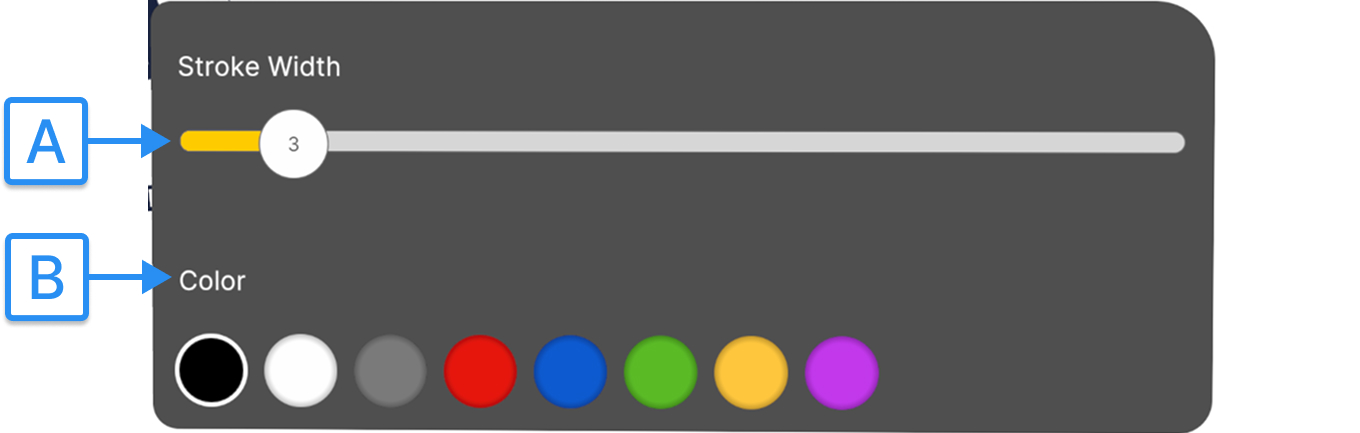
Places visual markers in the scene. Aim your laser at the button, press the trigger, and a colored arrow will appear at your controller’s fingertip. Move it to the desired location and press the trigger to place the marker. P Rotate horizontally
Rotates the active dataset left or right. Hold the trigger while moving the controller horizontally, then release to set the angle. R Rotate vertically
Tilts the dataset up or down. Hold the trigger and move the controller vertically, then release to set the angle. S Handle
Repositions the panel. Select it with trigger and release to set it to a new position. 3. Library panel The library panel is the main hub for accessing datasets. It includes five sections: saved scenes, Medical Imaging XR, RecordXR and Dissection Master and Anatomy Master.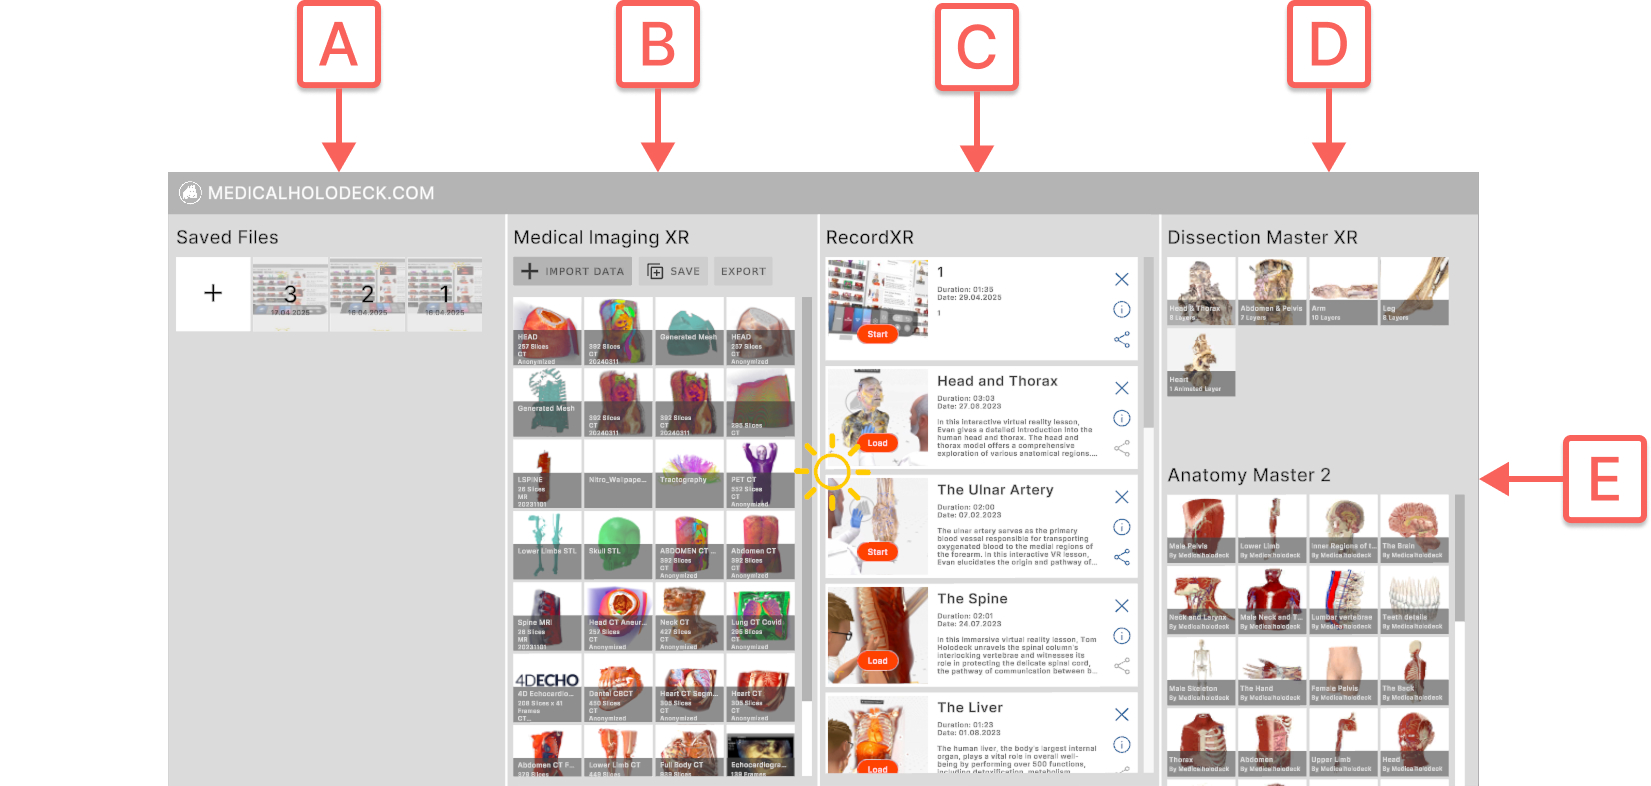
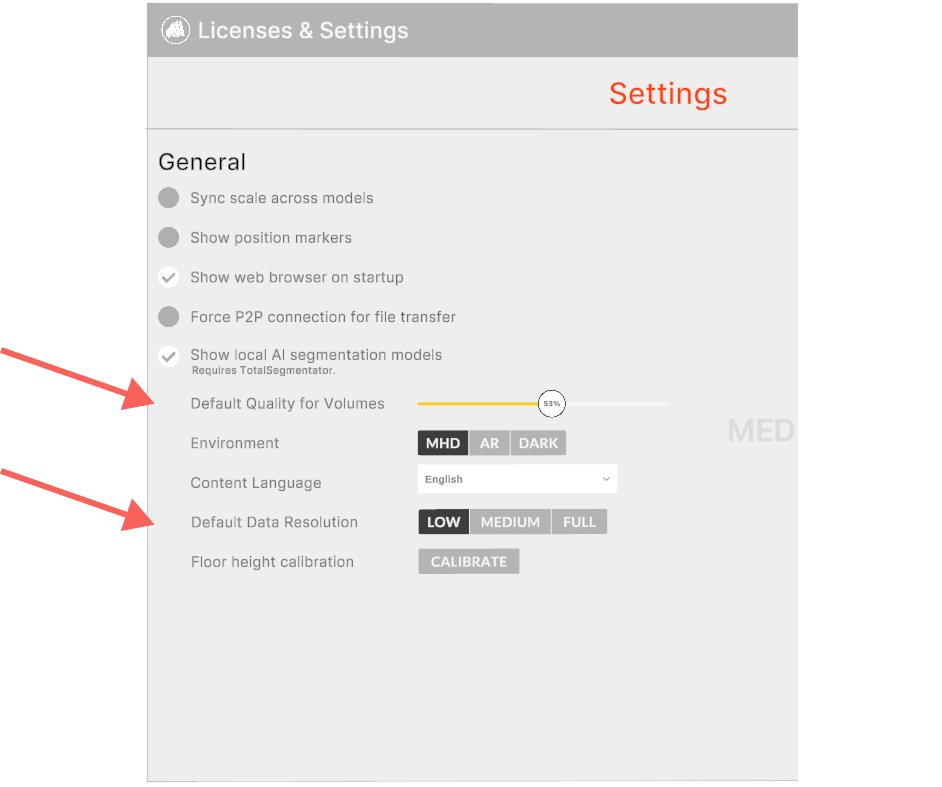
Medical imaging quality and performance settings
Learn how to adjust quality settings and improve performance on both
PC-VR and standalone devices. 3D DICOM data is volumetric - so the
larger you scale it or the closer you get in VR, the more processing
power your device needs. Only the models and data in your field of view
are rendered.
Below, we show you how to optimize DICOM visualization for better
performance on your VR system.
Medical imaging settings in Medicalholodeck
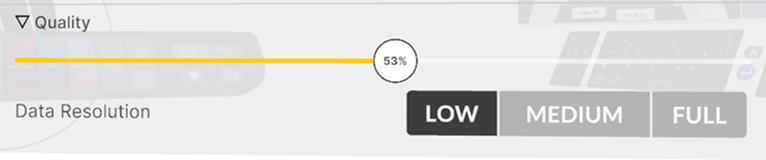
Quality settings help balance performance and visual clarity. If your
device slows down with large and numerous files, lowering the quality
can help it run more smoothly.
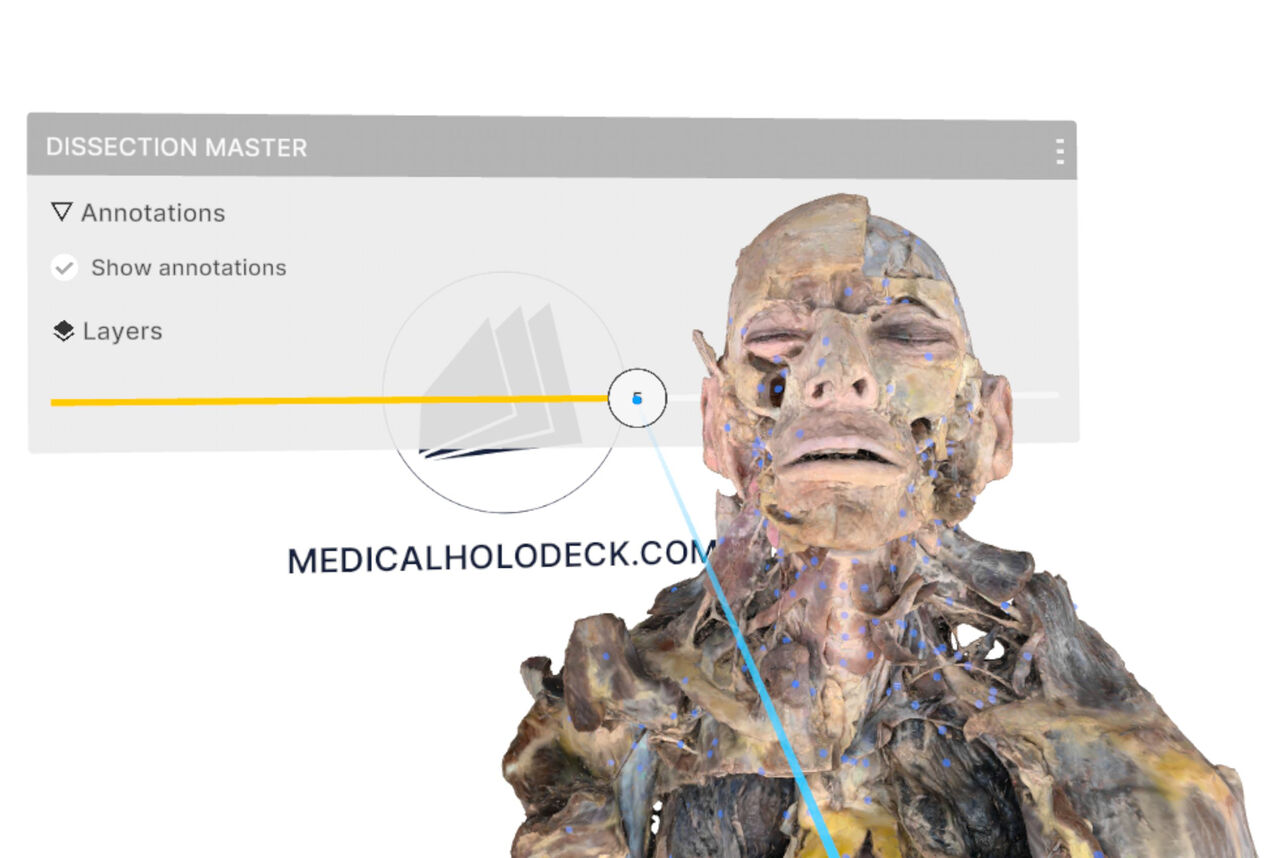
You can adjust quality settings for each individual model. Look for
quality for volumes and data resolution at the bottom of the Medical
Imaging XR panel, numbers 6 and 7. Use the quality for volumes slider to
adjust the density of the volume. Select the data resolution setting to
choose between low, medium, or high texture quality.
Enables precise cuts through the datasets. Select it with the right trigger to activate the cutter on your left controller; press again to switch it to the right. Move your hand into the model to see a live cut. Pull the left trigger to fix the cut. To remove it, point your laser at the red X. Use the marker’s cut visibility button to show/hide cuts. B Laser
Turns on the laser, by default on your right controller. Use the laser to point at interface elements, and press the trigger to select or activate them. C Masking
Lets you focus on specific regions of a DICOM dataset by modifying their visibility. Use your controller like a brush to 'paint' areas in the 3D image - depending on the selected mode, the marked region will be hidden, isolated, or highlighted. Pressing the mask button with the trigger opens an additional panel and displays a red ball at your controller’s fingertip. Masking requires a lot of rendering power so it is recommended for PC-VR setup.
A
Mask size
Adjusts the red ball’s size. Use the slider to set the desired width. B Mask mode
Allows switching between different masking modes.
Restores masked areas. Point at the region, hold the trigger to unmask, then release. D Mask channel
Let you organize and separate different masked areas within your DICOM dataset. Switch channels to apply and manage varied masking effects. E Mask volume
Shows the volume of the masked area on the selected channel.
D
Measure area
Adjusts the red ball’s size. Use the slider to set the desired width. B Mask mode
Allows switching between different masking modes.
- Isolate: keeps only the selected area visible
- Hide: hides parts of the dataset
- Highlight: visually emphasizes selected areas.
Restores masked areas. Point at the region, hold the trigger to unmask, then release. D Mask channel
Let you organize and separate different masked areas within your DICOM dataset. Switch channels to apply and manage varied masking effects. E Mask volume
Shows the volume of the masked area on the selected channel.
Allows area measurement. Press it with the trigger and a black cone will appear at your controller’s fingertip. Press the trigger to place points and outline your shape. To close the shape, move the cone near the first point and press the trigger when the click to close the shape prompt appears. The surface area will then be displayed in square millimeters (mm²). E Measure distance
Allows distance measurement. Press it with the trigger and a black cone will appear at your controller’s fingertip. Press the trigger to set the start point, move to the endpoint, and press again to display the distance in millimeters. F Delete
Removes objects like measurements, shapes, or drawings from the workspace. A red X will appear on your controller - aim at the object and press the trigger to delete it. G Scale
Resizes the active dataset. Press it with the trigger to enter scaling mode. Move the controller up or down while holding the trigger to adjust the size, then release the trigger to set it. H Move
Repositions the active dataset. Aim at the button, hold the trigger to move the dataset, and release to place it. I Move backward
Adjusts the dataset’s distance. Aim at the button, hold the trigger and move the controller up or down to bring it closer or farther while holding the trigger. Release to set the position. J Frame rate
Displays performance in FPS, helping you monitor app smoothness. K Remove dataset
Deletes the active dataset. Press it with the trigger to remove it from the scene. L Light on/off
Controls dataset lighting. Press the trigger to toggle the light on or off. In Medical Imaging XR, lighting is available only in PC-VR mode due to performance limitations. M Measure angle
Measures angles in VR. Press the trigger to set the angle’s vertex, then define the two line endpoints. The angle in degrees appears instantly once both lines are placed. N Draw
Enables drawing. Aim your laser at the button, press the trigger, and move your controller to draw lines. An additional panel will appear. Release the trigger to stop drawing.
A
Stroke width
Use the stroke width slider to adjust the line thickness. Aim your laser, pull the trigger, and adjust the size to your preference. B Color
Select your desired color and press the trigger to update the drawing tool's color.
O
Marker
Use the stroke width slider to adjust the line thickness. Aim your laser, pull the trigger, and adjust the size to your preference. B Color
Select your desired color and press the trigger to update the drawing tool's color.
Places visual markers in the scene. Aim your laser at the button, press the trigger, and a colored arrow will appear at your controller’s fingertip. Move it to the desired location and press the trigger to place the marker. P Rotate horizontally
Rotates the active dataset left or right. Hold the trigger while moving the controller horizontally, then release to set the angle. R Rotate vertically
Tilts the dataset up or down. Hold the trigger and move the controller vertically, then release to set the angle. S Handle
Repositions the panel. Select it with trigger and release to set it to a new position. 3. Library panel The library panel is the main hub for accessing datasets. It includes five sections: saved scenes, Medical Imaging XR, RecordXR and Dissection Master and Anatomy Master.
A
Saved scenes
Captures and stores your current VR setup. This lets you resume later with all settings and positions preserved.
It is section is for managing medical imaging data - upload, view in VR, and adjust DICOM windowing with ease. For full guidance, see the Medical Imaging XR manual. C RecordXR
A dedicated hub for spatial recordings - review, replay, delete, or export them as RXR files. For details, see the RecordXR manual. D Dissection Master XR
It is a virtual dissection lab with layered, annotated models from real human bodies. Press the model with the trigger to load a dataset into VR. For full guidance, see the Dissection Master manual. E Anatomy Master 2
It is a 3D human anatomy atlas in virtual reality, featuring detailed male and female models. Press a model with the trigger to load it into VR. For full guidance, see the Anatomy Master manual. 4. Object marker In Medicalholodeck, each loaded dataset is marked by an object marker on the floor - blue for active, grey for inactive.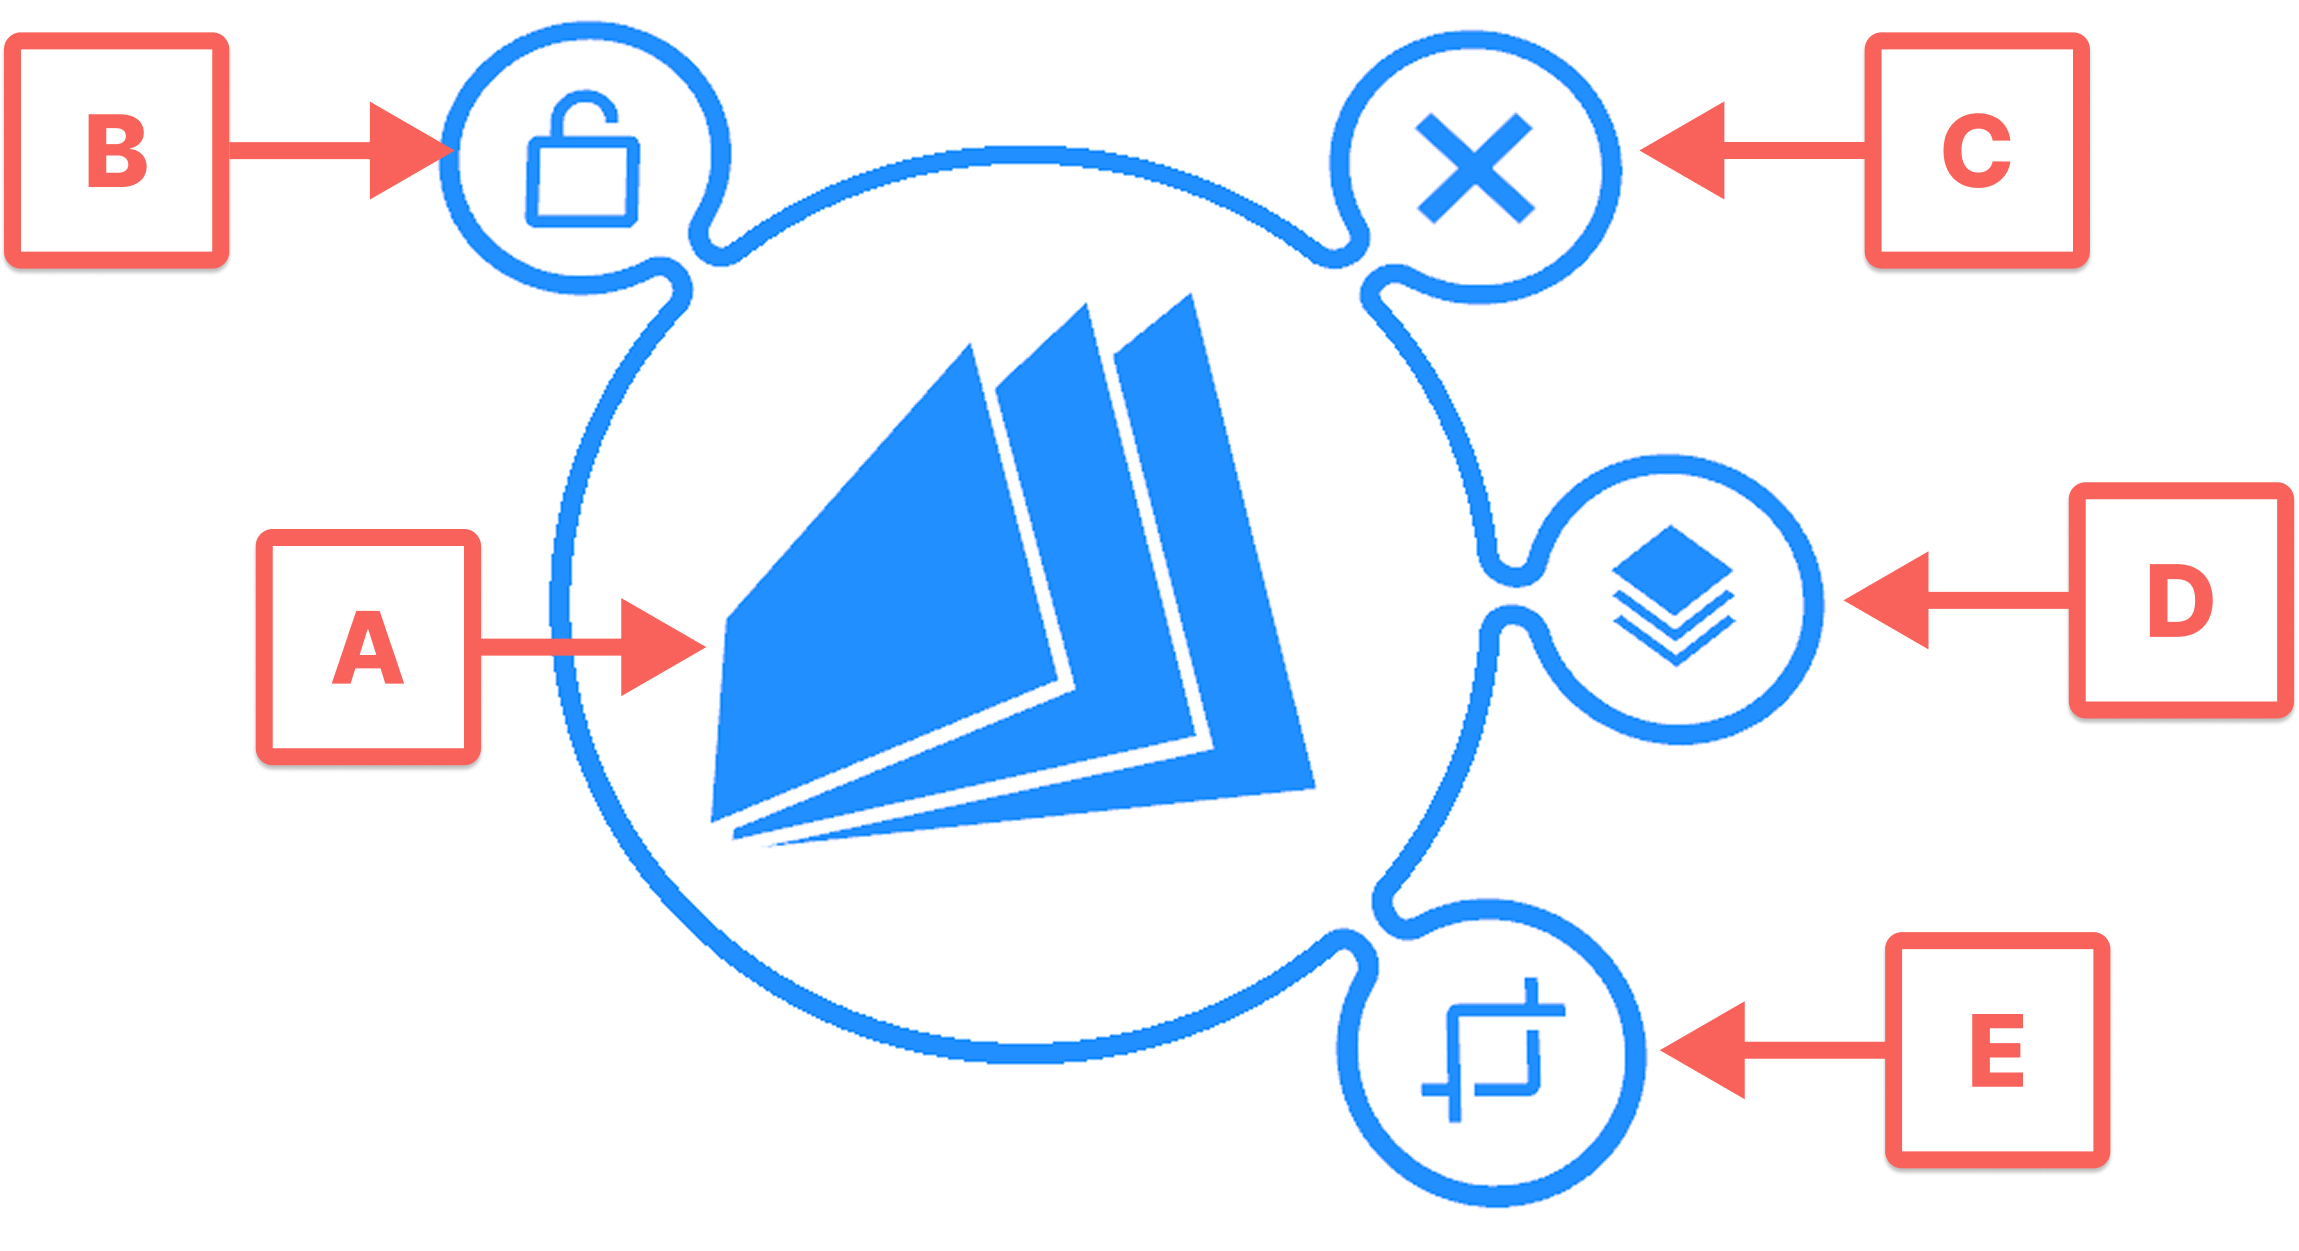
A yellow sun represents the lighting and appears above the scene by default. Aim and hold the trigger to move it and adjust the light angle. Light marker
This tool lets you move the lighting and toggle it on or off. When off, the sun and marker turn blue. Aim at the marker and hold the trigger to move it. Press the on/off button to toggle lighting. 6. Controllers
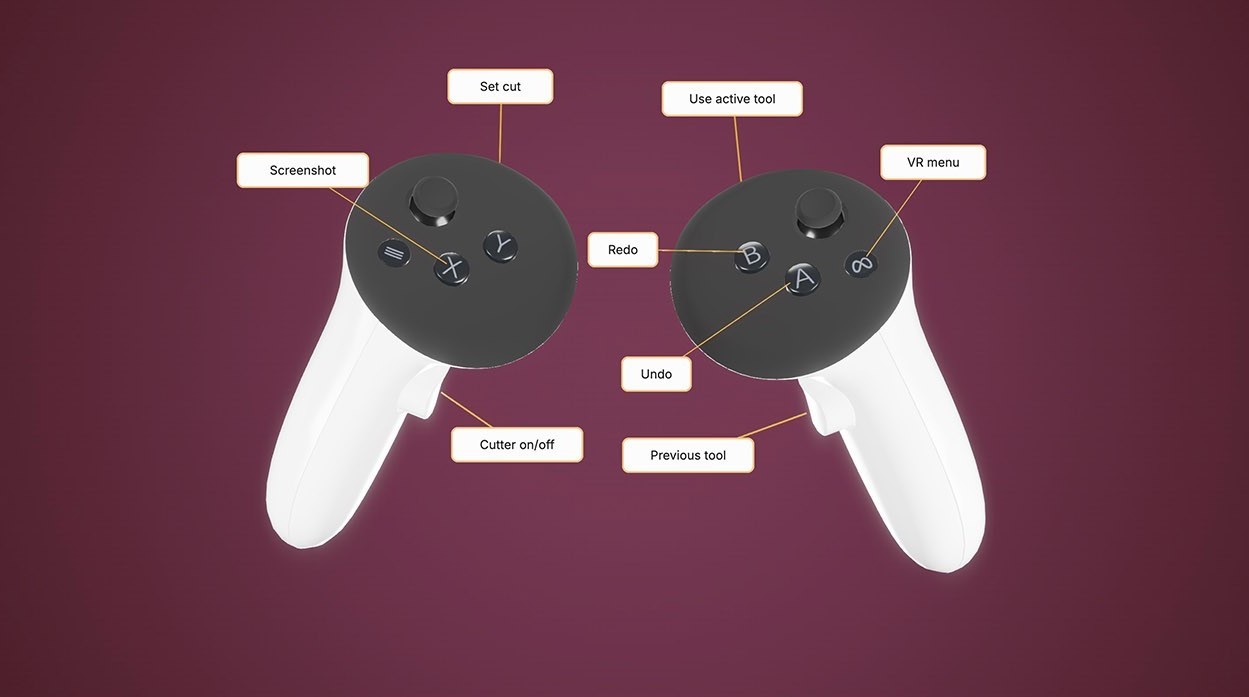 Left controller
Screenshot (X)
Left controller
Screenshot (X)
Captures a screenshot of your current view and saves it to your desktop. This function is only available in PC-VR mode. In standalone mode, press the Oculus button and open the camera icon from the menu. Then select “Record Video” or “Take Photo.” Set cut (trigger)
Places the cut when the cutter tool is active. Cutter on/off (grip)
Turns the cutter tool on or off. Right controller Previous tool (grip)
Activates the previously used tool. Undo (A)
Reverts your last action. Press repeatedly to undo multiple steps. Redo (B)
Restores undone actions. Press repeatedly to redo multiple steps. Use active tool (trigger)
Allows using the current tool. VR menu (menu button)
Opens the Meta Quest main menu. 7. Settings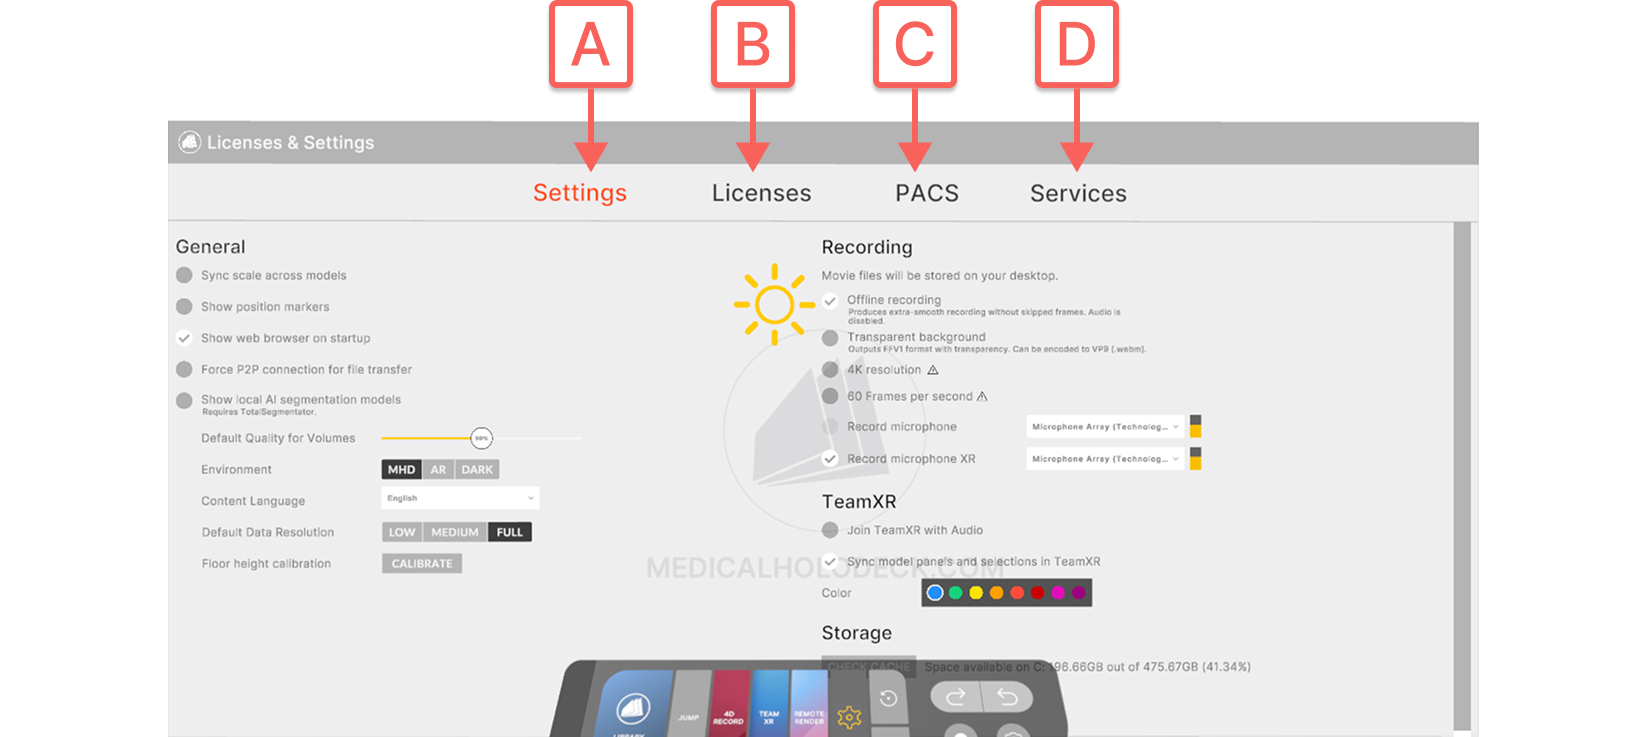
Captures and stores your current VR setup. This lets you resume later with all settings and positions preserved.
A
Save
Captures the current VR environment. Press the + button with the trigger. The saved scene will appear on the right with a unique ID, date, and preview image for easy reference. B Load
Opens a previously saved scene. Press the desired scene’s button with the trigger to restore it. C Delete
Removes a saved scene. Press the X in the top-right corner of the scene’s button with the trigger to delete it.
B
Medical Imaging XR
Captures the current VR environment. Press the + button with the trigger. The saved scene will appear on the right with a unique ID, date, and preview image for easy reference. B Load
Opens a previously saved scene. Press the desired scene’s button with the trigger to restore it. C Delete
Removes a saved scene. Press the X in the top-right corner of the scene’s button with the trigger to delete it.
It is section is for managing medical imaging data - upload, view in VR, and adjust DICOM windowing with ease. For full guidance, see the Medical Imaging XR manual. C RecordXR
A dedicated hub for spatial recordings - review, replay, delete, or export them as RXR files. For details, see the RecordXR manual. D Dissection Master XR
It is a virtual dissection lab with layered, annotated models from real human bodies. Press the model with the trigger to load a dataset into VR. For full guidance, see the Dissection Master manual. E Anatomy Master 2
It is a 3D human anatomy atlas in virtual reality, featuring detailed male and female models. Press a model with the trigger to load it into VR. For full guidance, see the Anatomy Master manual. 4. Object marker In Medicalholodeck, each loaded dataset is marked by an object marker on the floor - blue for active, grey for inactive.
A
Center
Allows moving the model around the workspace. To do so, click and hold on it to select. Then point the laser to the desired location and release it to drop in the new position. B Lock
Locks the model in its actual position C Delete
Deletes the model from workspace. D Groups
Allows grouping of data sets and overlaying them for comparison. Particularly useful for analyzing different types of data from a single patient. E Cuts visibility
Shows or hides the placed cuts.
5. Lighting
In Medicalholodeck, lighting can be toggled and angled to enhance
model visibility. It's visualized by a yellow sun and marker.
Light
Allows moving the model around the workspace. To do so, click and hold on it to select. Then point the laser to the desired location and release it to drop in the new position. B Lock
Locks the model in its actual position C Delete
Deletes the model from workspace. D Groups
Allows grouping of data sets and overlaying them for comparison. Particularly useful for analyzing different types of data from a single patient. E Cuts visibility
Shows or hides the placed cuts.
A yellow sun represents the lighting and appears above the scene by default. Aim and hold the trigger to move it and adjust the light angle.
Light marker
This tool lets you move the lighting and toggle it on or off. When off, the sun and marker turn blue. Aim at the marker and hold the trigger to move it. Press the on/off button to toggle lighting.
6. Controllers
Left controller
Screenshot (X)
Captures a screenshot of your current view and saves it to your desktop. This function is only available in PC-VR mode. In standalone mode, press the Oculus button and open the camera icon from the menu. Then select “Record Video” or “Take Photo.” Set cut (trigger)
Places the cut when the cutter tool is active. Cutter on/off (grip)
Turns the cutter tool on or off. Right controller Previous tool (grip)
Activates the previously used tool. Undo (A)
Reverts your last action. Press repeatedly to undo multiple steps. Redo (B)
Restores undone actions. Press repeatedly to redo multiple steps. Use active tool (trigger)
Allows using the current tool. VR menu (menu button)
Opens the Meta Quest main menu. 7. Settings
A
Settings
This section contains general settings for recording, TeamXR, and storage information. B Licenses
Contains details about your current license and it is possible to renew it from this section. C PACS
Allows connecting directly to your PACS server. D Services
Medicalholodeck offers on-premise solutions to ensure that your data never leaves your local servers. For more information contact info@medicalholodeck.com.
Note that quality settings above 50% offer only small visual
improvements but require significantly more performance.
You can set default rendering options in the settings panel on the
left. These apply when loading a new model. Medicalholodeck’s
recommended defaults are 10–14% volume quality and medium resolution for
headsets, and 50% volume quality with full resolution for PCs.
Low framerate screen
You can keep an eye on your device's performance by checking the frames
per second (FPS), shown in the top-right corner of the object pad. It
shows how many images your device displays each second - higher FPS
means smoother motion in VR.
If the FPS drops below 10, a low FPS warning screen will appear to help
protect your device. This gives your system a chance to recover and
avoid becoming unresponsive or overheating. It’s also a sign that you
may need to lower the rendering quality. This screen isn’t just a
warning - it’s there to help prevent crashes and keep everything running
smoothly.
When this screen appears, you can:
- Continue if your device can handle it.
- Reset the workspace to remove all loaded data.
- 50% Setting: Uses all key slices from the original DICOM dataset, balancing performance and visual quality.
- Above 50%: Uses more slices from the dataset for slightly better image quality, but the improvements are minimal and require significantly more performance.
- Below 50%: Fewer slices are used, reducing visual precision but improving performance.
What is volumetric data?
Volumetric data represents 3D anatomical structures by stacking 2D
image slices, typically obtained through CT or MRI scans. Each slice
captures a thin cross-section of the body at specific intervals. When
combined these slices form a full 3D volume. These datasets are usually
stored in the DICOM format, which includes both the images and the
metadata needed to interpret them properly.
From slices to 3D visualization: processing and texturing
Visualizing volumetric data in VR involves sophisticated processing
techniques. Texture maps are applied to each 2D slice, and algorithms
interpolate between them to generate a smooth, continuous 3D
representation. The more slices included-and the higher their
resolution-the more detailed the final rendering. However, this
increased fidelity comes with a computational cost.
Processing involves two key factors:
- Slice density: The number of slices in a dataset.
- Texture resolution: The visual clarity of each slice.
Challenges with large datasets in VR
Unlike conventional 2D image viewing, real-time 3D rendering in VR must
maintain high frame rates (ideally 60 FPS on a PC, 30 on a standalone
headset) to prevent motion sickness and ensure a smooth experience.
Large volumetric datasets, while visually impressive, can overwhelm
hardware if not managed properly. The larger the dataset - in physical
dimensions, not just file size - the more processing power is required
to render it effectively. This is where smart optimization and quality
settings become essential.
Adaptive detail rendering
To balance performance with visual quality, VR systems use level of
detail (LOD) techniques that adjust rendering based on the user’s
distance from the dataset. When the user is close, the system displays
high detail; when farther away, it switches to lower-resolution
textures, since fine details aren’t noticeable at a distance. This
approach preserves meaningful content while optimizing performance.
Activate licenses
Start Free Trial
In VR, go to settings settings and click the 'Activate Free Trial'
button.
Activating License Keys on PC VR Systems
In the following tutorial, learn how to activate the license keys on PC
VR System. Start by copying the license key to your clipboard. Launch
Medicalholodeck and go to the settings page by clicking on the cog wheel
in the main menu. Next, go to 'Licenses' tab at the top and select
'Enter License Key'. Paste the license key by clicking on the paste
button and selecting 'Activate'.
Activating License Keys on PC VR Systems
In the following tutorial, learn how to activate the license keys on
Quest 2 standalone VR headsets. Connect your headset to the Internet and
launch Medicalholodeck. Go to the settings page by clicking on the cog
wheel in the main menu and select 'Licenses' tab at the top.
Note your 6-digit device ID from the bottom of the screen. You will need
it for connecting your VR headset to your computer. Open a web browser
on your computer, navigate to www.medicalholodeck.com/link, and add your
headset’s device ID from the previous step. Select 'License Management’
from the menu, add your keys, and click 'Activate'.
Use your hands to interact with data. Put your right hand into a dataset
until it's highlighted with a blue frame. Then pull the trigger to grab
and move it. To scale the data, put both hands into a dataset until they
are highlighted in blue. Then pull the triggers on both controllers and
move the hands apart to scale and rotate the data.
To use live cut, activate the function from the control panel. A cutter
is attached to your left hand. Move your hand into a dataset to see a
live cut. You can fix the live cut plane in place by pulling the
trigger. Hit the red x button with your laser to remove the cut.
Capture Screenshots and Videos
Capture Screenshots
Capture screenshots and videos from inside the app. A preview of the
captured screenshot will be visible on your right hand. Videos will
capture your VR view. Photos and videos are stored in HD format
(1920x1080) on your desktop. When using the screenshot or video function
for the first time after starting the app it will take a few seconds
until the camera is ready. Capture screenshots by clicking the function
button on your right controller.
Capture Videos
Capture videos by activating the video function on the home menu UI.
Stop recording by shooting with the laser on the button a second time.
Medicalholodeck AI
What is AI segmentation?
AI segmentation automatically identifies and separates anatomical
structures like organs, bones, and tissues, in CT or MRI scans. Instead
of manually outlining regions, AI models complete the task in seconds by
recognizing patterns learned from expert-labeled data.
How to run AI segmentation in the cloud?
- Load your DICOM data into Medicalholodeck. See here how to load data.
- Select from AI models optimized for specific scan types, such as main structures MRI or chest CT.
- Start the segmentation process. All data is anonymized and handled in full compliance with HIPAA standards.
- The segmented data will appear in front of you, along with a segmentation panel.
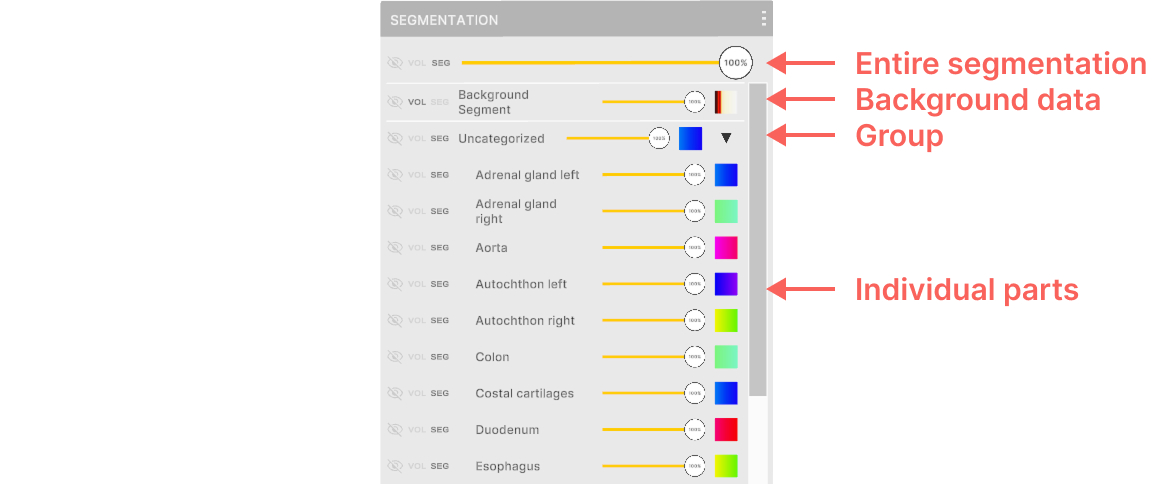
2. Options
2.1
Visibility controls
Control how the section is displayed. It can be hidden (eye with a slash), shown using the main transfer function from the Medical Imaging XR panel (vol), or displayed with its own segmentation transfer function (seg). 2.2 Opacity slider
Adjusts opacity of the section from 0% to 100% 2.3 Segmentation transfer function
Enables setting transparency and colors to specific Hounsfield Units (HU) using color pins in the segmentation.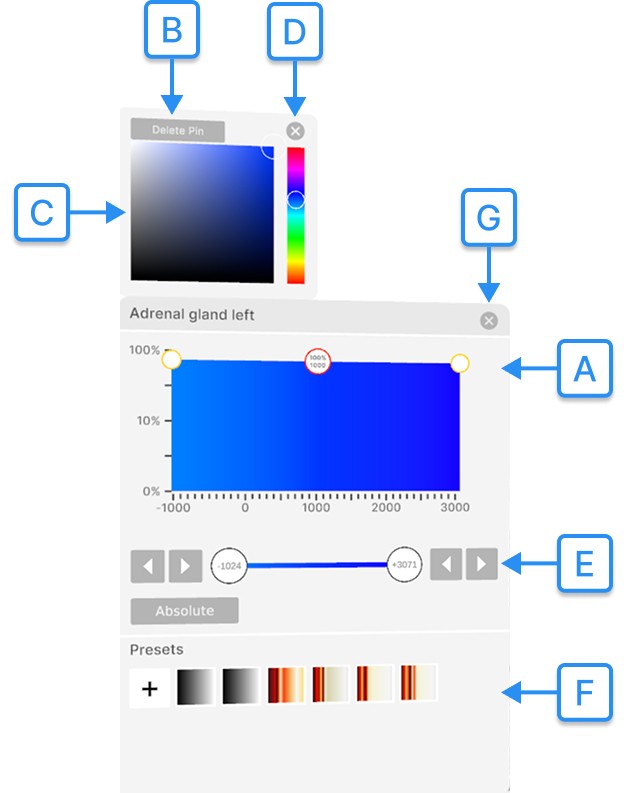
2.4
Arrow
Control how the section is displayed. It can be hidden (eye with a slash), shown using the main transfer function from the Medical Imaging XR panel (vol), or displayed with its own segmentation transfer function (seg). 2.2 Opacity slider
Adjusts opacity of the section from 0% to 100% 2.3 Segmentation transfer function
Enables setting transparency and colors to specific Hounsfield Units (HU) using color pins in the segmentation.
A
Color pins
They adjust transparency and assign colors to specific Hounsfield Units (HU).
To add a pin, click on an empty spot on the graph.
To change transparency, move the selected pin vertically and release the trigger. Transparency ranges from 0% to 100% on a logarithmic scale.
To assign a specific color to an HU value, move the selected color pin horizontally and release the trigger. B Delete pin
Deletes a color pin from the transfer function. Select the pin with the laser, then press the delete pin button. C Color picker
Allows changing a pin's color. Select the pin with the trigger, then choose a new color. D Close color picker
Closes color picker. E Tissue filter
The tissue filter section adjusts the visible range of DICOM data based on Hounsfield Units (HU). It also allows switching between relative and absolute color values. Learn more about it here. F Transfer function preset
Manages DICOM presets. Transfer function preset is a saved configuration of a transfer function and a color schema, also used in the Medical Imaging XR panel. Learn more about it here. G Close segmentation transfer function
Closes segmentation transfer function.
Collapses or expands the group section. 3. Handle Use the handle to move the segmentation control panel. Hover with your laser, hold the trigger to drag it, then release to set its position.
How to install TotalSegmentator
To install TotalSegmentator you need to first install Python, PyTorch
and add python to the PATH. TotalSegmentator works on Ubuntu, macOS, and
Windows, and supports both CPU and GPU. Performance on CPU is
significantly slower.
1. Installing Python
If you already have Python on your device you can skip this step.
How to check if you have Python installed?
- Open command prompt.
- Type
python --version - If it’s installed you will see the installed version. If not, a message like 'python' is not recognized as an internal or external command will be shown.
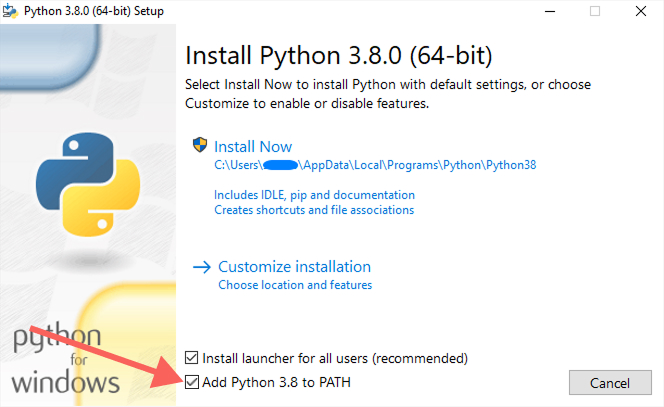
- Go to Download Python Website.
- Find the version between 3.7 and 3.13.
- Look for the downloaded .exe file.
- Make sure to select the 'Add python.exe to PATH' checkbox, and ensure that pip will be installed alongside Python (it is included when you choose the 'Install Now' option).
- Install Python.
- You can check if installed properly by following the steps above: How to check if you have Python installed?
Note, that it’s very important to have Python added to the environmental variable PATH. To see if you have it in PATH type ‘python’ in the command prompt. If it’s added you will see it ‘open’ in the command prompt. If not, a message like that will appear ‘python is not recognized as an internal or external variable. See here how to add Python to the PATH. 2. Installing PyTorch If you already have PyTorch on your device you can skip this step. How to check if you have PyTorch installed?
- Open command prompt.
- Type
python - Type
import torch - Type
print(torch.__version__) - If it’s installed you will see the installed version. If not, a message like 'ModuleNotFoundError: No module named 'torch' will be shown.
- Go to Download PyTorch Website.
- Choose the correct version of PyTorch depending if you want to use the CPU or CUDA (GPU) version.
-
Copy (CTRL+C) the command specified in Run this Command section e.g
pip3 install torch torchvision torchaudio --index-url https://download.pytorch.org/whl/cu118 - Open command prompt and paste the copied command.
- Install PyTorch.
- You can check if installed properly by following the steps above: How to check if you have PyTorch installed?
- Open a command prompt.
- Type
pip install TotalSegmentator==2.5.0 - Install TotalSegmentator.
-
To check if TotalSegmentator is installed properly type in the command
line
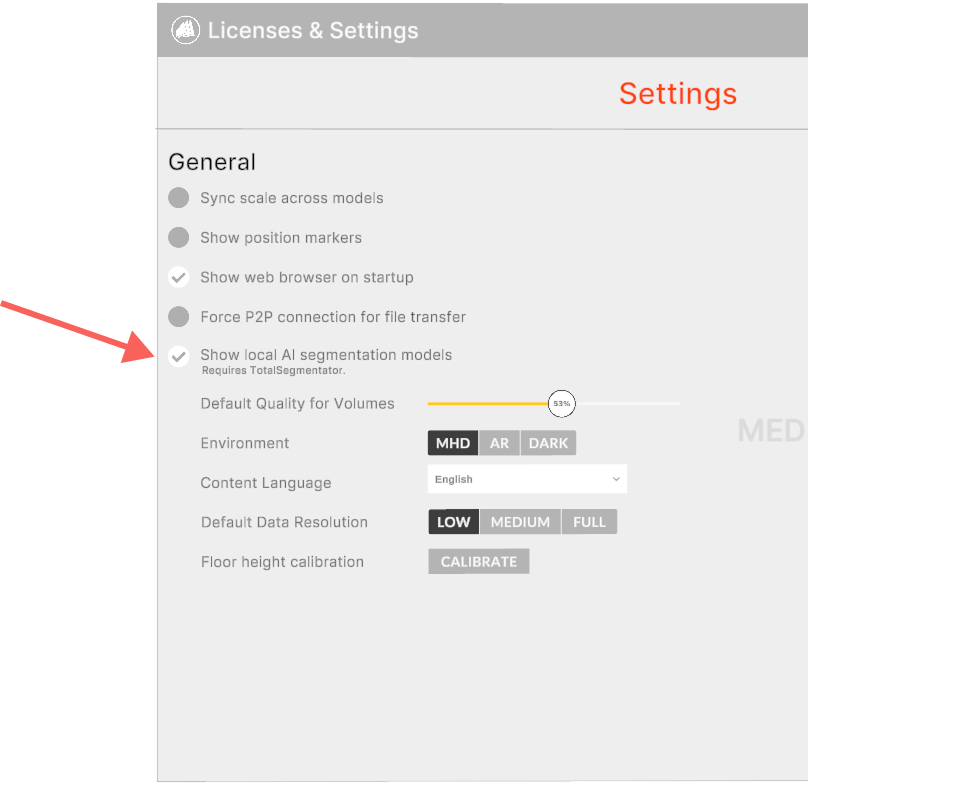
TotalSegmentator -–version. It should show the installed version. - Restart your computer to make TotalSegmentator available to other apps, like Medicalholodeck.
- Go to the settings and allow showing local segmentation models.
- Once everything is installed correctly, the segmentation options in Medicalholodeck will appear without the cloud note, indicating local processing.
A
Import data
Opens data importing panel. B Save
Saves active dataset with all applied changes to the library. C Export
Exports active dataset with all applied changes to the library and the desktop. D Load data
Loads a dataset into the VR environment. Press the button for the desired dataset with the trigger to render it. E Delete data
Removes dataset from the library.
Medical Imaging XR Panel
The Medical Imaging XR panel is designed for setting tissue filtering
and windowing for DICOMs. Additionally, it provides tools to convert
DICOM data into a STL format for printing or further analysis.
Opens data importing panel. B Save
Saves active dataset with all applied changes to the library. C Export
Exports active dataset with all applied changes to the library and the desktop. D Load data
Loads a dataset into the VR environment. Press the button for the desired dataset with the trigger to render it. E Delete data
Removes dataset from the library.
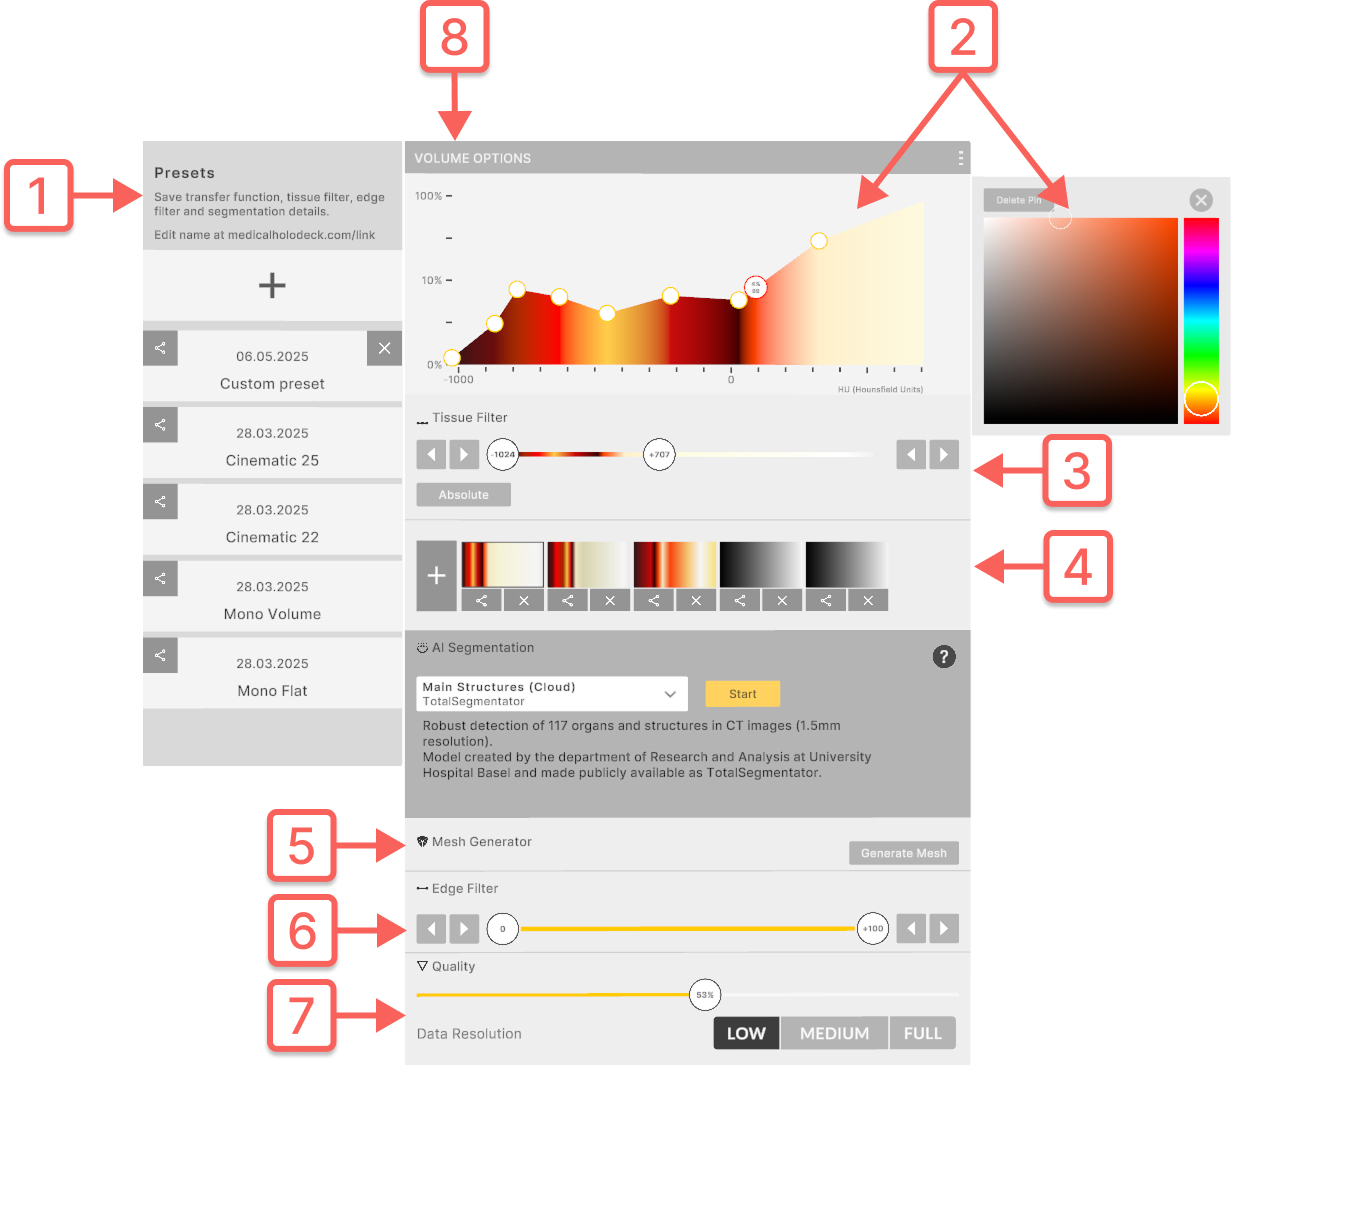
A
Option Preset
Manages DICOM presets. Option preset is a saved configuration of display and processing settings. Select, create, edit, or delete built-in and custom presets here.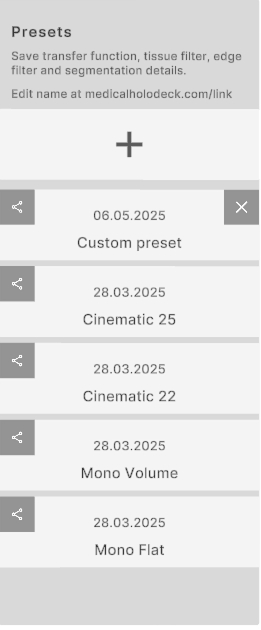
Enables setting transparency and colors to specific Hounsfield Units (HU) using color pins.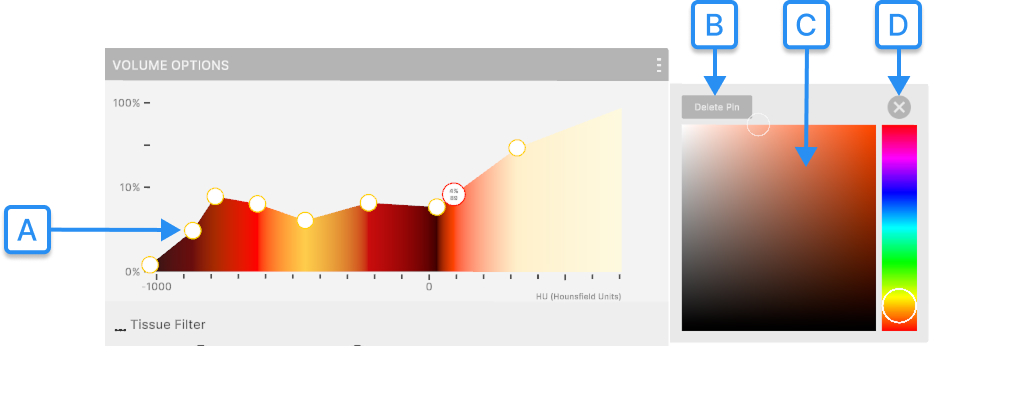
The tissue filter section adjusts the visible range of DICOM data based on Hounsfield Units (HU). It also allows switching between relative and absolute color values.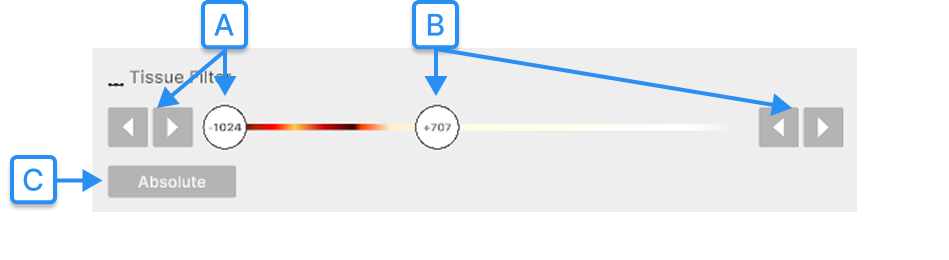
Manages DICOM presets. Transfer function preset is a saved configuration of a transfer function and a color schema. Select, create, edit, or delete built-in and custom presets here.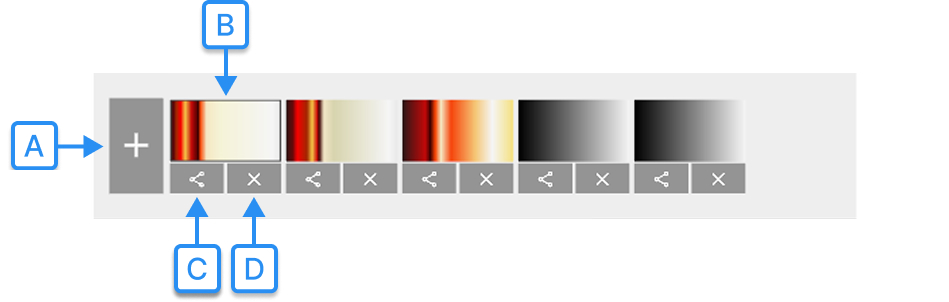
Converts DICOM data into a STL format for printing or further analysis.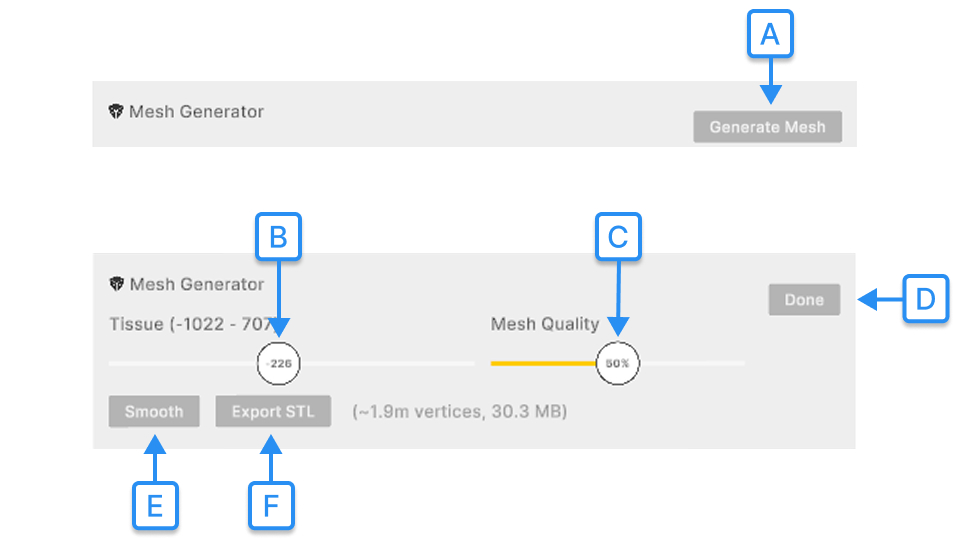
Improves how clearly you can see where different tissues meet in DICOM data. Move the filter left to show smooth areas. Move it right to highlight where tissue changes quickly.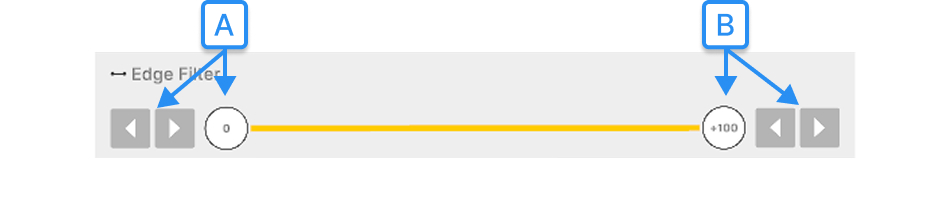
Balance DICOM visual quality and app performance. Adjust the settings to prioritize either image detail or smoother performance based on your system’s capabilities.
Repositions the panel. Select it with trigger and release to set it to a new position.
Medical Imaging XR Tutorials
Import and Display Data
To import a file, launch Medicalholodeck and click on the '+' button on
the top left of the Library Panel. Use the file explorer to navigate to
your data. Medicalholodeck supports multiple file formats, including
DICOM, STL, OBJ, PDF, JPG, and MP4 files. Select the file or the whole
folder by clicking on it, and then click the 'Select' button at the
bottom.
Medicalholodeck will analyze the folder and display all the compatible
data for review. You can select and import multiple files at once.
When you've made your selections, click the 'Import' button at the
bottom of the screen. This will load your chosen data into the Library.
Your selected data has been successfully imported and is ready for use.
Display DICOM
To display a DICOM dataset select it with the laser from the library.
The data will load in front of you. Grab it with your hands or the
laser. You can display several DICOM datasets side by side.
To display a DICOM dataset select it with the laser from the library.
The data will load in front of you. Grab it with your hands or the
laser. You can display several DICOM datasets side by side.
Importing Data on Standalone Devices
To import a file, launch Medicalholodeck and click the '+' button on the
top left of the Library Panel. Next, go to the 'Cloud' tab and note your
6-digit device ID from the bottom of the screen, you will need it for
connecting your VR headset to your computer.
Open a web browser on your computer, navigate to
www.medicalholodeck.com/link, and add your headset’s device ID from the
previous step. Select 'Upload' from the menu. An upload box will appear,
ready to receive the files to import. Medicalholodeck supports various
file formats, including DICOM, STL, OBJ, PDF, JPG, and MP4. Drag and
drop the files onto the upload box. Wait until upload is finished.
Then put on your VR headset. In Medicalholodeck, select the files you
want to add to the Library and click the 'Import' button at the bottom.
Your files will now be available in Medicalholodeck Library, ready for
work.
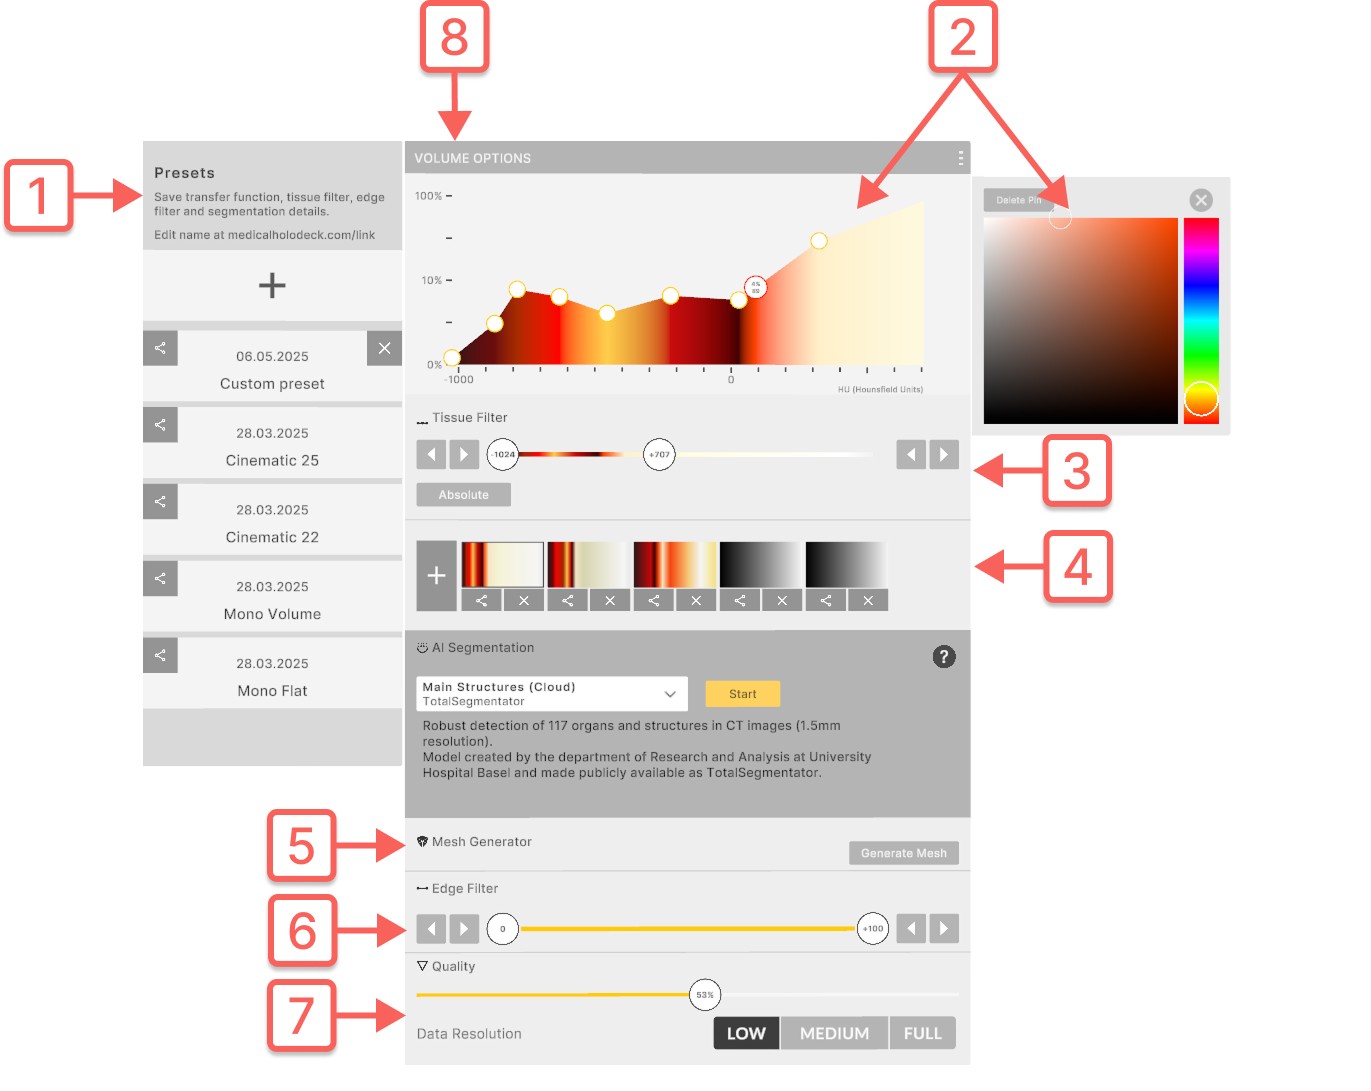
Edit DICOM
Once you have loaded your DICOM dataset from the Library into VR, the
Medical Imaging XR Panel will appear. This panel is your control center
for customizing the display of DICOM data. The Color Section is located
at the top. Adjust the transparency and assign colors to specific
Hounsfield Units (HU) using Color Pins.
The transparency is adjustable from 0% to 100%. Modify these values by
moving the Color Pins vertically. Hounsfield Units (HU) allow you to
filter DICOM data based on radiodensity. Moving the Color Pins
horizontally will assign specific colors to specific HU values. Use the
Color and Hue Pickers located on the right side to change the color of
each pin.
The Preset Section is located on the left side of the panel.
Medicalholodeck provides several built-in color presets. To edit a
preset, move the existing color pins or add new ones until the desired
tissues are visible. To save the current settings, click the "+" button
at the top of the Preset Section. This will create a new custom preset.
Next, there is the Tissue Filter Section. This section includes the
Lower and Upper Hounsfield Unit (HU) buttons. Move these buttons to
window DICOM data until the desired body tissue is visible. You also
have the option to switch between Relative and Absolute Color Values.
In absolute mode, colors are fixed to specific Hounsfield Units (HU).
This means that when you limit the HU range using the Lower and Upper HU
buttons, you also limit the visibility of colors associated with those
HU values.
On the other hand, in relative mode, colors are not directly tied to
specific HU values. Instead, they are relative to the current HU window.
This means that when you adjust the HU range, the full spectrum of
colors will still be visible within the new window, regardless of how
narrow it might be. This allows more flexibility in visualizing
different tissue types within a specific HU range.
Below the Tissue Filter Section, you will find the Mesh Generator
Section. This feature allows you to generate a 3D mesh from your DICOM
data, which can be used to create 3D models for printing or further
analysis. Find a tutorial for mesh generating here.
Next, we have the Edge Filter Section. This feature is used to enhance
the visibility of transitions between different tissue densities in your
DICOM data. Filtering based on tissue homogeneity allows clearer
differentiation between structures. When the filter is adjusted towards
the left, it focuses on more homogeneous tissue. As you move the filter
towards the right, it increasingly highlights areas where there is a
rapid change in tissue density, such as transitions from soft to dense
tissue. This makes it easier to distinguish between different structures
in your dataset.
In the Quality Section, you can adjust the displayed quality of the
DICOM data. This tool allows you to fine-tune the balance between the
visual quality of your DICOM data and the application's performance. By
adjusting this setting, you can optimize the display of your data to
match the capabilities of your computer. Whether you prioritize
high-resolution imagery or smoother performance, this function allows
you to customize your experience to your needs.
Measure, Mark and Draw on DICOM
Use tools for measuring, marking and drawing in virtual reality. The
measurements, markers and drawings are connected to the active dataset
and will move and scale with it. They can be removed with the delete
tool on your Panel.
Measuring Distances in Virtual Reality: Precise Spatial Measurements in
Medicalholodeck
To measure distances, select the measurement tool from the Control
Panel. Move the black cone on your fingertip to the first position.
Press the trigger to fix the first point, move the cone to the endpoint,
and press the trigger again. The distance measure between the two points
will be displayed in millimeters.
Select the delete function from the Control Panel to delete a
measurement, move the delete icon on your fingertip to the measurement,
and press the trigger.
How to Place and Remove Markers: Highlighting and Removing Key Points
in VR
Highlight important areas in a DICOM with arrow-shaped markers. Select
the marker function from the control panel, and an arrow will appear on
your fingertip. Move it to the field of interest in your data set and
press the trigger.
Select the delete function from the control panel to delete a marker,
move the delete icon on your fingertip to the marker, and press the
trigger. The marker will disappear.
Free Line Drawing in Virtual Environment
Use the drawing tool for free line drawing in VR. Select the tool from
the Object Pad. Customize the thickness and color of lines. Use the
provided Slider to increase or decrease the thickness, and select your
favored Color on the Color Buttons.
After adjusting settings, hold the trigger on your right controller to
initiate drawing. While holding the trigger, move your hand. You will
notice lines drawn in 3D space. Experiment with different movements and
angles to create your drawings.
To stop drawing, release the trigger button. This action will stop the
creation of lines.
To delete a drawing, select the delete function from the Object Pad. A
delete tool will appear on your fingertip. Move the delete tool over the
drawing you want to remove and press the trigger button on your
controller. This action will remove the selected drawing from the 3D
environment.
Anatomy Master 2 Manual
Anatomy Master XR is the three-dimensional human anatomy atlas in
virtual reality. It is located at the bottom-right corner of the
library. Aim your laser at the desired model's button and press the
trigger button to activate it. The model is then displayed in front of
you.
Manages DICOM presets. Option preset is a saved configuration of display and processing settings. Select, create, edit, or delete built-in and custom presets here.
A Add
Saves your color schema, transfer function, edge filter, and segmentation as a new preset. Point at the + button and press the trigger to make a new preset. It will appear at the top of the list. B Export
Saves the preset to your desktop. C Preset
Loads a saved preset. Select it with the trigger to apply. D Delete
Deletes the selected preset.
B
Transfer Function
Saves your color schema, transfer function, edge filter, and segmentation as a new preset. Point at the + button and press the trigger to make a new preset. It will appear at the top of the list. B Export
Saves the preset to your desktop. C Preset
Loads a saved preset. Select it with the trigger to apply. D Delete
Deletes the selected preset.
Enables setting transparency and colors to specific Hounsfield Units (HU) using color pins.
A Color Pins
They adjust transparency and assign colors to specific Hounsfield Units (HU).
To add a pin, click on an empty spot on the graph.
To change transparency, move the selected pin vertically and release the trigger. Transparency ranges from 0% to 100% on a logarithmic scale.
To assign a specific color to an HU value, move the selected color pin horizontally and release the trigger. B Delete Pin
Deletes a color pin from the transfer function. Select the pin with the laser, then press the delete pin button. C Color Picker
Allows changing a pin's color. Select the pin with the trigger, then choose a new color. D Close Color Picker
Closes color picker.
C
Tissue filter
They adjust transparency and assign colors to specific Hounsfield Units (HU).
To add a pin, click on an empty spot on the graph.
To change transparency, move the selected pin vertically and release the trigger. Transparency ranges from 0% to 100% on a logarithmic scale.
To assign a specific color to an HU value, move the selected color pin horizontally and release the trigger. B Delete Pin
Deletes a color pin from the transfer function. Select the pin with the laser, then press the delete pin button. C Color Picker
Allows changing a pin's color. Select the pin with the trigger, then choose a new color. D Close Color Picker
Closes color picker.
The tissue filter section adjusts the visible range of DICOM data based on Hounsfield Units (HU). It also allows switching between relative and absolute color values.
A Min HU
Adjusts the lower Hounsfield Unit (HU) value. Select the slider with the trigger and move the slider left or right, then release. Use the arrow to decrease/ increase the value by 1. B Max HU
Adjusts the higher Hounsfield Unit (HU) value.Select the slider with the trigger and move the slider left or right, then release. Use the arrow to decrease/ increase the value by 1. C Absolute/Relative
Switches between color modes. In absolute mode, colors are fixed to specific Hounsfield Units (HU), so narrowing the HU range limits visible colors. In relative mode, colors adjust to fit the current HU window, keeping the full color range visible. Press the button with the trigger to switch modes.
D
Transfer Function Preset
Adjusts the lower Hounsfield Unit (HU) value. Select the slider with the trigger and move the slider left or right, then release. Use the arrow to decrease/ increase the value by 1. B Max HU
Adjusts the higher Hounsfield Unit (HU) value.Select the slider with the trigger and move the slider left or right, then release. Use the arrow to decrease/ increase the value by 1. C Absolute/Relative
Switches between color modes. In absolute mode, colors are fixed to specific Hounsfield Units (HU), so narrowing the HU range limits visible colors. In relative mode, colors adjust to fit the current HU window, keeping the full color range visible. Press the button with the trigger to switch modes.
Manages DICOM presets. Transfer function preset is a saved configuration of a transfer function and a color schema. Select, create, edit, or delete built-in and custom presets here.
A Add
Saves your color schema and transfer function as a new preset. Press the + button with the trigger to make a new preset. It will appear at the top of the list. B Preset
Loads a saved preset. Select it with the trigger to apply. C Export
Saves the preset to your desktop. C Delete
Deletes selected preset.
E
Mesh Generator
Saves your color schema and transfer function as a new preset. Press the + button with the trigger to make a new preset. It will appear at the top of the list. B Preset
Loads a saved preset. Select it with the trigger to apply. C Export
Saves the preset to your desktop. C Delete
Deletes selected preset.
Converts DICOM data into a STL format for printing or further analysis.
A Generate Mesh
Displays mesh options and a preview alongside the original dataset. B Tissue
Allows setting the ISO Value to control which tissues appear in the mesh.Press the button with the trigger and slide left or right. C Mesh Quality
Balances mesh detail and STL file size. Press the button with the trigger and slide left or right. C Done
Adds generated mesh to the library. C Smooth
Smooths out the created mesh. C Export STL
Saves the mesh as an STL file. Press the button with the trigger to export it directly to your desktop.
F
Edge Filter
Displays mesh options and a preview alongside the original dataset. B Tissue
Allows setting the ISO Value to control which tissues appear in the mesh.Press the button with the trigger and slide left or right. C Mesh Quality
Balances mesh detail and STL file size. Press the button with the trigger and slide left or right. C Done
Adds generated mesh to the library. C Smooth
Smooths out the created mesh. C Export STL
Saves the mesh as an STL file. Press the button with the trigger to export it directly to your desktop.
Improves how clearly you can see where different tissues meet in DICOM data. Move the filter left to show smooth areas. Move it right to highlight where tissue changes quickly.
A Min Edge
Adjusts the lower edge value. Select the slider with the trigger and move the slider left or right, then release. Use the arrow to decrease/ increase the value by 1. B Max Edge
Adjusts the higher edge value. Select the slider with the trigger and move the slider left or right, then release. Use the arrow to decrease/ increase the value by 1.
G
Quality Settings
Adjusts the lower edge value. Select the slider with the trigger and move the slider left or right, then release. Use the arrow to decrease/ increase the value by 1. B Max Edge
Adjusts the higher edge value. Select the slider with the trigger and move the slider left or right, then release. Use the arrow to decrease/ increase the value by 1.
Balance DICOM visual quality and app performance. Adjust the settings to prioritize either image detail or smoother performance based on your system’s capabilities.
A Quality For Volumes
Controls how many slices are used for rendering. At 50%, all original slices are included. Above 50%, additional slices are generated using interpolation to increase detail. B Data Resolution
Controls the texture quality of each slice in the dataset.
H
Handle
Controls how many slices are used for rendering. At 50%, all original slices are included. Above 50%, additional slices are generated using interpolation to increase detail. B Data Resolution
Controls the texture quality of each slice in the dataset.
Repositions the panel. Select it with trigger and release to set it to a new position.
Navigating the Anatomy Master 2 models
1. Model
Anatomy Master 2 models are detailed 3D human body reconstructions
based on CT and MRI data. They feature 2,000+ labeled structures, full
scaling, part-by-part manipulation, and tools like visibility controls
and an object marker.
1.1 Scaling
Put both hands into a model until they are framed in blue. Hold both
triggers and move your hands apart to scale.
1.2 Taking apart
Point the laser at a part and pull the trigger to highlight it yellow.
Pull the trigger again and move it aside while holding.
1.3 Moving
1.4 Rotating
A Moving with the laser
Aim at the model or marker and hold the trigger to grab. Move it, then release it to place. B Moving with controllers
Place your hand in the model until it's framed in blue. Pull the trigger to grab and move it.
Aim at the model or marker and hold the trigger to grab. Move it, then release it to place. B Moving with controllers
Place your hand in the model until it's framed in blue. Pull the trigger to grab and move it.
To remove it, point your laser at the red X. Use the marker’s cut visibility button to show/hide cuts. 1.6 Annotations
A Visibility button
Switches the visibility of the selected part. B Transparency button
Makes the selected part transparent.
1.7 Anatomy Master visibility controls
This section shows, hides, or makes the parts of the model
transparent.
Switches the visibility of the selected part. B Transparency button
Makes the selected part transparent.
A Arrow
Expands or collapses the section. B Visibility button
Switches the visibility of the selected part.
Expands or collapses the section. B Visibility button
Switches the visibility of the selected part.
C Transparency button
Makes the selected part transparent.
Makes the selected part transparent.
With multiple models loaded, point the laser at one to access its
visibility controls.
To move visibility controls, grab the top bar with the trigger. Drag to a new spot and release. Dissection Master XR Manual Dissection Master XR is a VR tool for exploring human anatomy in detailed 3D, based on real bodies. It lets you interact with dissections and scale anatomical structures. Find it in the top-right of the library. Point your laser at a model’s button and pull the trigger to load it.
Navigating the Dissection Master models
1. Model
Dissection Master models show the full human body in 10 interactive layers, with 3,000+ labeled structures
linked to extra information. They are created from real dissections and digitized for precision. Each model
includes visibility controls and an object marker.
1.1 Changing layers
Go to the visibility controls and use the slider to reveal deeper anatomical layers.
1.2 Scaling
Put both hands into a model until they are framed in blue. Hold both triggers and move your hands apart to
scale.
1.3 Moving
1.4 Rotating
1.2 Scaling
A Moving with the laser
Aim at the model or marker and hold the trigger to grab. Move it, then release it to place. B Moving with controllers
Place your hand in the model until it's framed in blue. Pull the trigger to grab and move it.
Aim at the model or marker and hold the trigger to grab. Move it, then release it to place. B Moving with controllers
Place your hand in the model until it's framed in blue. Pull the trigger to grab and move it.
A Annotations
Switches annotation visibility for the selected model.
Switches annotation visibility for the selected model.
B Layers
The slider moves through model layers, revealing deeper anatomical details.
The slider moves through model layers, revealing deeper anatomical details.
With multiple models loaded, point the laser at one to access its visibility controls.
To move visibility controls, grab the top bar with the trigger. Drag to a new spot and release.
RecordXR Manual
1. User Interface
The RecordXR User Interface consists of the Main Control Pad (A), the
RecordXR Panel (B), and the RecordXR Section in the Library Panel (C).
A
Main Control Pad
On the Main Control Pad, you will find the RecordXR Button (A). You can activate this button with the laser to start and stop recording.
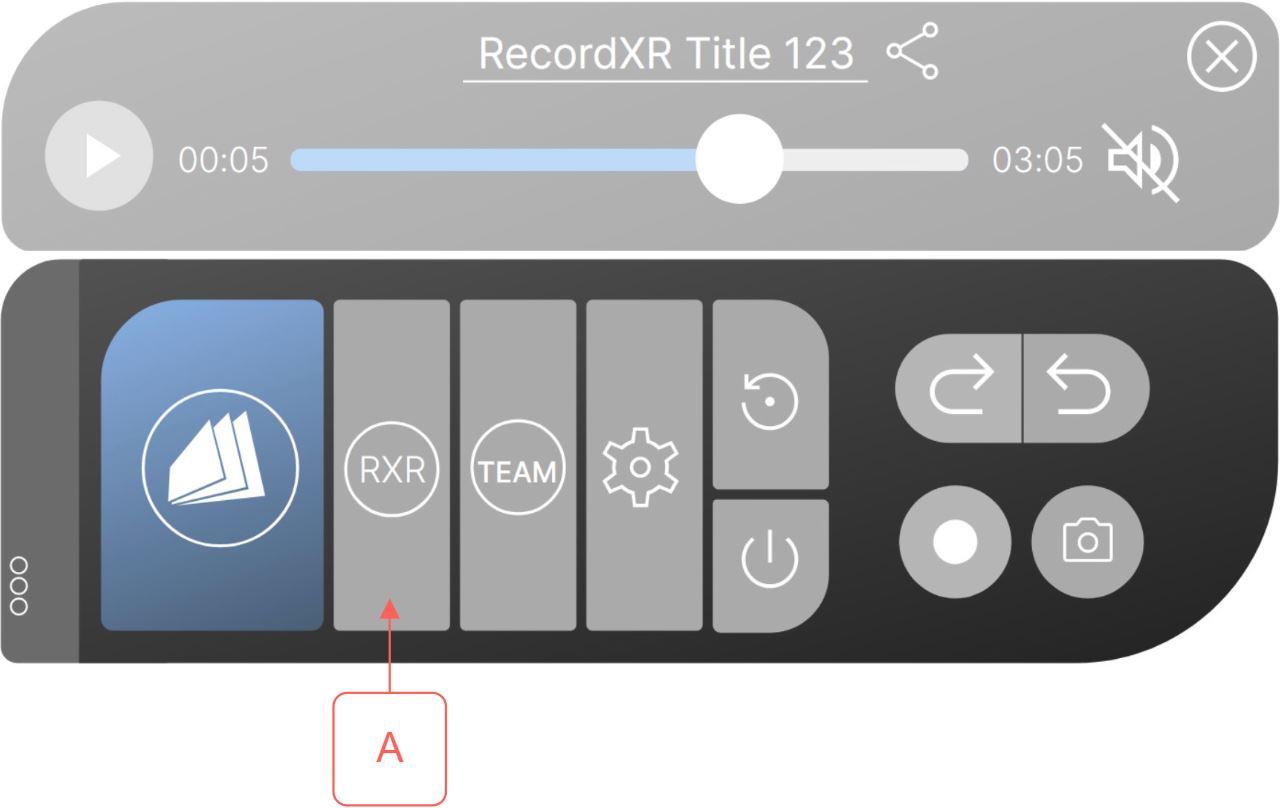
Initiate Recording
Simply point your laser at the RecordXR button and press the trigger to start recording.
Stop Recording
When you're finished, click the same RecordXR button again using your laser to stop the recording process.
Easy Access to Recordings
Once you've stopped recording, you'll find the saved file conveniently stored in the RecordXR section on the library panel (see chapter 1.3). From there, you can easily replay your recorded content whenever you like. B RecordXR Panel
When replaying a RXR file, the RecordXR Panel will appear on top of the Main Control Pad.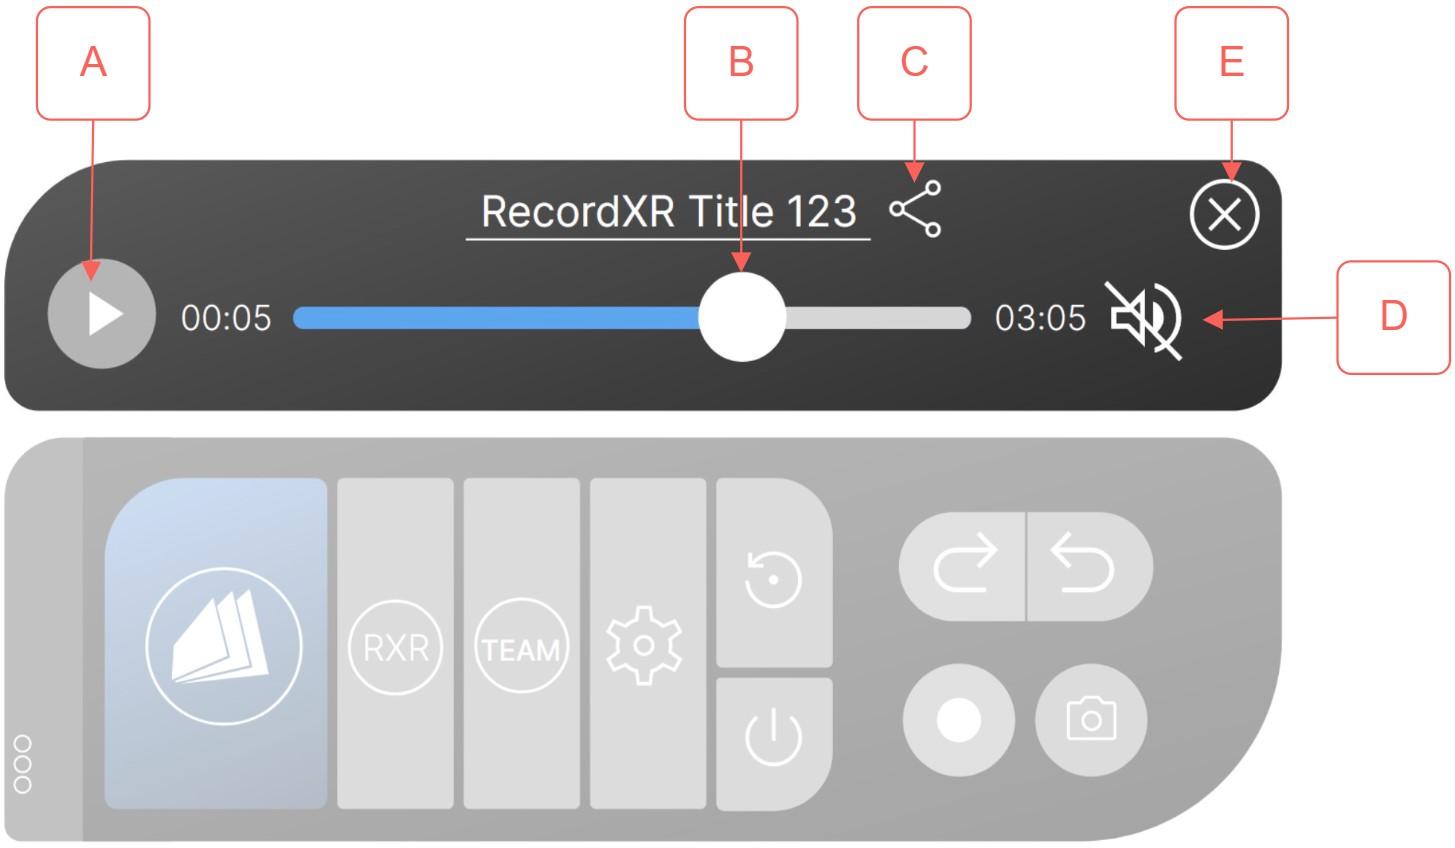
In the Library Panel, locate the RecordXR section A situated on the lower right-hand side. Each entry in this section represents a single record and is shown as a distinct bar.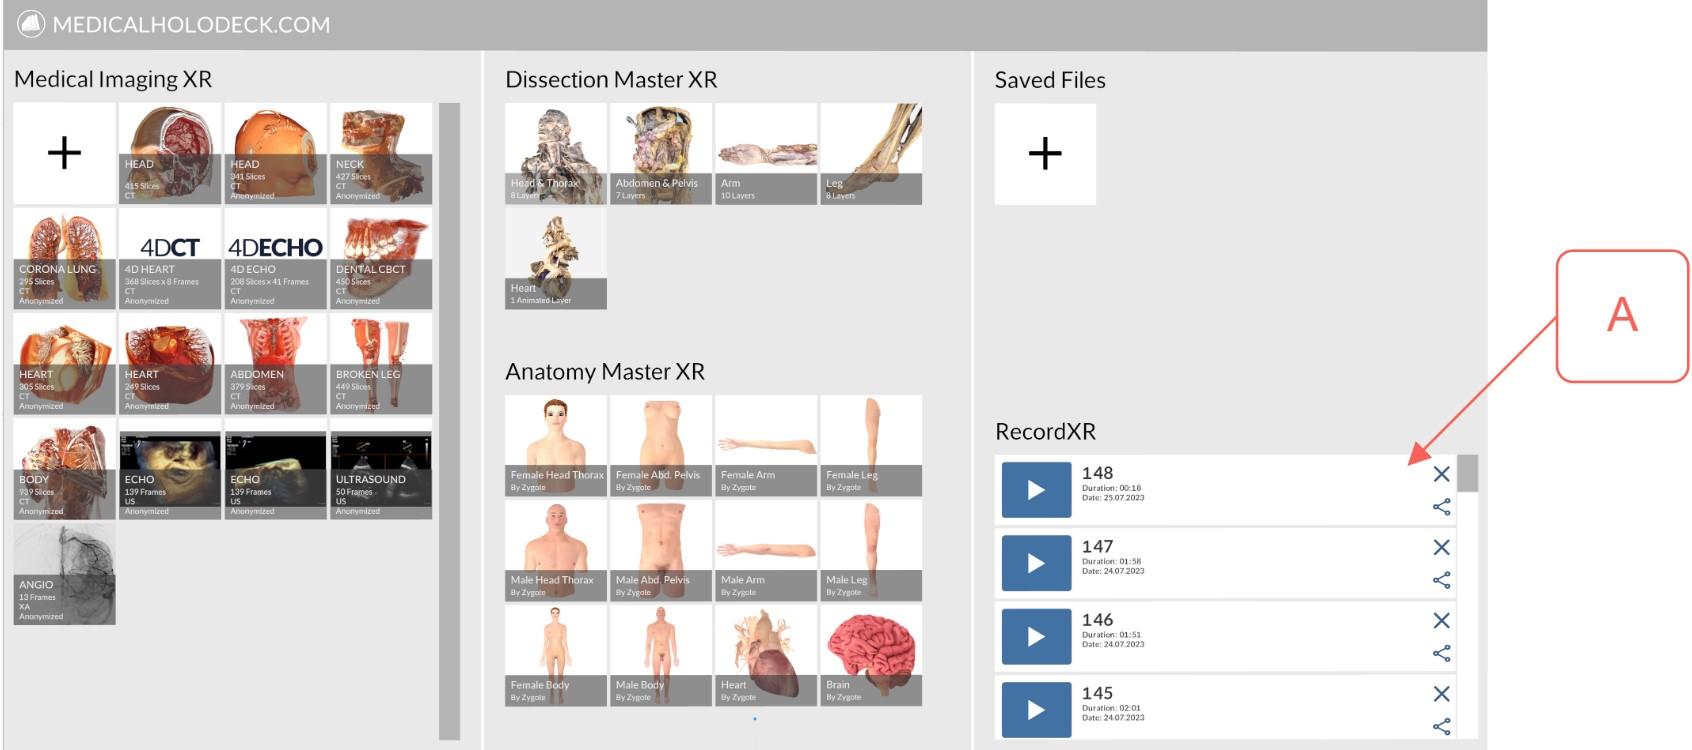 Each bar comprises the following key components:
Further, each record bar is equipped with certain functional options to manage and interact with the records: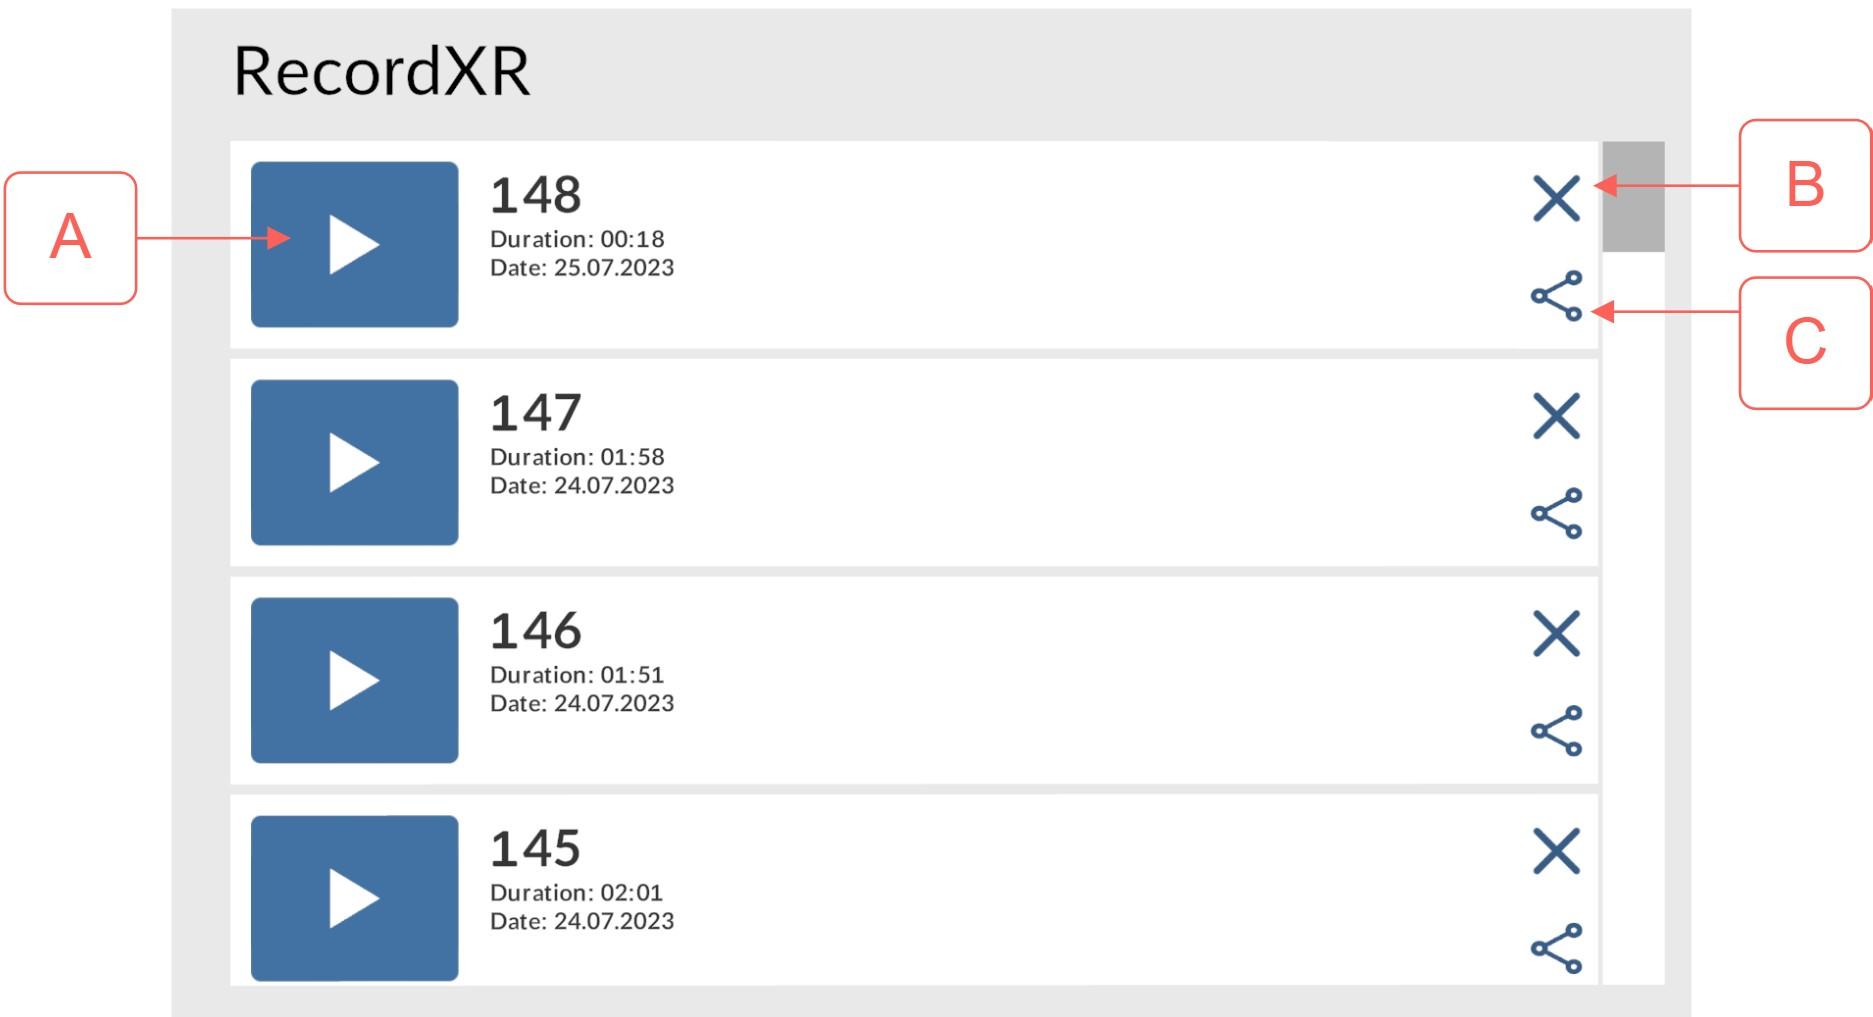
RecordXR Studio Manual
The RecordXR Studio User Interface consists of the editing tools, the
metadata section and the project controls.
On the Main Control Pad, you will find the RecordXR Button (A). You can activate this button with the laser to start and stop recording.
Initiate Recording
Simply point your laser at the RecordXR button and press the trigger to start recording.
Stop Recording
When you're finished, click the same RecordXR button again using your laser to stop the recording process.
Easy Access to Recordings
Once you've stopped recording, you'll find the saved file conveniently stored in the RecordXR section on the library panel (see chapter 1.3). From there, you can easily replay your recorded content whenever you like. B RecordXR Panel
When replaying a RXR file, the RecordXR Panel will appear on top of the Main Control Pad.
A Play/Pause Button
Start Replay
Locate and click the Play Button to initiate the replay of your recorded session.
Pause and Resume
To pause the replay at any point, simply click the same Play Button again. Click it again to resume the replay from where you left off.
While in replay mode, take full advantage of AR and VR by moving around freely and interacting with the recorded data. Feel free to explore different perspectives and details during the replay. B RXR Slider
Slider Navigation
Use the RXR Slider to control the playback of the recorded RXR file. Slide it forward to fast forward through the recording, or slide it backward to rewind and review specific moments.
Jump to Sections
The Slider allows you to jump to specific sections in the recorded RXR file. Easily navigate to key events or points of interest during the replay. C Export RXR File Button
Export Your Record
To preserve your recorded RXR experience, simply click the Export Button. This action will compile all the data, audio, and actions you performed during the recording.
File Storage
Once exported, the RXR file will be conveniently saved on your desktop. You can easily access it whenever you need, ensuring your lessons and content are safely stored.
Sharing Possibilities
The exported RXR file can be shared with other users, allowing them to experience your recorded session in both virtual and augmented reality environments.
Complete Experience
The RXR file contains all the necessary elements to recreate your interactive, spatial experiences. Anyone who opens it can relive your recorded moments just as you did during the initial recording. D Audio On/Off Button
Click the Audio Button to toggle between muting and unmuting the audio. E Close RecordXR Panel
Click this button to close the RecordXR panel.
C
Library Panel
Start Replay
Locate and click the Play Button to initiate the replay of your recorded session.
Pause and Resume
To pause the replay at any point, simply click the same Play Button again. Click it again to resume the replay from where you left off.
While in replay mode, take full advantage of AR and VR by moving around freely and interacting with the recorded data. Feel free to explore different perspectives and details during the replay. B RXR Slider
Slider Navigation
Use the RXR Slider to control the playback of the recorded RXR file. Slide it forward to fast forward through the recording, or slide it backward to rewind and review specific moments.
Jump to Sections
The Slider allows you to jump to specific sections in the recorded RXR file. Easily navigate to key events or points of interest during the replay. C Export RXR File Button
Export Your Record
To preserve your recorded RXR experience, simply click the Export Button. This action will compile all the data, audio, and actions you performed during the recording.
File Storage
Once exported, the RXR file will be conveniently saved on your desktop. You can easily access it whenever you need, ensuring your lessons and content are safely stored.
Sharing Possibilities
The exported RXR file can be shared with other users, allowing them to experience your recorded session in both virtual and augmented reality environments.
Complete Experience
The RXR file contains all the necessary elements to recreate your interactive, spatial experiences. Anyone who opens it can relive your recorded moments just as you did during the initial recording. D Audio On/Off Button
Click the Audio Button to toggle between muting and unmuting the audio. E Close RecordXR Panel
Click this button to close the RecordXR panel.
In the Library Panel, locate the RecordXR section A situated on the lower right-hand side. Each entry in this section represents a single record and is shown as a distinct bar.
Each bar comprises the following key components:
- Name: The record's distinct identifier.
- Duration: The total length of the record.
- Date: The specific date on which the record was created or last modified.
Further, each record bar is equipped with certain functional options to manage and interact with the records:
A Play/Pause
To replay a record, follow these simple steps:
Using your laser pointer, aim at the Play Button situated on the desired record's bar.
Click the button to initiate the replay.
If the record has not been downloaded to your device previously, a loading icon will appear at this point, indicating that the file is being prepared for playback.
Upon successful download, the record will commence playing automatically. In addition, you will notice that the Play Button has now transformed into a Pause icon, signifying that you can pause the playback at any point. B Delete
The Delete button in the Library Panel provides a simple means for you to manage your collection of records. It allows you to permanently remove any record that you no longer need or want to keep.
Please proceed with caution when using this feature, as clicking the Delete button will permanently remove the record from your Library Panel. This action cannot be undone, meaning that the record cannot be retrieved once deleted. C Export/Share
This feature enables you to export the record to a local drive or share it with other users. Exporting and Sharing a Record with the Export/Share Button
The Export/Share button serves as a tool for both exporting records to your local storage and sharing them with other users. Here's how to use it:
First, use your laser pointer, aim at the Export/Share button associated with the desired record. Then click the button to initiate the export/share process.
Upon activation, the record, saved as an RXR file, will be exported to your desktop. This file will contain all actions and data related to the selected record.
Once stored on your desktop, you have the option to share the RXR file with other users. You can do this via various methods such as email, cloud storage, or any other preferred mode of file transfer. This feature provides a convenient way to collaborate and share information with others.
Please remember, the recipients of the RXR file must also have the appropriate software to open and interact with these record files.
1. Editing tools
The editing tools section includes three main components: the preview
window, the timeline toolbar, and the timeline.
1.1
Preview window
This window allows previewing the recording along with the avatar. The view is zoomable and rotatable, offering a 360° perspective. 1.2 Timeline toolbar
This section contains all the essential action buttons for editing recordings.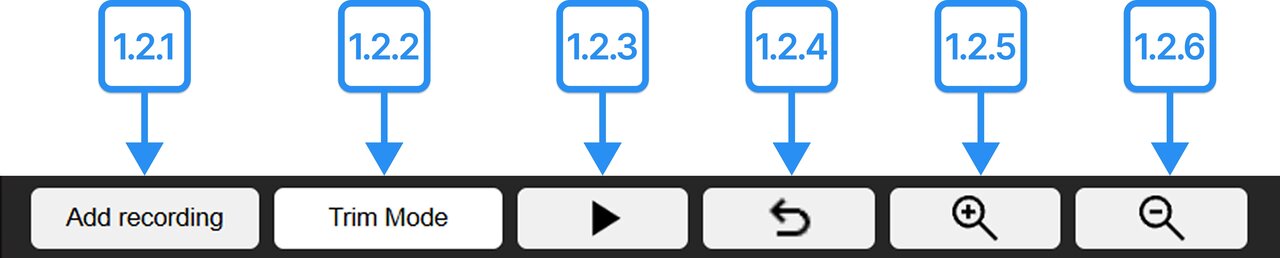
This is an editing interface that displays recordings along a horizontal time axis, where time progresses from left to right. Recordings can be rearranged by dragging and dropping them into the desired order.
A white vertical line, known as the playhead, indicates the current position in the timeline. The playhead can be moved to preview a specific moment in the recording or to begin viewing from that point.
Each recording is visually represented by two rows: the top row displays the movement of objects within the recording. The bottom row displays the associated audio.
To navigate through the timeline, use the keyboard arrow keys or the scroll bar located at the bottom of the page.
2. Metadata section
This section displays key project information and allows for its
configuration.
This window allows previewing the recording along with the avatar. The view is zoomable and rotatable, offering a 360° perspective. 1.2 Timeline toolbar
This section contains all the essential action buttons for editing recordings.
1.2.1 Add recording
Adds a recording file to the project. Newly added recordings appear at the end of the timeline. 1.2.2 Trim mode
This function enables removal of unwanted portions from the beginning and end of uploaded recordings. After pressing the trim mode, two additional buttons will appear.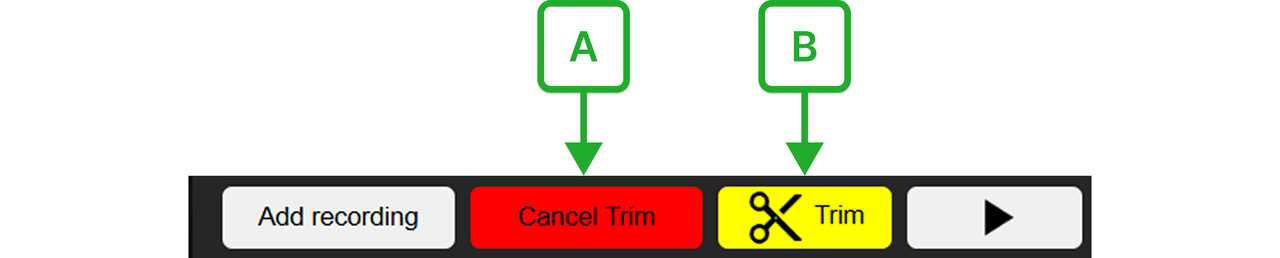
Starts or stops the preview of the recording. 1.2.4 Undo
Reverts the last change. If multiple edits have been made, they will be undone in reverse order. 1.2.5 Zoom in
Zooms in on the timeline to allow for more precise editing, such as trimming. 1.2.6 Zoom out
Zooms out of the timeline to provide a broader view of the recording.
1.3
Timeline
Adds a recording file to the project. Newly added recordings appear at the end of the timeline. 1.2.2 Trim mode
This function enables removal of unwanted portions from the beginning and end of uploaded recordings. After pressing the trim mode, two additional buttons will appear.
A Cancel trim
Exits trim mode without applying any changes. B Trim
To trim a recording, drag the red handles that appear at the beginning and end of each file to the desired positions. Once the selection is set, click the trim button to apply the changes.
1.2.3 Play/pause
Exits trim mode without applying any changes. B Trim
To trim a recording, drag the red handles that appear at the beginning and end of each file to the desired positions. Once the selection is set, click the trim button to apply the changes.
Starts or stops the preview of the recording. 1.2.4 Undo
Reverts the last change. If multiple edits have been made, they will be undone in reverse order. 1.2.5 Zoom in
Zooms in on the timeline to allow for more precise editing, such as trimming. 1.2.6 Zoom out
Zooms out of the timeline to provide a broader view of the recording.
This is an editing interface that displays recordings along a horizontal time axis, where time progresses from left to right. Recordings can be rearranged by dragging and dropping them into the desired order.
A white vertical line, known as the playhead, indicates the current position in the timeline. The playhead can be moved to preview a specific moment in the recording or to begin viewing from that point.
Each recording is visually represented by two rows: the top row displays the movement of objects within the recording. The bottom row displays the associated audio.
To navigate through the timeline, use the keyboard arrow keys or the scroll bar located at the bottom of the page.
2.1
Title
Shows the name of the project. The title can be edited at any time. This name will appear in the Medicalholodeck library. 2.2 Avatar
A customized avatar can be added to the recording. To create one, visit https://readyplayer.me/avatar and design the avatar. Once ready, paste its URL in this field. 2.3 Preview icons
Allows preview visuals to be added to the recording displayed in the library. A smaller, square image appears in the library panel, while a larger, rectangular image is shown in the store. 2.4 Duration
Displays the total length of the created recording. 2.5 Description
Provides space for a brief description of the recording. This description will be visible in the library beneath the project title.
3. Project controls
This section provides options for managing your project.
Shows the name of the project. The title can be edited at any time. This name will appear in the Medicalholodeck library. 2.2 Avatar
A customized avatar can be added to the recording. To create one, visit https://readyplayer.me/avatar and design the avatar. Once ready, paste its URL in this field. 2.3 Preview icons
Allows preview visuals to be added to the recording displayed in the library. A smaller, square image appears in the library panel, while a larger, rectangular image is shown in the store. 2.4 Duration
Displays the total length of the created recording. 2.5 Description
Provides space for a brief description of the recording. This description will be visible in the library beneath the project title.
3.1
Save project
This button saves the current project to your computer as a .rxrproj file, which can be reopened later in RecordXR Studio. 3.2 Export RXR
Exports the completed recording as a .RXR file, allowing it to be displayed within the Medicalholodeck App. 3.3 Close
Closes RecordXR Studio. Save your project before closing.
How to use RecordXR Studio
1. Get records from Medicalholodeck
Navigate to the RecordXR section in the library panel.
Locate the recording you wish to export and click the
export/share button. The file will be saved as a .RXR file and
automatically exported to your desktop.
This button saves the current project to your computer as a .rxrproj file, which can be reopened later in RecordXR Studio. 3.2 Export RXR
Exports the completed recording as a .RXR file, allowing it to be displayed within the Medicalholodeck App. 3.3 Close
Closes RecordXR Studio. Save your project before closing.
To learn more about creating recordings in Medicalholodeck App, check
the
manual for RecordXR on the website.
2. Open RecordXR Studio
Access RecordXR Studio
here.
3. Open a project
There are two ways to start a project:
Option 1: Drag & drop
Drop a .RXR or .rxrproj file into the designated area to start.
Option 2: Start new
Click the start project button to open a new project.
4. Add recordings
To add a recording to your project, click the
add recording button and browse for the desired .RXR file on your
computer. Recordings must be added one at a time.
Note that the project automatically keeps the metadata from the first
recording uploaded. It can be changed later in the metadata section.
New recordings are placed at the end of the timeline.
5. Zoom in/ zoom out
To adjust the timeline view use zoom in/out. Zooming in for precise
edits or out for a full view is especially helpful when trimming or
rearranging.
6. Change the order
To reorder recordings within the timeline, click and drag a recording to
the desired position marked by a yellow vertical line. Use the keyboard
arrow keys to move across the timeline as the timeline does not scroll
automatically.
7. Trim
To trim a recording, click the trim mode button. Red handles will
appear at the beginning and end of each file. Drag these handles to
select the segment to be cut off and click the yellow trim button
to apply the changes.
To exit trim mode without applying any changes, click the red
cancel trim button.
8. Set the metadata
The title, description, and preview icons for your
project can be edited in the metadata section.
9. Add an avatar
A customized avatar can be added to your recording. Click the
“Create one here” link below the field to design your avatar. Once
ready, copy its URL and paste it into the avatar field within the
metadata section.
11. Export a .RXR file
To export a recording from the opened project, click the
export RXR button. The recording will be saved to your computer
as a .RXR file and can then be opened in Medicalholodeck.
12. Exit the platform
To exit RecordXR Studio, either click the close button or close
the browser tab.
Be sure to save your work before exiting to avoid losing any progress.
13. Open the recording
To import your newly created recording into the Medicalholodeck:
1. Open the app and navigate to the library panel.
2. Locate the Medical Imaging XR section and click the
import data button.
3. Find and select your .RXR recording file from your computer.
4. Confirm the import. The record will appear at the top position under
the RecordXR section.
Medicalholodeck Link Manual
What is Medicalholodeck Link
Medicalholodeck Link is a web dashboard for managing VR and PC devices. Use it to activate licenses,
organize content, and upload files. Devices connect via a 6-digit code and are managed through the device bar.
Supported file types include DICOM, STL, OBJ, RXR, PDF, JPG, and MP4.
Device dashboard
Link’s device dashboard consists of the device bar and 7 sections: license management, datasets, RecordXR,
presets, transfer functions, upload and support.
1. Device bar
Shows connected devices and their status. The active device is highlighted in yellow. Click another device to
switch control.
1.1 Link a device
Connect your device using the 6 digit code. See here how to get/where to find the code.
2. License management
Activate licenses by pasting your code you received by email into the field. Click the activate button. Works
for both VR headsets and PCs.
3. Datasets
Displays datasets saved on the connected device.
3.1 Label
In this text field you can change the name of the dataset. 3.2 Delete
Delete the dataset from the connected device here.
4. RecordXR
Displays recordings saved on the connected device.
In this text field you can change the name of the dataset. 3.2 Delete
Delete the dataset from the connected device here.
4.1 Label
Change the description of the recording here. 4.2 Delete
Delete the recording on the connected device here.
5. Presets
Displays presets saved on the connected device.
Change the description of the recording here. 4.2 Delete
Delete the recording on the connected device here.
5.1 Label
Change the name of the preset here. 5.2 Delete
Delete the preset on the connected device here.
6. Transfer functions
Displays transfer functions saved on the connected device.
Change the name of the preset here. 5.2 Delete
Delete the preset on the connected device here.
6.1 Label
Change the name of the transfer function here. 6.2 Delete
Delete the transfer functions on the connected device here.
7. Upload
Upload files to the connected device by clicking choose directory or dragging them into the upload area.
Multiple files are supported and auto-anonymized before transfer. Confirm the import in VR on the connected
device to complete the upload.
Change the name of the transfer function here. 6.2 Delete
Delete the transfer functions on the connected device here.
How to use Medicalholodeck Link
What is Medicalholodeck Link?
Medicalholodeck Link is a web dashboard for managing VR and PC
devices. Use it to activate licenses, organize content, and upload
files. Devices connect via a 6-digit code and are managed through the
device bar. Supported file types include DICOM, STL, OBJ, RXR, PDF, JPG,
and MP4.
How to add your device
1. Open Medicalholodeck, navigate to the
Medical Imaging XR section and press the
import data button.
2. Click the cloud tab and find your device number on the right side.
3. Visit
medicalholodeck.com/link
on your computer and enter the 6 digit code.
If you're on the Device Dashboard page, click +link device. A window
will appear where you can enter the 6-digit code.
Please note that multiple devices can be connected simultaneously, but
the device dashboard will operate only on the selected device.
Activating a license via Link
1. Connect your device to Link. See here how
to link your device.
2. On the dashboard navigate to the license management section.
3. Enter the license keys in the appropriate fields and press the
activate button.
Uploading data from your computer to your headset
1. Connect your device to Link. See here how
to link your device.
2. On the dashboard navigate to the upload section.
3. Drop the file in the designated section or click
choose directory to load from your computer.
4. To complete the process, continue in your headset.
5. Select the data you wish to import or click on the
select all
button.
6. Then click the import datasets button.
Accessing files via Link
You can edit metadata for datasets, RXR recordings, presets, and
transfer functions. You can also remove files from here.
1. Connect your device to Link. See here how
to link your device.
2. On the dashboard navigate to the datasets.
3. You can edit the file feature in the text field named label. In case
of datasets - name.
4. To delete a file press the delete button on the right.