1.7 Settings
1.7.V1.9-01
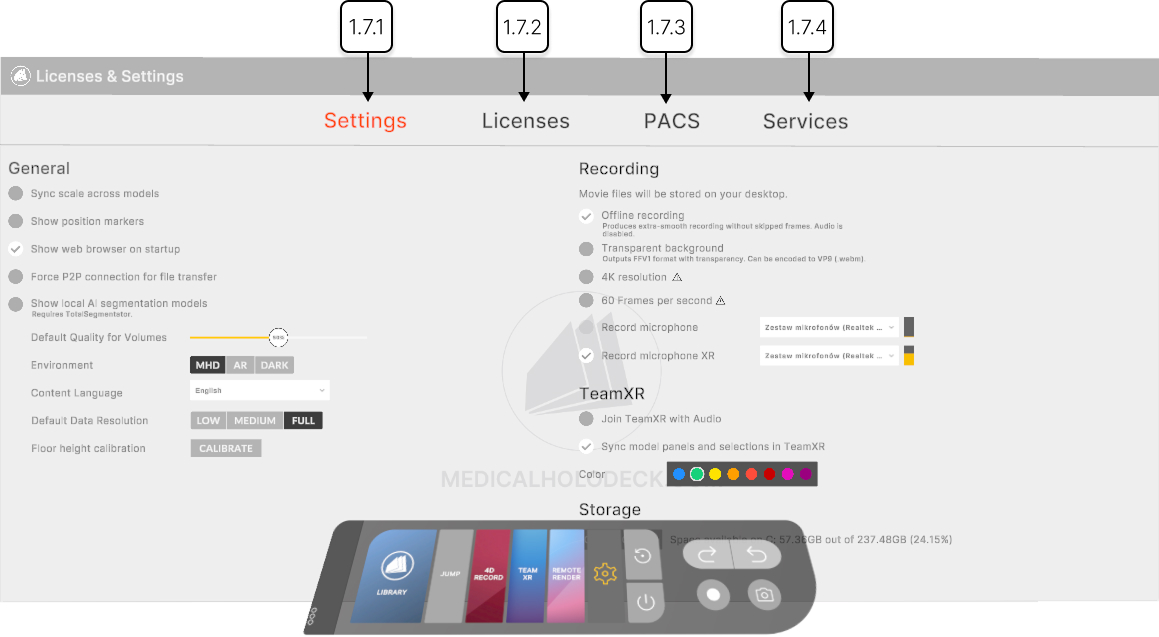
1.7.1
Settings
1.7.1.V1.9-01
This section contains general settings for recording, TeamXR, and storage information.
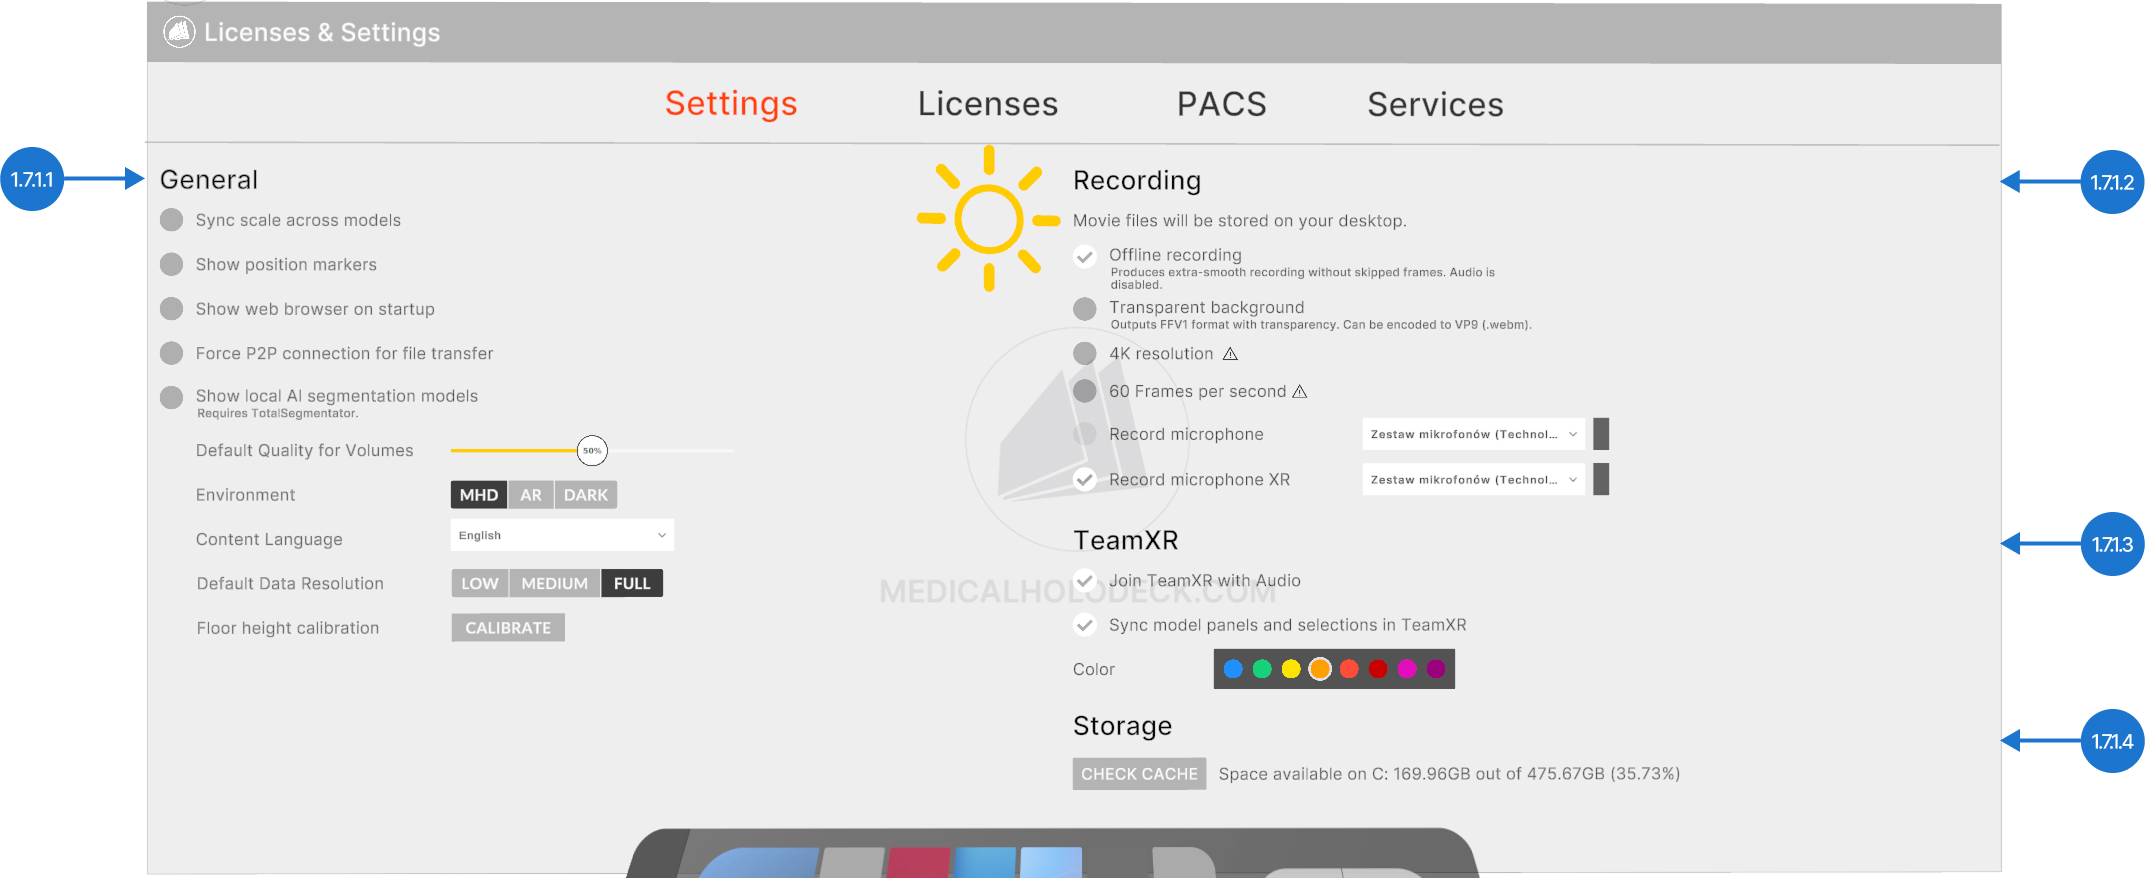
1.7.1.1
General
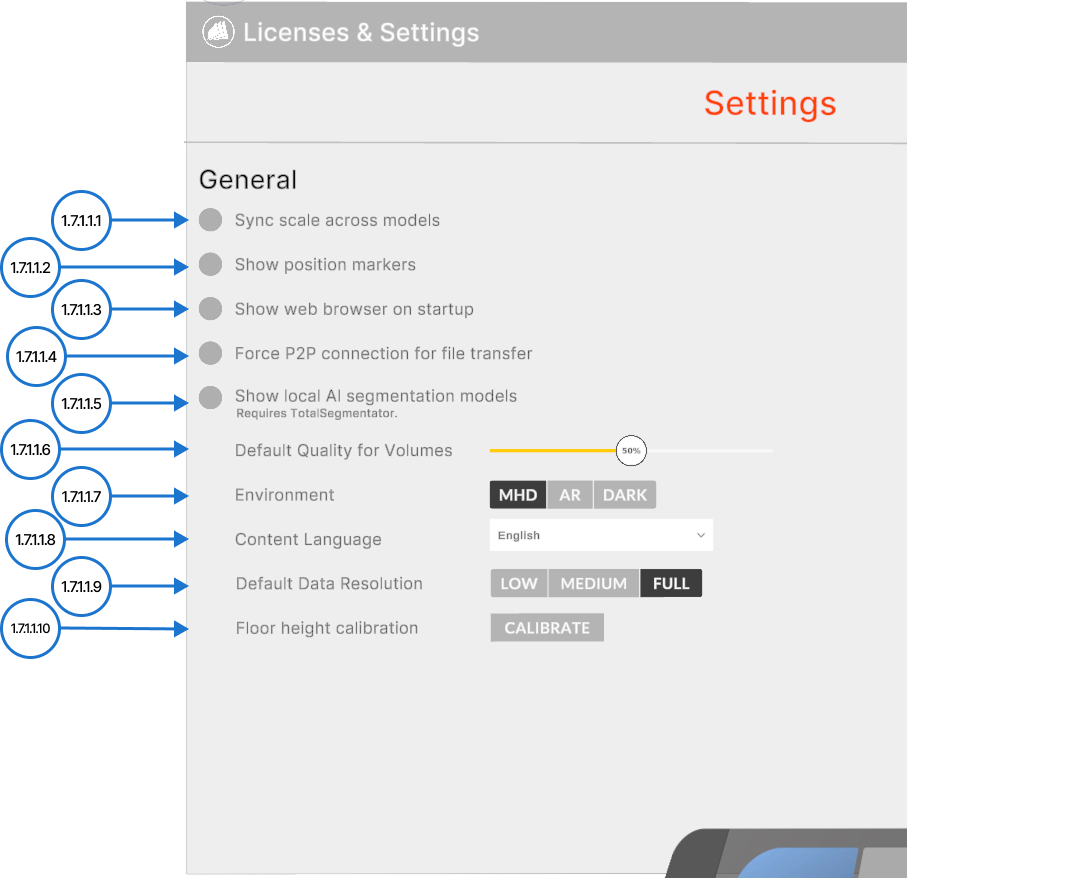
1.7.1.1.1
Sync scale across models
When selected, the same scaling factor is applied to all models in the workspace. This is particularly useful when comparing scans of the same person, as it allows you to place them side by side or overlay them without needing to manually match their scale.
1.7.1.1.2
Show position markers
Displays A (anterior), P (posterior), L (left), R (right), S (superior), and I (inferior) markers for all the 3D DICOM in the workspace.
1.7.1.1.3
Show web browser on startup
On by default. Disabling it stops the web browser from opening automatically when the app starts.
1.7.1.1.4
Force P2P connection for the file transfer
Enables direct device-to-device data transfer via Medicalholodeck Link. Data is not uploaded to any server, enhancing privacy and security.
1.7.1.1.5
Show local AI segmentation models
Connects TotalSegmentator AI models installed locally to Medicalholodeck AI.
1.7.1.1.6
Default quality for volumes
Sets default quality for volumetric data loaded to the workspace. The slider adjusts how much of the dataset is used during rendering, balancing performance and visual quality.
1.7.1.1.7
Environment
Sets the virtual environment. MHD provides a white workspace, Dark offers a black workspace, and AR enables a see-through mode. Please note that, on the PC-VR, AR setting is only available while using Virtual Desktop for connection between headset and computer.
1.7.1.1.8
Content language
Sets the language for displayed content for Anatomy and Dissection Master.
1.7.1.1.9
Default data resolution
Sets default data resolution for volumetric data loaded to the workspace. Resolution controls how detailed each slice used for rendering appears.
1.7.1.1.10
Floor height calibration
Adjusts the virtual floor to match real-world height. You can set it manually or put any controller on the floor to set it automatically. Then confirm your choice by pressing the done button.
1.7.1.2
Recording
1.7.1.2.1
Offline recording
Produces extra-smooth video without skipped frames. Audio is then disabled.
1.7.1.2.2
Transparent background
When selected, the background will not appear in the video. This is useful if you want to record a video without the skybox, for example, for use in publications, websites, or other media.
1.7.1.2.3
4K resolution
Enables capturing videos in 4K for sharper visuals. This option is performance-intensive and should be used with caution.
1.7.1.2.4
60 frames per second
Enables capturing videos in 60 frames per second. Provides smoother motion and improved responsiveness. This option is performance-intensive and should be used with caution.
1.7.1.2.5
Record microphone
Includes audio in the video. Select the microphone from the list.
1.7.1.2.6
Record microphone XR
Includes audio in RecordXR recording. Select the microphone from the list.
1.7.1.3
TeamXR
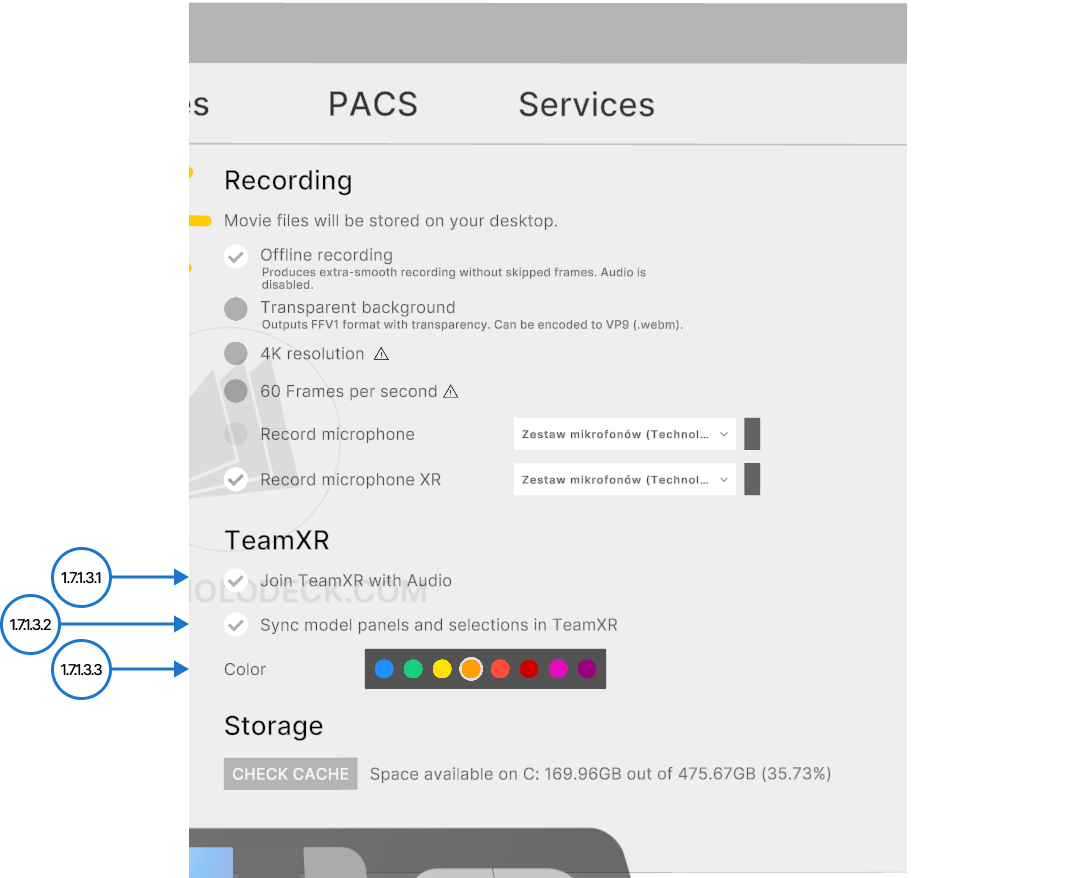
1.7.1.3.1
Join Team XR with audio
When selected, you join TeamXR sessions with the microphone on.
1.7.1.3.2
Sync model panels and selections in TeamXR
When selected, panel positions and active model selections are shared between all TeamXR session members. When one participant enables it, the setting applies to everyone in the session.
1.7.1.3.3
Color
Lets you choose the color of your hands and glasses in the TeamXR session.
1.7.1.4
Storage
Displays available disk C space where the app data is stored and allows clearing the cache.
1.7.2
Licenses
1.7.2.V1.9-01
Contains details about your current license and it is possible to renew it from this section.
1.7.3
PACS
1.7.3.V1.9-01
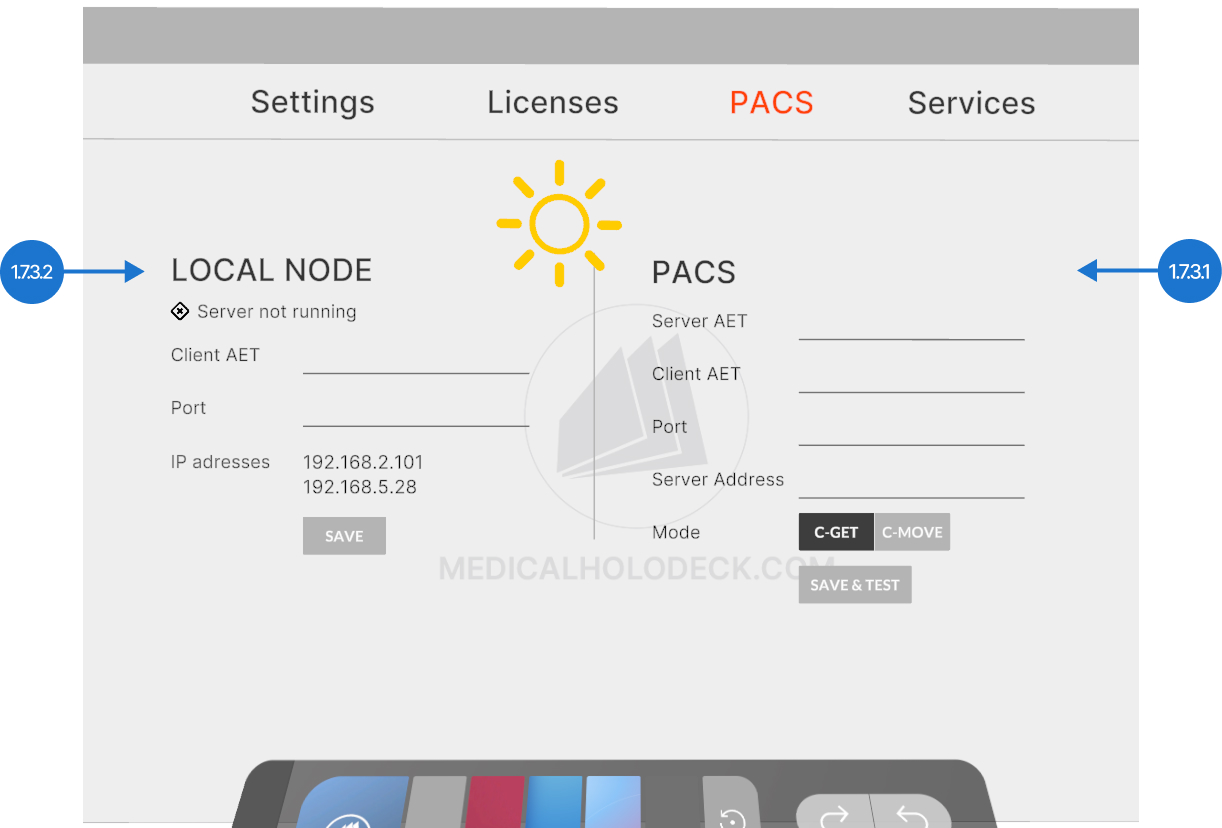
1.7.3.1
PACS configuration fields
To connect MH to your PACS server, you need to fill all fields below. If you're unsure what to enter, please consult your IT technician or system administrator.
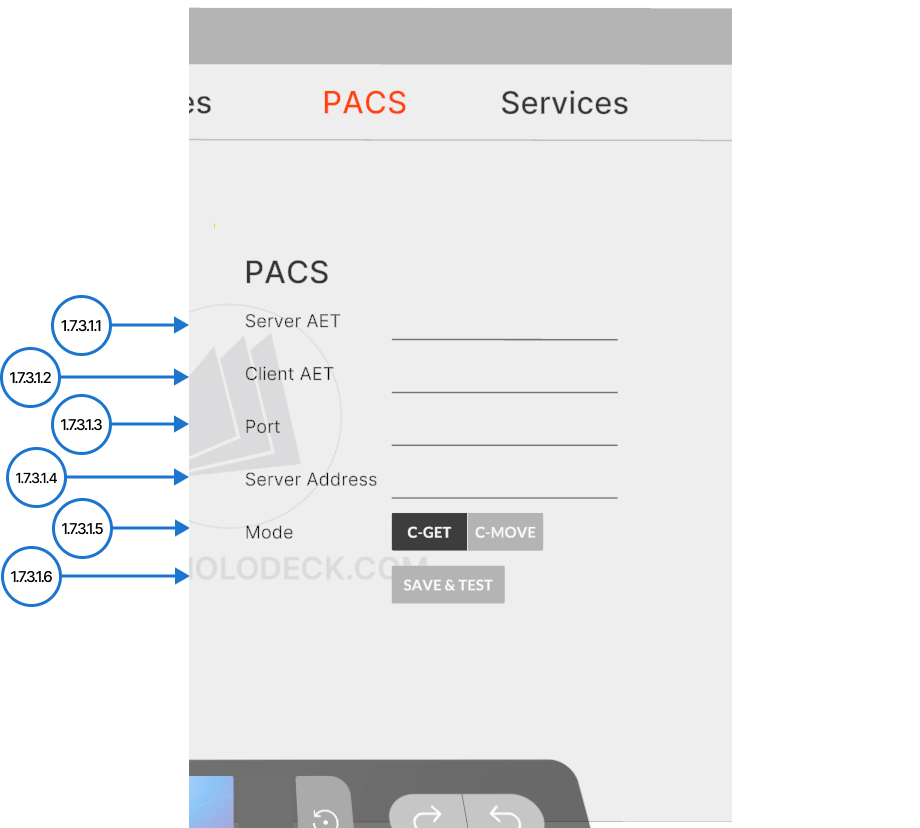
1.7.3.1.1
Server AET
Application Entity Title (AET) of the PACS server. This is the identifier used by the server during DICOM communication.
1.7.3.1.2
Client AET
Application Entity Title used by this client (your system). It identifies your application when connecting to the PACS server.
1.7.3.1.3
Port
Network port used to connect to the PACS server.
1.7.3.1.4
Server address
Hostname or IP address of the PACS server. Used to locate and establish a network connection with the PACS system.
1.7.3.1.5
Mode
Mode determines the way Medicalholodeck and PACS server communicate. To determine which method your PACS uses, check your PACS server settings or consult your technician. If unsure, try C-GET first for direct transfers; if that doesn’t work, switch to C-MOVE. If you select C-MOVE, be sure to complete the local node fields as well.
1.7.3.1.6
Save&test
Saves the entered PACS configuration and tests DICOM connectivity by sending a C-ECHO (DICOM ping). Use this to verify the setup is correct before querying or retrieving data.
1.7.3.2
Local node configuration fields
A local node is your personal server running on your computer. It is essential for enabling DICOM push operations and for retrieving data from a PACS using the C-MOVE protocol.
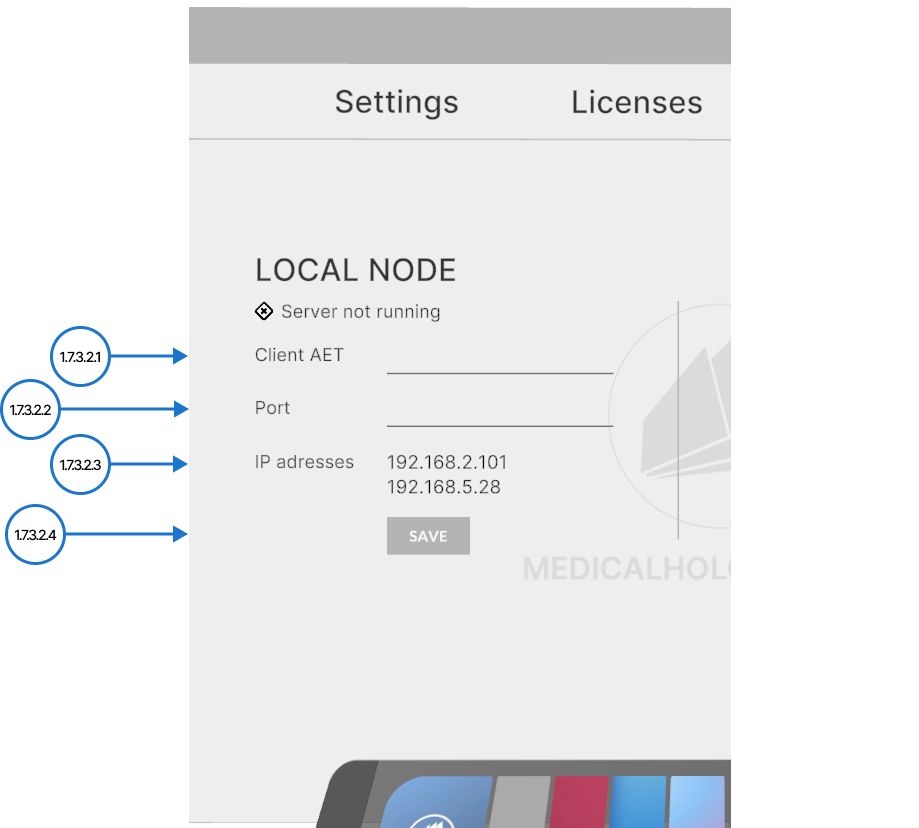
1.7.3.2.1
Client AET
Application Entity Title used by this client (your system). It identifies your application when connecting to the PACS server.
1.7.3.2.2
Port
The network port number your system uses to communicate with the PACS server. This must match the port configured on the server side to establish a connection.
1.7.3.2.3
IP addresses
Shows your IP address. This information may be useful for the PACS configuration.
1.7.3.2.4
Save
Save and check if the server got connected - information is shown below the ‘local node’.
1.7.4
Services
1.7.4.V1.9-01
Medicalholodeck offers on-premise solutions to ensure that your data never leaves your local servers. For more information contact info@medicalholodeck.com.